DISTRIBUTION OF TIZEN-BASED WATCH APPS HAS BEEN DISCONTINUED
FAQ
Galaxy Watch Studio supports Gear S3, Gear Sport, Galaxy Watch, Galaxy Watch Active, Galaxy Watch Active2, and Galaxy Watch3.

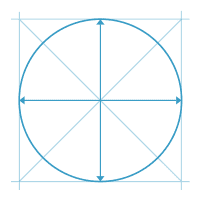
Circular type : 360 x 360 px
The version of Java supported by Galaxy Watch Studio (GWS) depends on the version of GWS you are installing and your operating system.
For more information, see Required Java Versions.
Sometimes, Galaxy Watch Studio can’t find the Java you installed because it was installed in an unusual folder or because the installer set a system variable incorrectly. Galaxy Watch Studio won’t run if it can’t find the Java you installed or if you are using an unsupported version of Java. See Galaxy Watch Studio fails to launch for more information.
Do one of the following:
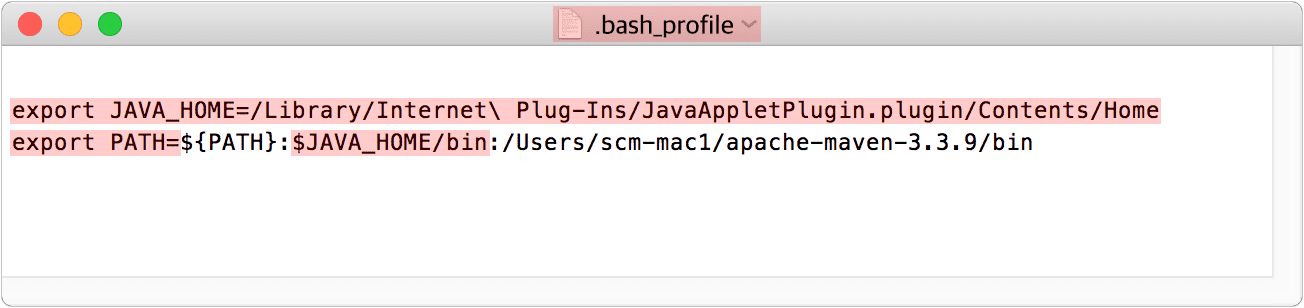
Add the following line to ~/.bash_profile
export JAVA_HOME=/Library/Internet\ Plug-Ins/JavaAppletPlugin.plugin/Contents/HomeAdd the following line to the PATH variable.
$JAVA_HOME/binor
Install the JDK (not the JRE).
Having too many complex conditions may cause problems. Only use conditions to show or hide components. For more complicated motion designs, use animation.
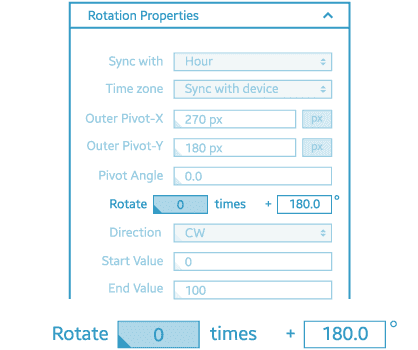
You can change this in Rotation properties > Rotate.
For example, a complication showing the battery level will have a watch hand that rotates clockwise through 360°. Using the settings above will change the rotation to anti-clockwise through 180°.You can also customize the start and end points of a watch hand’s rotation from Preview.


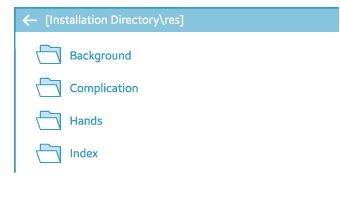
Of course. Simply save your image in
[Installation Directory\res\], and it will appear as the corresponding preset.
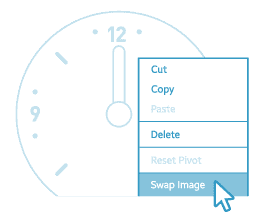
Right-click on your watch face in Preview or on a layer. Select Swap image, then upload the new one.
Before you swap a watch hand image, set the timeline to midnight (the Current time displays 00:00:00) to ensure exact hand alignment when the design is run on a watch.
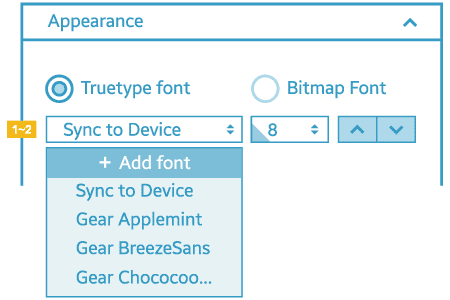
There are two ways to add a font to your project:
- In the Properties > Appearance > Font drop-down list, click Add font. From the file manager, select the font to add.
- Drag and drop the .ttf file into the GWS workspace.
On macOS, the font must be installed before it can be added to GWS. To install the font, double-click the font in the Finder and click Install Font. To make the font available to all projects in GWS, add the font to the
\\Galaxy Watch Studio\fontdirectory.

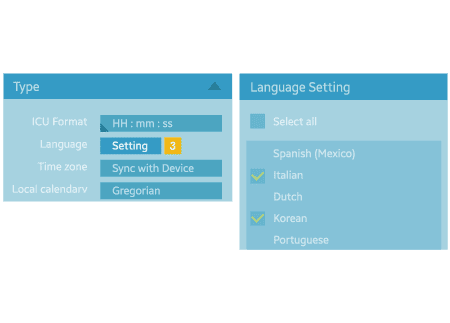
You can display your digital clock, weather type text component, or normal text in another language. See Language Settings for more information.
If your selected font is not supported in a particular language, then that font won't be displayed properly on your watch.
- Use a Truetype font which is supported by the target languages.
- Set Truetype font to "Sync to Device".
- Select a language which supports the desired font. For digital clocks, click Setting in Properties > Type to open the Language Setting pop-up. For Weather Type text components, select the language in Properties > Data (the Display Type must be set to Description). Note that with this method, text such as AM/PM won't be translated.
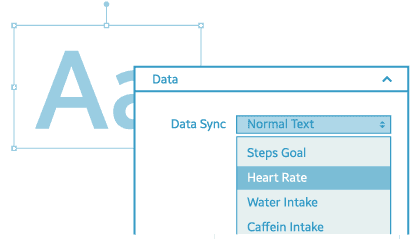
You can show a variety of different information on the watch face.
For example: You can show the user’s heart rate as text by going to Text > Heart Rate from the Component window. Or, select an existing text component, and go to Properties > Data > Data Sync > Heart rate.
You can test out all the conditions you’ve added in Preview.

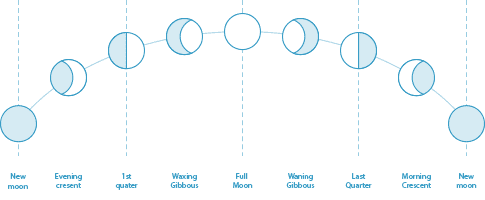
Moon phase position. From 0.00 ~ 27.99
0 (-0.5 ~ 0.5) : New Moon
0.5 ~ 6.5 : Evening Crescent
7 (6.5 ~ 7.5) : First Quarter
7.5 ~ 13.5 : Waxing Gibbous
14 (13.5 ~ 14.5) : Full Moon
14.5 ~ 20.5 : Waning Gibbous
21 (20.5 ~ 21.5) : Last Quarter
21.5 ~ 27.5 : Morning Crescent
28 (0) : New MoonMoon phase from 0 to 7
0 : New Moon
1 : Evening Crescent
2 : First Quarter
3 : Waxing Gibbous
4 : Full Moon
5 : Waning Gibbous
6 : Last(Third) Quarter
7 : Morning Crescent
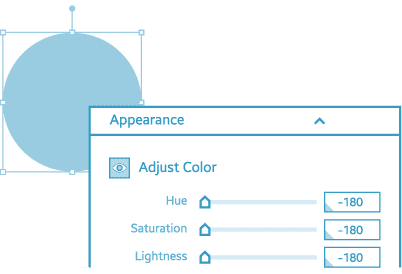
A. Creating shadows
You can create object shadows by using Adjust Color to set the color of the original object to black, then positioning it as required.
- Copy and paste the original object.
- Use Adjust Color to set the color of the new object to black.
- Set the position and layer position of the new object to make it look like a shadow (from the same position as the original object, move the new object downwards by around 7 pixels).
B. Creating button areas
Create transparent button areas by selecting an image, setting its opacity to 0%, then setting it as a button.
C. Repeating conditional lines
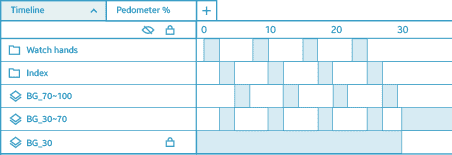
You can create repeating conditional lines by copy and pasting existing conditional line patterns. For example, you can set an image to show or hide every 30 minutes.
- Add the image.
- Set the Timeline scale to Minute.
- Set the properties to have the image show for the first 30 minutes and hide for the next 30 minutes.
- Set the Timeline scale to Hour.
- Select the 30 minute show/hide period and copy it.
- Paste the period.
Note :Excessively detailed patterns can cause the device to function incorrectly.


Images that contain bright colors and animations use battery power more quickly.

Watch faces with always-on pixel usage of more than 15% cannot be built in GWS due to battery drain or burn-in.
However, if it exceeds 15% temporarily, the watch face could be built. In this case, even if the watch face build is successful, store registration can be rejected during the quality verification process or it can be canceled if too many complaints are reported by users.
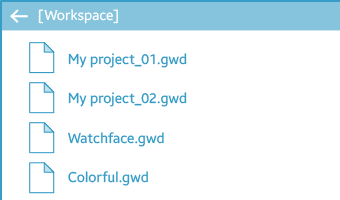
Your design will be saved as a .gwd file in [home folder\GearWatchDesigner\workspace]. You can share this file with other users for collaborative design projects.
The author certificate is used for signing and verifying your app. It identifies the developer of the app and ensures the following: the app is not distributed by someone else, the developer can publish updates, and secure IPC (inter-process communication). After you publish an app, you must use the same certificate to sign and publish updates for this app.
To generate an author certificate, from the main menu bar, click Project > Author Certificate. For more information, see Get Your Certificates.
Important! :Make a backup of your author certificate, save the backup on a different device, and keep both the original and backup in a secure place. If you lose your author certificate, you will not be able to publish updates to your apps.
For more information about author certificates, see Getting the Certificates.
If you have lost your author certificate and do not have a backup or if you have forgotten the password for the certificate and cannot reset it, do the following:
Make a backup of your new author certificate and do not save the backup on the same device as the original certificate. Keep both the original and backup in a secure place.
Build a newer version of your app with the new certificate.
Upload the app to Seller Portal and release it.
Suspend the older version of the app.
For more Galaxy Watch FAQs, click here.
This is usually due to certification not being performed correctly. Perform the certification process again in this order: Distributor certification -> Build -> Run on device.
Distributor certification can be performed by going to the menu bar and selecting Project > Distributor Certificate.
If you have reset or otherwise changed your device, you need to perform the distributor certification again.

The distributor certificate is used for signing and verifying your app. It identifies the distributor (for example, Galaxy Store) and grants privileges to that distributor. For testing purposes, it ensures that your signed application is installed on registered devices only.
In order to test your app on a device, the device must be registered in your personal distributor certificate. Then, you must build your app, which signs the app using your personal distributor certificate.
To generate a personal distributor certificate and register a Samsung device, using Galaxy Watch Studio, from the main menu bar, click Project > Distribute Certificate. For more information, see Get Your Certificates.
The personal distributor certificate is used for testing only. When you release your app for sale in Galaxy Store, your personal distributor certificate is replaced by an official distributor certificate.
If you upgrade a registered device (for example, you upgrade the Tizen OS), you may need to re-register the device in your personal distributor certificate. For example, if you upgrade your Gear 3 or Sport watch to Tizen 4.0, you must re- register the device in your personal distributor certificate and rebuild your app before testing it on the device.
You may encounter one of the following error messages if there is a problem with the distributor certificate.
Message Cause Solution Account in device profile mismatch with distributor certificate. The device has been upgraded and the DUID (Device Unique Identifier) has changed. Re-register the device in your personal distributor certificate and rebuild your app. Launching AppManagerAppID has encountered a problem. The device is not found in your personal distributor certificate or your personal distributor certificate was not created properly. Register the device in your personal distributor certificate or re-create your personal distributor certificate and rebuild your app. The application installation on the device has failed due to a signature error! (error code : -12) You used the Tizen Studio distributor certificate when building your app, not the distributor certificate generated by the Samsung Certificate Extension. Select or create a distributor certificate for your Samsung device using the Certificate Manager and rebuild your app. For information about the Samsung Certificate Extension, see Installing Certificate Extension.
For information about the Certificate Manager, see Creating Certificates and Managing Certificate Profile.
For more information about distributor certificates, see Getting the Certificates.
Note :If you cannot connect because of a firewall or do not have Wi-Fi, you must use sdboverbt (connect your watch to your phone over Bluetooth with your phone physically connected to your PC). See Connect to GWS for more information.
- If your PC is physically connected to the network, unplug your cable and connect your PC to the network using Wi-Fi.
- The watch must be in debug mode and Wi-Fi in always-on mode. If you enable debugging, restart (power off then power on) the watch.
- Connect to the watch using its IP address. In GWS, click on the Run on Device icon, click +, enter the IP address, and click OK.
- To find the IP address of your watch: Launch Settings, scroll to and tap Connections, scroll to Wi-Fi, verify that it is connected to the correct network, tap Wi-Fi, scroll to and tap Wi-Fi networks, tap your Wi-Fi network, then scroll to and make note of the IP address.
- Verify that your PC and watch are connected to the same access point/network (the first three fields of the IP addresses must match). For example:
Watch = 111.112.113.89
PC = 111.112.113.123- You must have acknowledged the RSA key screen on the watch (allows for data transfer between the watch and your PC). If you missed this screen or don’t remember if you acknowledged it, disable Bluetooth, restart (power off then power on) the watch, and, after the message that shows your watch has reconnected to the network disappears, wait 30 - 60 seconds, then try connecting again. Keep your watch nearby and active as the RSA key screen displays for only a few seconds. You may need to repeat these steps (increasing the wait time after Wi-Fi has connected) to get to and acknowledge the RSA key screen.
- If you have a dual-band router, your PC and watch may both need to be using the 2.4 GHz band.
Other Options
- If available, try using another network (for example, use your phone as a mobile hotspot). Connect both your watch and PC to this network.
Tip :Using your phone as a hotspot is useful when traveling.
- Use sdboverbt (connect your watch to your phone over Bluetooth with your phone physically connected to your PC). See Connect to GWS for more information.
- If you have Tizen Studio installed, use the device manager to connect to the device first. Then, connect the device to GWS.
Note :It can take up to four hours to install Tizen Studio.
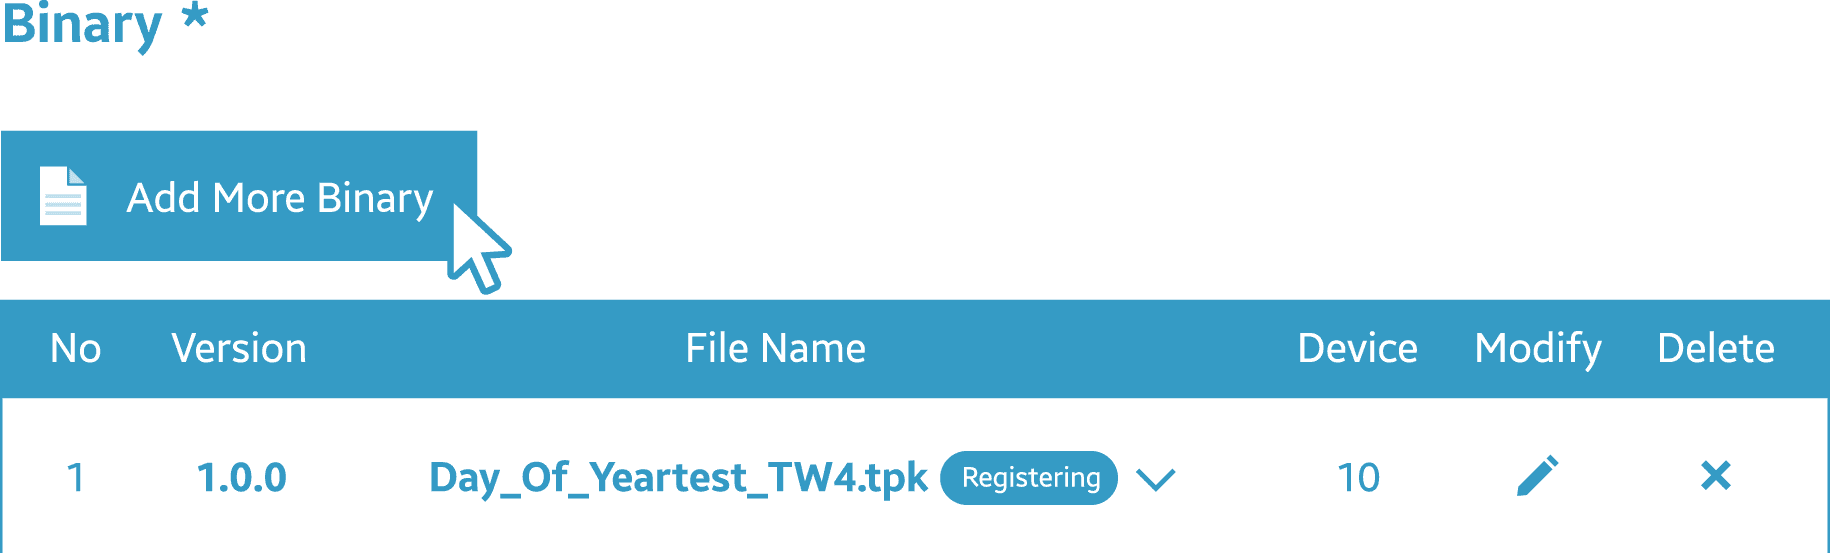
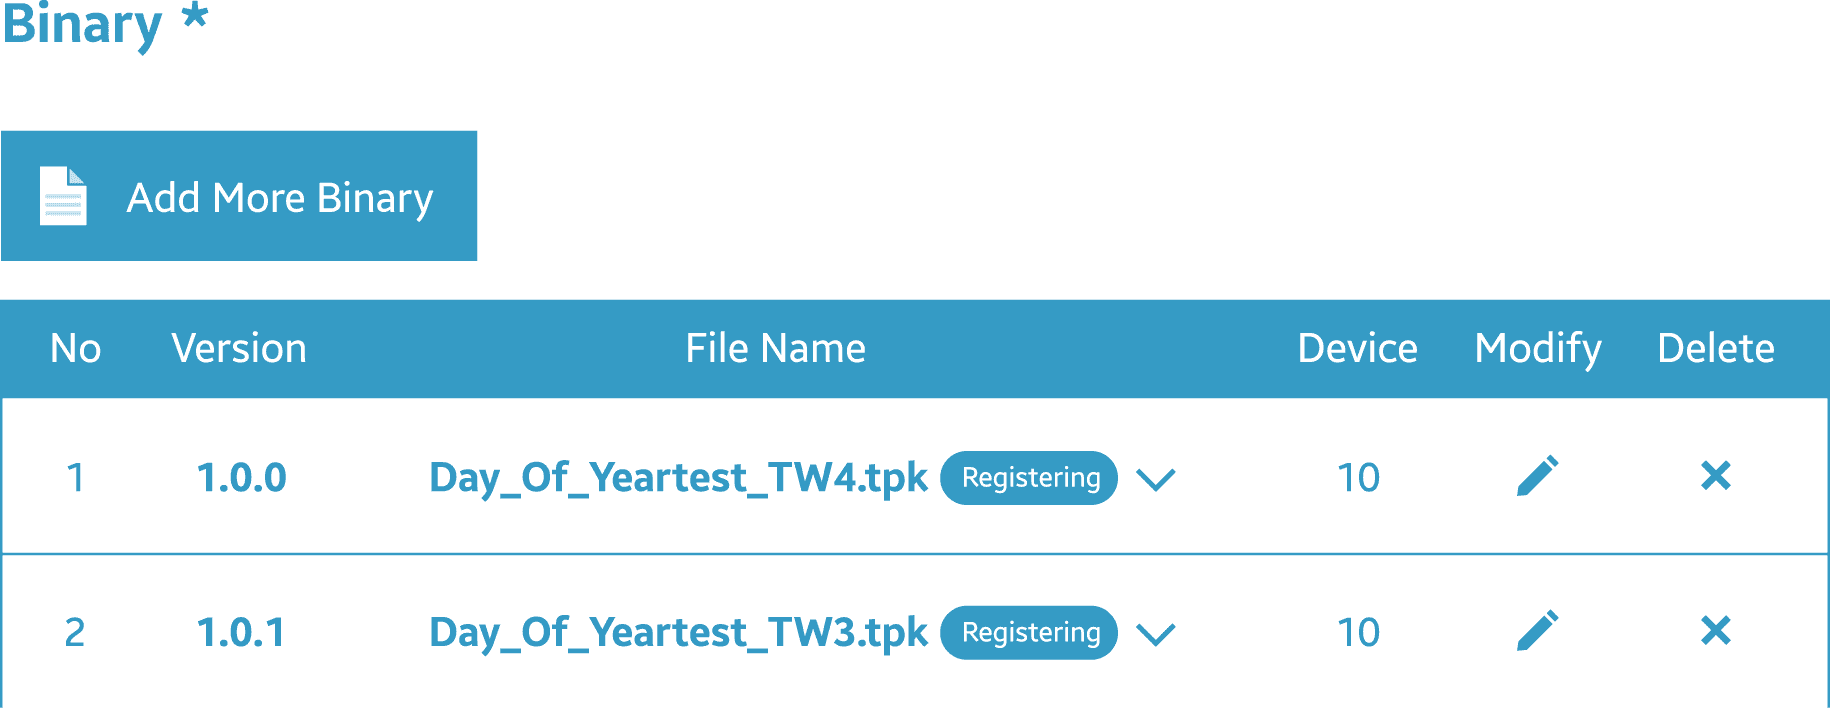
When you create a new watch face app, you must create two separate .tpk files (one for Galaxy Watch [Tizen 4.0 and above], and another for Gear S3 and older devices [Tizen 3.0 and below]) and upload both files at the same time.
Build two .tpk files
You must build twice. For each build, set a different target API version, and enter a different version number.
Build two .tpk files: one for Galaxy Watch (Tizen 4.0 and later) and one for older Gear models (Tizen 3.0 and earlier). In the build settings, make sure that.
- Both .tpk files must have the same package name.
- Both .tpk files must have their own version numbers.
- Both .tpk files must have their own target API versions (one 3.0 and below, and the other 4.0 and above).
In File browser, note the two different .tpk files that were generated.
Upload both files at the same time
- Go to https://seller.samsungapps.com and upload the first binary.
- Select Add More Binary.
- Upload the second binary. At this point, a standard notice about Samsung version policy may appear, which you can disregard.
Two binaries are now updated. TW4 will be downloaded by Galaxy Watch (Tizen 4.0 and later), and TW3 will be downloaded by Gear S3 or older models (Tizen 3.0 and earlier).
Continue the App Information process
Enter all required information. After you upload the binary files, complete testing and verification, and start your service.