Building NaCl Projects
This topic describes how to build a Native Client project in the Tizen Studio.
A Native Client (NaCl) project can be built using the "Debug-glibc", "Debug-pnacl", "Release-glibc" or "Release-pnacl" configurations. Depending on the selected build configuration, binaries are created for either one or several architectures, with or without debug symbols.
| Configuration | Debug Symbols | Binaries Created |
|---|---|---|
| Debug-glibc | Yes | ARMv7 |
| Debug-pnacl | ARMv7, i686, and x86-64 | |
| Release-glibc | No | ARMv7 |
| Release-pnacl | One of ARMv7, i686, or x86-64 |
Table 1. Build configurations
Basics of Building
To build a NaCl project:
-
Define the NaCl toolchain to use for building the project.
- In the "Project Explorer" view, right-click the project and select "Properties > Tizen Studio > NaCl toolchain".
- Select a valid NaCl toolchain from the list.
Valid toolchains have the "ready to use" or "update available" status message. - Click "Apply and Close".
-
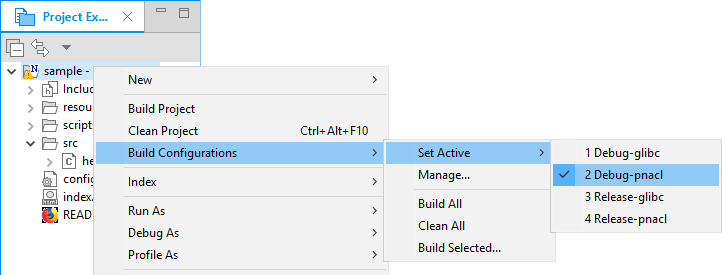
Select a build configuration.
In the "Project Explorer" view, right-click the project, select "Build Configurations > Set Active", and select the configuration you want.
The "Debug-pnacl" configuration is active by default.
-
In the "Project Explorer" view, right-click the project and select "Build project".
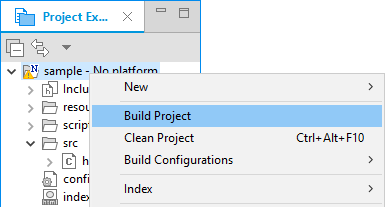
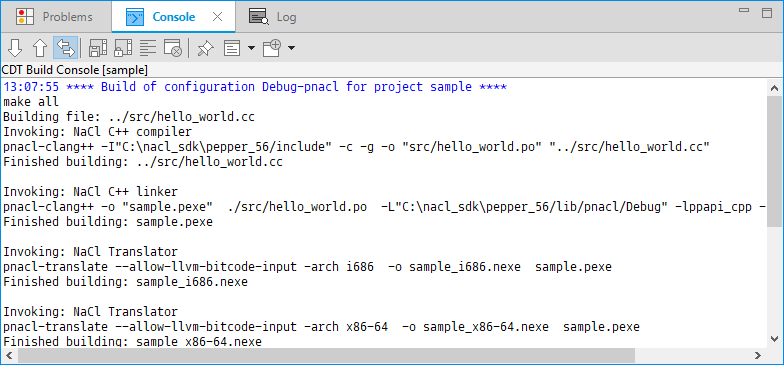
In the "Console" view, you can monitor the build progress and status.
The build result is located in the "CurrentBin" directory inside the main project directory.
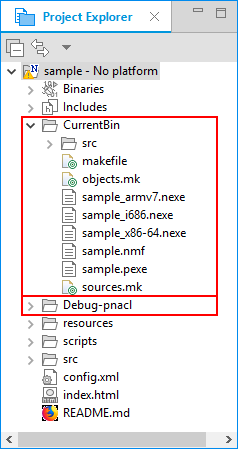
Depending on the build configuration, the build process can result in the following files:
-
Portable NaCl executable file (".pexe")
If you selected the "Debug-pnacl" or "Release-pnacl" configurations, the ".pexe" file contains the PNaCl (Portable NaCl) executable code built from the C or C++ source code, independent of the target architecture. -
NaCl executable files (".nexe")
The ".nexe" files contain the native NaCl executable code for the target architecture or architectures. If you selected the "Debug-pnacl" or "Release-pnacl" configurations, the binaries are translated from the ".pexe" file, otherwise they are direct results of the linking process. -
Required libraries (.so files)
If you selected the "Debug-glibc" or "Release-glibc" configurations, the required library files are produced. -
NaCl manifest file (".nmf")
The manifest file contains paths to the ".nexe" files for the supported architectures. The Web browser uses the manifest file to find the appropriate ".nexe" file. In Tizen applications, the manifest file also contains a list of application permissions needed to load the NaCl module.NoteThe ".pexe" file is not listed in the manifest file, since it is only supported by the Google Chrome™ browser.
Customizing Build Configurations
To customize a build configuration:
-
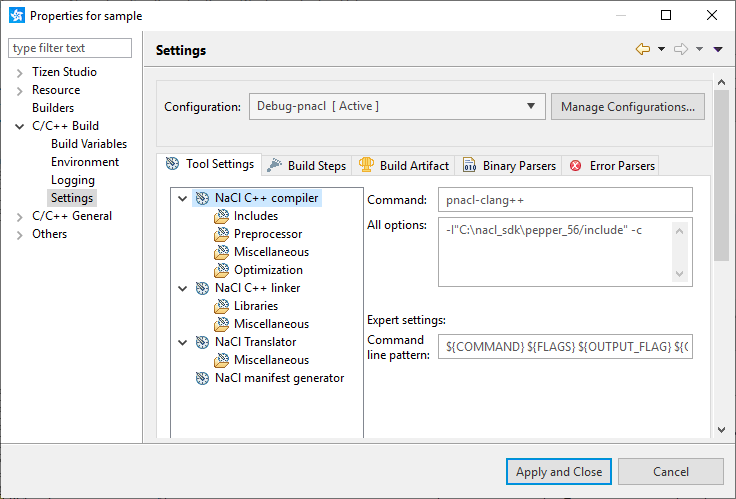
In the "Project Explorer" view, right-click the project and select "Properties > C/C++ Build > Settings".
-
From the "Configuration" drop-down menu, select the configuration that you want to modify.
-
Modify the desired settings.
For each tool, you can change the command name and its options.ImportantChange the settings with caution, as they can cause the build system to break.You can configure the following tools:
- NaCl Compiler
- "Includes" specifies the include paths to be passed to the compiler command.
- "Preprocessor" specifies the defined and undefined preprocessor symbols.
- "Miscellaneous" specifies other command parameters to be passed to the compiler.
- "Optimization" defines the optimization level.
- NaCl Linker
- "Libraries" specifies the library search paths and library names to be passed to the linker command.
- "Miscellaneous" specifies other command parameters to be passed to the linker.
- NaCl Translator
- "Architecture" defines the architecture to generate the ".nexe" file for. This setting is only available in the "Release-pnacl" configuration.
- "Miscellaneous" specifies other command parameters to be passed to the translator.
- NaCl Manifest Generator specifies the manifest file generation command.
- NaCl Compiler
-
To save the settings, click "OK".