The Web(GL) from your wrist!
Sylwester Mielniczuk
Web Developer Advocate
Hey! I have a new watch capable of displaying web content, even more — it can do WebGL for blazing-fast 2D/3D animations! But now, I would love to use its 44mm display as a simple remote controller. Let’s say… just to change the light intensity in the room of the Metaverse we just built for the Web.
What is required? Basic knowledge of Fronted Stack (Javascript for PixiJS, NodeJS for Websocket server and Webpack) and basic sys-admin skills. For the sake of clarity, I will skip some parts, for example how to configure Nginx and use SSL certificates.
Let’s go!
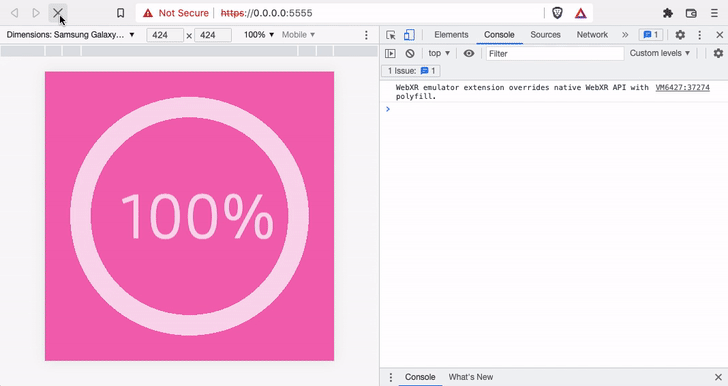
Let’s design and build the UI for the Watch. This controller might looks circular, like an arc with a digital representation of light intensity from 0–100%.
We can use PixiJS Graphics to draw the arc (How to draw graphics in PixiJS — examples):
function drawARC(angle) {

  // the arc has bee already created earlier
  // and added to "mC" container, we just call the reference

    let arc = app.stage.getChildByName("mC").getChildByName("ARC");

    // every time we would love to update
    // arc we need to clear it and redraw it

    arc.clear();

    let cx = app.renderer.width/2;
    let cy = app.renderer.height/2;
    let radius = 160;
    let startAngle = -90 * (Math.PI/180);
    let endAngle = startAngle + (360 - angle) * (Math.PI/180);
    let anticlockwise = false;
    let lineWidth = 30;
    let lineColor = 0xFFFFFF;
    let lineOpacity = 0.75

    arc.lineStyle(lineWidth, lineColor, lineOpacity);
    arc.arc(cx, cy, radius, startAngle, endAngle);

}
The value we need will be just simply a position of the touch event. We will get the percentage “pr” by dividing e.touches[0].clientY by the height of the app (app.renderer.height). We can catch this value by listening to the event ‘touchmove’. Additionally, we will pass the percentage: “pr” argument to the function called: “changeLights”.
function captureTouch(e) {

 let x = e.touches[0].clientX;
 let y = e.touches[0].clientY;
 let pr = y/app.renderer.height;

 changeLights(pr);
}

window.addEventListener('touchmove', captureTouch, false);
To update on the display percentage we will create the variable "volume" and pass the value to the text object “Volume” — (how to create PIXI.Text)
It’s convenient to test UI for watch in the desktop Browser with Device emulation for touch events enabled.
So as you can see the finger movement (the touch event) generates a value and we are now ready to send it to the other web apps. Let’s use WebSockets!
Let’s use WebSockets!
For learning purposes, the starting point would be just to experiment with the codebase from the examples folder of the WebSockets official GitHub repository. I will skip that part here, but it’s really fun!
$git clone git@github.com:websockets/ws.git
Before we will be sending data from the Watch UI we need to create ws object connected to the websocket server (See below a function called initWebSocket). We can add extra events listeners like onerror, onopen, onclose to handle disconnections and add display extra information (see the updateStats function) but for the simple case, the most important method is ws.send (see the changeLights function).
function initWebSockets() {
    let ws = new WebSocket("wss://localhost:2222");
    let sock = {}
    w.sock = sock;

    ws.onerror = function () {
        let msg = 'WebSocket error';
        console.log('▒▒▒▒▒ ★',msg);
        updateStats(msg)
    };

    ws.onopen = function () {
        let msg = 'WebSocket connection established';
        console.log('▒▒▒▒▒ ★',msg);
        updateStats(msg)
    };

    ws.onclose = function () {
        let msg = 'WebSocket connection closed'
        console.log('▒▒▒▒▒ ★',msg);
        updateStats(msg)
        ws = null;
    };

    ws.onmessage = function(event) {
        console.log("ws.onmessage")
        const data = event.data;
        sock.data = data;

        let obj = JSON.parse(data)

        if(obj.function == "showStats") {
            updateStats(obj.args.str)
        }

        if(obj.function == "lightUp") {
            console.log("lightUp",obj.args)
        }
    };
}
The very same client-side code can be reused in the WebXR app. All the magic with the light will happen with the code located in the event “onmessage”.
We pass all the information via JSON object converted to the string. This way we can send separately the name of the function we want to execute, and the volume of intensity as one of the arguments.
function changeLights(pr) {

  let volume = Math.floor((1 - pr)*100);

  app.stage.getChildByName("mC").getChildByName("Volume").text = volume + "%";

  ws.send(JSON.stringify({function:"lightUp",args {volume:volume*0.01}}));
  let angle = pr*360;

  drawARC(angle)

}
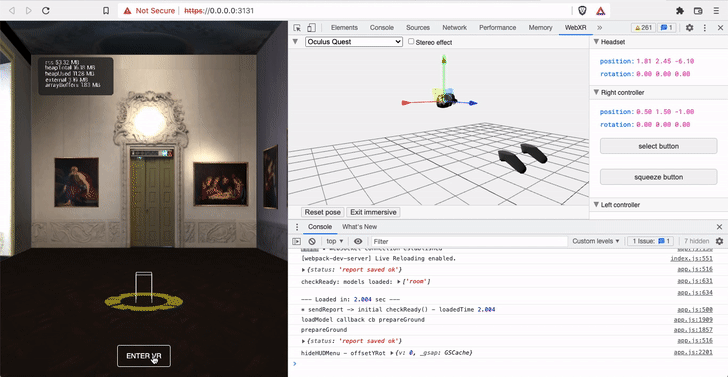
For testing purposes, we send from the server information about memory usage, which is on the wall of the VR app.
The whole WebSockets server would look like this gist below. All the population of information from the clients (wearable watch and VR app) via WebSocket server happens mainly where we invoke ws.on(‘message’,…
The way how we can parse and filter JSON data is a topic for a long tutorial but the idea is very simple. When an object has a specific property and arguments we can execute a conditionally specific function.
'use strict';
const https = require('https');
const fs = require('fs');
const express = require('express');
const path = require('path');
const { createServer } = require('http');
const WebSocket = require('ws');
const app = express();

const port = 2222;

const server = https.createServer({
    // you need to change this, depends on your own SSL environment,
    // see - https://letsencrypt.org/getting-started/ and https://certbot.eff.org/
    // also - https://nginx.org/en/docs/http/configuring_https_servers.html
    // self signed cert for localhost and development
    /*
        openssl req -x509 -out localhost.crt -keyout localhost.key \
  -newkey rsa:2048 -nodes -sha256 \
  -subj '/CN=localhost' -extensions EXT -config <( \
   printf "[dn]\nCN=localhost\n[req]\ndistinguished_name = dn\n[EXT]\nsubjectAltName=DNS:localhost\nkeyUsage=digitalSignature\nextendedKeyUsage=serverAuth")

   */
    key: fs.readFileSync('../ssl/localhost.key'),
    cert: fs.readFileSync('../ssl/localhost.crt')
}, app);

function getmem() {
    const used = process.memoryUsage();
    let memstr = ''
    for (let key in used) {
        memstr += `${key} ${Math.round(used[key] / 1024 / 1024 * 100) / 100} MB\n`
    }
    return memstr;
}

function isJsonString(str) {
    try {
        JSON.parse(str);
    } catch (e) {
        return false;
    }
    return true;
}

function sendAllExcept(message, ids) {
    if (undefined === ids) throw new Error('ids must be specified');
    if (!Array.isArray(ids)) ids = [ids];
    for (var i = 0, cLength = CLIENTS.length; i < cLength; i++) {
        if (ids.indexOf(i) !== -1) continue;
        CLIENTS[i].send(message);
    }
}

var CLIENTS = [];
var id;

const wss = new WebSocket.Server({ server });

wss.on('connection', function(ws) {
    id = Math.random();
    console.log('connection is established : ' + id);
    CLIENTS[id] = ws;
    CLIENTS.push(ws);

    id = setInterval(function() {
        ws.send(JSON.stringify({ function: "showStats", args: { str: getmem() } }), function() {});
    }, 2000);

    console.log('started client interval');

    ws.on('close', function() {
        console.log('stopping client interval');
        clearInterval(id);
    });

    ws.on('message', function(message) {

        let messageType = typeof message;
        if (messageType == "object") {
            console.log("really object")
        }

        if (isJsonString(message)) {
            console.log("this is JSON");
            // if JSON, let's parse it
            let obj = JSON.parse(message);
            console.log("function:", obj.function)
            console.log("args:", obj.args)
            if (obj.function == "lightUp")
                for (let e = 0; e < CLIENTS.length; e++) {
                    CLIENTS[e].send(JSON.stringify({ function: "lightUp", args: obj.args }), function() {});
                }
        } else {
            console.log("not a JSON:", String("String: " + message));
        }

    });
});

server.listen(port, function() {
    console.log('Listening on:' + port);
});
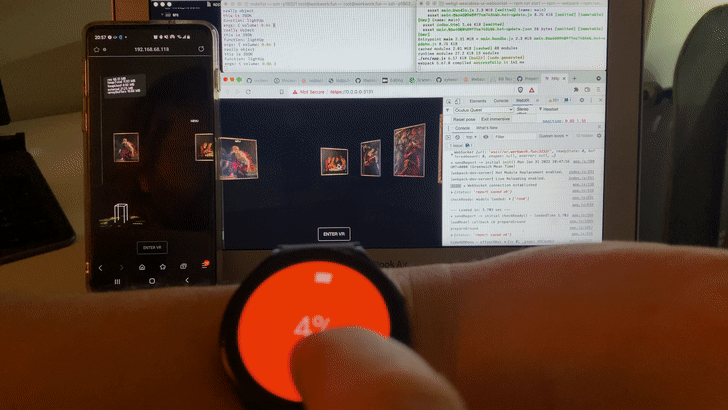
Below is the ad-hoc demo, with the earlier version of the UI. The WebSocket server is hosted on an external server. The UI is loaded to the Chrome-based Browser on my dev laptop and Samsung Internet browser on Samsung Galaxy S10.
Wearables are cool and theirs potential grows every day. They became a vital part of Internet of Things ecosystem (IOT). Having a small and handy device on hand capable to connect to other things you are immersed and to control theirs parameters is super fun!
The WebSocket API is an advanced technology that makes it possible to open a two-way interactive communication session between the user’s browser and a server. With this API, you can send messages to a server and receive event-driven responses without having to poll the server for a reply. — https://developer.mozilla.org/en-US/docs/Web/API/WebSockets_API
Here is the link to the repository: https://github.com/websockets/ws

It is worth to mention that you can run Samsung Internet app on other non-Samsung Wearable OS watches. More about Samsung Internet browser:


