Configuring Instant Server Notifications for Samsung IAP
Md. Hossain
Engineer, Samsung Developer Program
In-App purchases are crucial for many applications, and the Samsung In-App Purchase (IAP) service helps developers manage purchases, subscriptions, and refunds efficiently. To keep your server in sync with user transactions, Samsung IAP Instant Server Notification (ISN) sends real-time notifications to your backend server when purchase-related events occur.
ISN for Samsung IAP is a method used by Samsung's system to notify your server about user activities related to in-app items and subscriptions. When a change occurs, Samsung sends a notification to your server. A list of all events that trigger a notification is available here.
In this article, we will build a Spring Boot server that handles these notifications.
Prerequisites
To implement ISN for Samsung IAP, it is important to focus on the requirements that helps you to most easily implement the process:
- Create an IAP public key in the Seller Portal. This key is used to authenticate the notifications you receive and verify that they are from the Samsung IAP ISN system. The steps you need to follow are outlined in the Create an IAP public key in Seller Portal documentation.
- Create an in-app item in the Seller Portal. Follow the related documentation to create an in-app item.
ISN Structure
The ISN for Samsung IAP service sends a notification to the application developer server. The structure of the notification is always a base64-encoded JSON Web Token (JWT) and consists of three parts. The three parts are:
- Header
- Payload
- Signature
Header
The JWT uses a JOSE (JavaScript Object Signing and Encryption) header. Similar to the envelope of a letter, the header indicates the type of notification being sent. For additional information, refer to the Samsung IAP ISN Header article.
Example encoded header:
eyJ0eXAiOiJKV1QiLCJhbGciOiJSXXXXXXXX
Example decoded header:
{
   "alg" : "RS256",
   "typ" : "JWT"
}
Payload
The payload is the actual content of the message, like the letter inside the envelope. This part contains the crucial information you need, like the user’s subscription details, the product they have subscribed to, and the current status of the subscription.
More details about the payload check are available in the following documentation and Data claims section.
Example encoded payload:
eyJpc3MiOiJpYXAuc2Ftc3VuZ2FwcHMuY29tIiwic3ViIjoiRVZFTlRfTkFNRSIsImF1ZCI6WyJjb20ucGFja2FnZS5uYW1lIl0sIm5iZiI6MTcxNzIwNCwiaWF0IjoxNzE3MjA0LCJkYXRhIjp7InNlbGxlck5hbWUiOm51bGwsIm
NvbnRlbnROYW1lIjoiTWFydGluZSJ9LCJ2ZXJzaW9uIjoXXXXXXXX
Example decoded payload:
{
    "iss": "iap.samsungapps.com",
    "sub": "EVENT_NAME",
    "aud": ["com.package.name"],
    "nbf": 1717XXXXXX,
    "iat": 1717XXXXXX,
    "data": {..},
    "version": "X.0"
}
Signature
The signature is the security feature that acts as a digital stamp to prove the message is genuine and hasn’t been tampered with. You can use this signature to verify that the data in the payload is authentic and was created by Samsung.
Further information is provided in the signature documentation.
Now that we know the structure of the ISN for Samsung IAP, we can configure the server to handle it.
Server Configuration
According to the ISN for Samsung IAP requirements, you must set up a server to receive the notifications.
Below, we create a Spring Boot server. Use your preferred IDE (Integrated Development Environment) or online Spring Initializr to create a Spring Boot server. Follow the steps below to set up your own server.
Step 1: Set Up a Spring Boot Project
- Use the Spring Initializr tool to create a new project.
- Choose the following dependency: Spring Web
- Generate and download the project.
Step 2: Import the Project into IDE
- Open the project in the IDE (IntelliJ, Eclipse, etc.)
Step 3: Set Up ISN Endpoint
-
Create a controller for ISN Notifications in the IDE after importing the Spring Boot project. The controller receives POST requests (Subscription, Refund and Cancel) sent from Samsung’s IAP server.
-
Add necessary dependencies in the
build.gradlefile:
{
   implementation 'com.auth0:java-jwt:4.0.0' //For JWT verifier
   implementation 'org.json:json:20230227'    // For JSON parsing
}
- Load the public key detailed in the prerequisite section:
  private String loadPublicKey(String fileName) throws IOException {
        ClassPathResource resource = new ClassPathResource(fileName);
        StringBuilder contentBuilder = new StringBuilder();

        try (InputStream inputStream = resource.getInputStream();
            BufferedReader reader = new BufferedReader(new
            InputStreamReader(inputStream))) {
            String line;
            while ((line = reader.readLine()) != null) {
                contentBuilder.append(line).append("\n");
            }
        }
        return contentBuilder.toString();
    }
- Remove headers, footers, and whitespace from the public key and convert it to the RSAPublicKey format.
    private RSAPublicKey getRSAPublicKeyFromPEM(String pem) throws Exception {
        String publicKeyPEM = pem
                .replace("-----BEGIN PUBLIC KEY-----", "")
                .replace("-----END PUBLIC KEY-----", "")
                .replaceAll("\\s", ""); // Remove headers, footers, and whitespace

        byte[] encoded = Base64.getDecoder().decode(publicKeyPEM);
        KeyFactory keyFactory = KeyFactory.getInstance("RSA");
        X509EncodedKeySpec keySpec = new X509EncodedKeySpec(encoded);
        return (RSAPublicKey) keyFactory.generatePublic(keySpec);
    }
- Create a JWT verifier with RSAPublicKey and, finally, verify the JWT. If the verification is successful, decode the JWT to retrieve the decoded JSON payload. The decoded payload contains the message of the notification.
   private void verifyToken(String token, RSAPublicKey publicKey) {
        try {
            // Create JWT verifier with RSA public key
            Algorithm algorithm = Algorithm.RSA256(publicKey, null);

            // Verify the JWT token
            JWTVerifier verifier = JWT.require(algorithm)
                    .withIssuer("iap.samsungapps.com")
                    .build();
            DecodedJWT jwt = verifier.verify(token);

            // Decode the JWT token
            String payloadJson = new String(Base64.getDecoder().decode(jwt.getPayload()));
            JSONObject jsonObject = new JSONObject(payloadJson);

            //Print decoded JSON payload
            System.out.println("Payload as JSON: " + jsonObject.toString(4));
        } catch (JWTVerificationException e) {
            System.out.println("Invalid token: " + e.getMessage());
        }
    }
In this sample project, we have only printed the payload data to the console. You can use this according to your requirements.
Step 4: Deploy the Server
The server needs a publicly accessible URL to receive ISN notifications. In our project, we have used CodeSandbox to get the publicly accessible URL for the server. Once you deploy the project on CodeSandbox, you will get a publicly accessible URL that looks like this: https://abcde-8080.csb.app/iap/isn.
Testing with Seller Portal
Test your server with Samsung Galaxy Store Seller Portal:
-
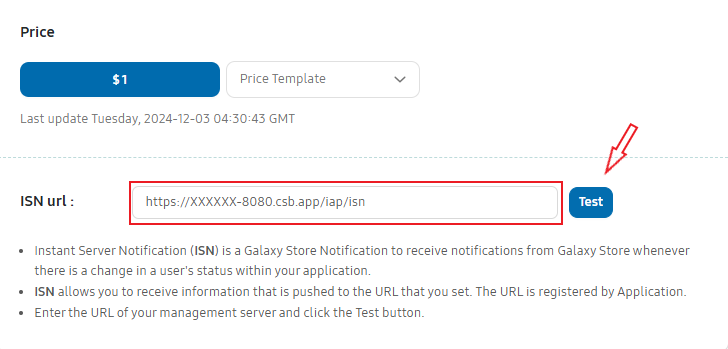
Set the CodeSandbox URL as the ISN URL in Seller Portal.
- Go to the In-App Purchase section and create items with the required details.
- In the "ISN URL" field, set the publicly accessible server URL.
-
After setting the URL, click the
Testbutton. A notification will be sent to the specified server immediately. You will also receive a notification on the server that you just deployed in the CodeSandbox.
Testing with a Sample Application
Now it is time to test the ISN for Samsung IAP from the user application. Further details are provided in the Integrate the Samsung In-App Purchase Orders API with Your Application article. Download the sample application from this blog and then follow the instructions until you reach the "Implementation of Item Subscription" section.
In the sample application, after clicking the "Buy" button, startPayment() is called. The onPayment() callback returns an indication of whether the purchase succeeds or fails. If the purchase is successful, the IAP server sends a notification to your server.
  iapHelper.startPayment(itemId, String.valueOf(1), new OnPaymentListener() {
            @Override
            public void onPayment(@NonNull ErrorVo errorVo, @Nullable PurchaseVo purchaseVo) {
                if (purchaseVo != null) {
                    Log.d("purchaseId" , purchaseVo.getPurchaseId().toString());
                    //  Purchase successfull
                }else {
                    Log.d("purchaseError" , errorVo.toString());
                }
            }
        });
Example Response
After successfully purchasing an item, a JSON response is returned. For more information on each parameter, you can check the Item purchased documentation.
Example JSON response:
 "data" : {
   "itemId": "example_item_id",
   "orderId": "XXXX40601KRA00XXXXX",
   "purchaseId": "XXXXX7245d57cc1ba072b81d06e6f86cd49d3da63854538eea689273787XXXXX",
   "testPayYn": "N",
   "betaTestYn": "N",
   "passThroughParam": null
}
Conclusion
By implementing the ISN for Samsung IAP with your server, you can easily and securely stay in sync with user in-app purchases.
Integrating ISN for Samsung IAP helps you improve your application management experience and grow your application’s revenue. Following this guide will help you smoothly set up the system and provide a better way to manage your application.
References
For additional information on this topic, see the resources below:


