Adding and Updating Samsung Wallet Cards Using Server APIs
Mobassir Ahsan
Engineer, Samsung Developer Program
In a previous blog article, we learned about Samsung Wallet’s server notification API and how to use this API to receive server notifications about Samsung Wallet card updates in a user’s Samsung Galaxy devices. This time, we look at the Partner Server API called “Get Card Data” and how partners can use this API in order to add, update, or cancel issued wallet cards in user’s devices.
Prerequisites
The prerequisites needed for this article are similar to those for our previous article about Samsung Wallet server APIs. Namely, we require a partner server where we can set up the Get Card Data API endpoint. In order to set up and test this API, you need to:
- Complete the Samsung Wallet onboarding process.
- Create a Samsung Wallet card template.
- Launch the wallet card template and have it in either the VERIFYING or ACTIVE status so that the card can be added to a user’s device.
- Have an existing server to set up the Get Card Data API endpoint. You can use CodeSandbox or a similar online hosting service for testing.
- Configure your firewall (if you use any) to accept incoming connections from the Samsung Wallet server (34.200.172.231 and 13.209.93.60).
When you have completed all the prerequisites, proceed to the next step to configure your wallet card template to send requests to your server.
Setting Up the Get Card Data API
In the Samsung Wallet Partners portal, open the desired wallet card template and then edit it to set the following “GET” field:

- Go to the Wallet Partners portal.
- From the Wallet Cards dropdown, select “Manage Wallet Card.”
- Click the name of the wallet card you want to edit.
- Click “Edit” and then scroll down to the “Partner Get card data” section to modify the partner server URL.
- Click “Save” to set the server URL for the card.
Get Card Data API Specification
For a complete description of the Get Card Data API specification, please check the Samsung Wallet Documentation.
Method:
The Get Card Data API uses a GET method to fetch card information from the server.
API Path:
The API path for the request is fixed and uses the “Partner Get card data” server URL that you configured in the previous section. The Samsung Wallet server sends the GET request to this exact URL whenever it needs to fetch card data from the partner server.
The format for the API path URL for the complete Get Card Data request is:
{Partner server URL}/cards/{cardId}/{refId}
If the Samsung Wallet Server needs to fetch specific fields from the card data instead of the entire card, then it uses the additional query parameter named “fields” at the end of the URL:
{Partner server URL}/cards/{cardId}/{refId}?fields={fields}
Request Header:
The Samsung Wallet server includes 2 fields in the header when calling the Get Card Data endpoint: Authorization and x-request-id. An Authorization bearer token is provided in the Authorization field, so that the partner can verify the request before providing the data.
Request Payload:
The request does not contain any payload.
Expected Response Payload:
The response to the Get Card Data request must contain the card data in one of the following two formats:
- Plain card data in the RAW JSON format.
- Encrypted card data in the CDATA format.
When the fields query parameter is used in the request URL, the card data returned in the response can provide only the fields included in the request. However, it is acceptable to return the entire card data in the response as well.
Implementing the Get Card Data API
We will extend the Spring server from the previous article to create the Get Card Data API endpoint. In the API, we need to do 2 things:
- Verify the incoming request to check that it is authentic and actually coming from the Samsung Wallet server.
- Send the requested card’s data back as the response.
The verification part is similar to the verification steps performed in the previous article. The request header contains the Authorization bearer token, which we can use to verify the request.
After verification, it is necessary to send back valid card data in the response to this GET request. We can return either the plain card data or encrypt and tokenize it into CDATA. In this implementation, we return the plain card data in the JSON format.
In this example, we use a raw JSON file from a plaintext file called Ticket_ref-001.json for simplicity. The complete Get Card Data API implementation will therefore be as follows:
@RestController
@RequestMapping("/cards")
class CardDataController {
    // Data Transmit Link
    @GetMapping(path = ["/{cardId}/{refId}"])
    fun provideCardData(@PathVariable cardId: String,
                        @PathVariable refId: String,
                        @RequestParam("fields", defaultValue = "") fields: String,
                        @RequestHeader("Authorization") authToken: String,
                        @RequestHeader("x-request-id") requestId: String,): String {
        if(verifyAuthToken(authToken)){
            return JwtGen.getPlainCardData()
        }
        else{
            return HttpStatus.UNAUTHORIZED.toString()
        }
    }
}
Next, define the getPlainCardData() function, where the CDATA is generated using the data provided in the Ticket_ref-001.json file.
fun getPlainCardData():String{
    val data:String = getStringFromFile("sample/payload/Ticket_ref-001.json")
    return data
}
Adding Cards to Samsung Wallet Using Data Fetch Link
Once you have configured the Get Card Data API for your server, you can use the API to add cards to the user’s device directly. This is called the Data Fetch Link and unlike the standard approach, it is not necessary to send the card information in the CDATA format. Instead, you can simply provide the user with the URL and they can then add the card to their device by clicking the URL.
The URL format for adding card data is as follows: https://a.swallet.link/atw/v3/{CertificateId}/{cardId}#Clip?pdata={pdata}
So, for example, if your CertificateId is A123, CardId is 3h844abcdefg00, and RefID is ref-001, then the Slim API URL for the Add to Wallet operation is: https://a.swallet.link/atw/v3/A123/3h844abcdefg00#Clip?pdata=ref-001
To add the card to their wallet using this method, the user needs to simply visit this URL from their device. Once the user clicks the link, the Samsung Wallet server requests the card data from the previously configured Get Card Data API and adds the wallet card to the device.
pdata (also known as RefID). Ensure that this value is a unique hash identifier so that it cannot be easily compromised by third parties
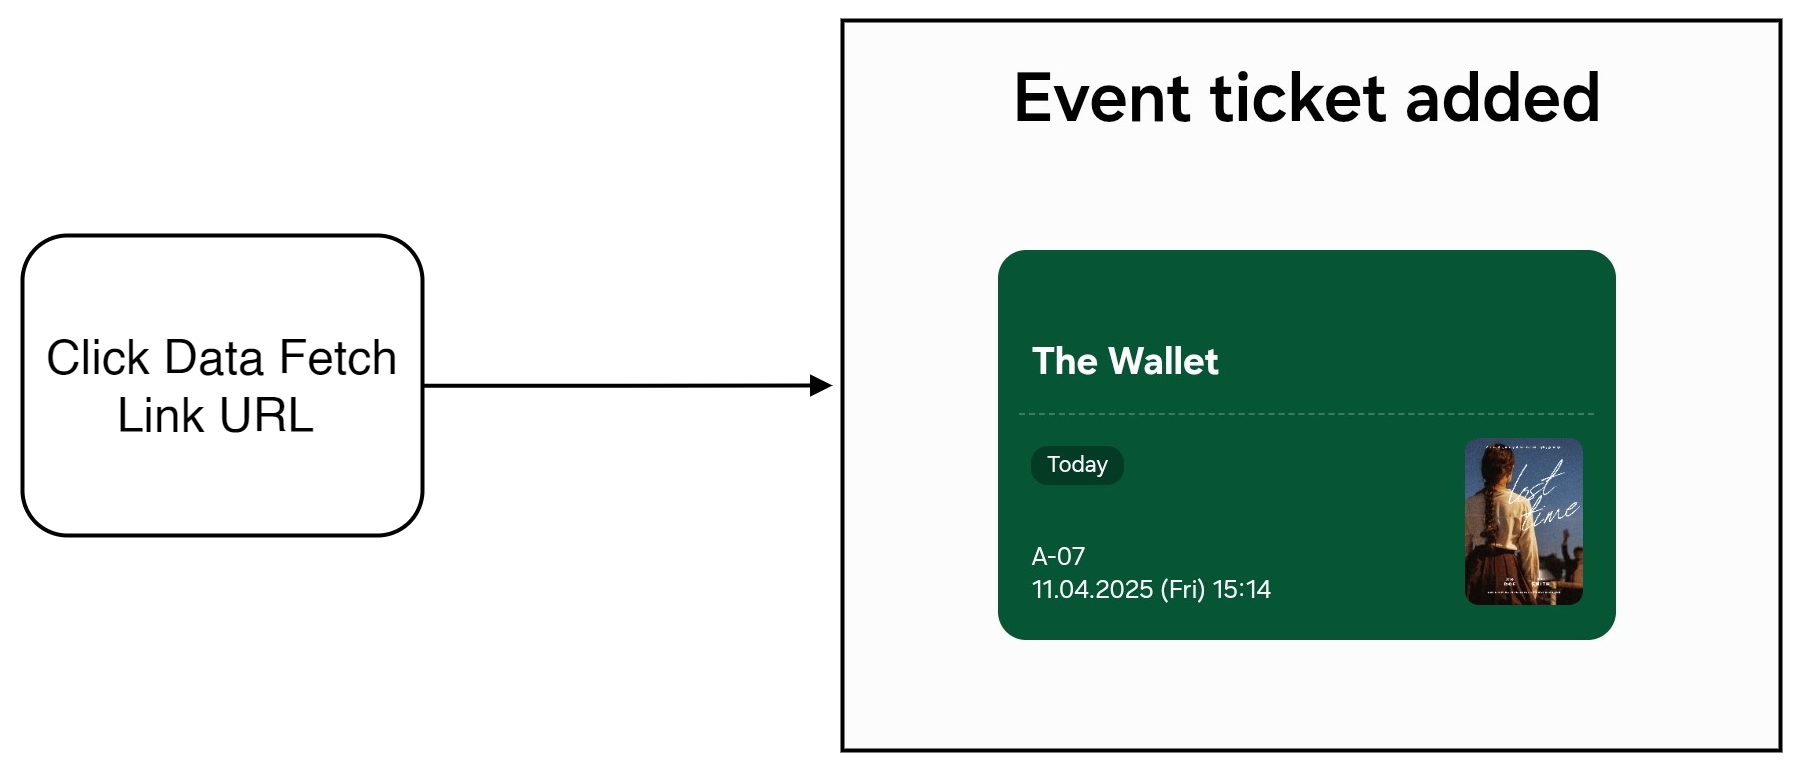
Figure 1: Adding a card to the wallet using Data Fetch Link
Updating Card Data Using an Update Notification
Samsung Wallet allows partners to update any issued card’s data using the previously configured Get Card Data API. The card data can be updated in one of the following two ways:
- The card data is refreshed automatically every time the user opens the card in the detail view.
- The card data update is triggered manually when the partner sends an update notification. In this case, the card data is updated even when Samsung Wallet is running in the background, and it is not necessary to open the card in the detail view.
When an update notification is sent, the state of the card is immediately updated on the device. Afterwards, when the user opens Samsung Wallet in their device, the card data attributes are refreshed by calling the Get Card Data API. This ensures that the wallet card data is always updated right before the user views it.
In order to update card data manually and notify the user about the change, we need to configure the changes in the card data and then send an update notification to the Samsung Wallet server. Once the Update Notification API is called following the specification, the card’s status and data are updated on the user’s device automatically.
Samsung Wallet uses the RefID as the unique identifier of Samsung Wallet cards. Therefore, the RefID of the specific card must be included in the payload of the update notification request in order to update the card.
The complete specification for the Update Notification API can be found in the documentation:
Method: POST
API Path: The request needs to be sent at:{Samsung Wallet Server domain URL}/{cc2}/wltex/cards/{cardId}/updates
For the Samsung Wallet Server domain URL, we can either use the public domain (https://tsapi-card.walletsvc.samsung.com) or the private domain we received in our API callback.
Request Header: The header must contain the Authorization, x-smcs-partner-id, and x-request-id request header fields. The Samsung Wallet server uses this header information to verify the authenticity of the request. Additionally, the header also needs to specify the Content-Type header, which must be set to application/json.
Request Payload: The payload of the update notification must contain the card type, RefID, and the new state of the card. Optionally, the payload can also contain the fields to be updated so that only those specific fields are retrieved and updated.
The payload must be in the following JSON format:
{
 "card": {
   "type": "{card type}",
   "data": [
     {
       "refId": "{ref ID}",
       "state": "{UPDATE/DELETED/EXPIRED}",
       "fields": "{fields, comma-separated, optional}"
     }
   ]
 }
}
Steps for using the update notification:
- Configure the Authorization token.
- Prepare the card data in your server for updating.
- Prepare the header and payload with the RefId of the selected card for updating.
- Send the POST request to the Samsung Wallet server for updating.
Once you send the update notification POST request following the specification, the Samsung Wallet server updates the card on the user’s device. Let us modify the data of the previously added card from our server and then call the Update Notification API.
Configuring the Authorization Token
All Samsung Wallet server APIs require the use of a bearer Authorization token in order to ensure the security and authenticity of the request. You can find the complete specification of the Authorization token required by Samsung Wallet in the documentation
The Authorization token generation process is very similar to generating CDATA, except that for CDATA, the payload needs to be encrypted first. For the Authorization token, the payload is in plaintext and only contains the API path for verification.
To create the bearer Authorization token:
- Configure the JSON payload that describes the method and API path of the request.
- Configure a custom JWS header following the JWT format specification.
- Create a JWS object using the payload and custom JWS header.
- Sign and validate the complete JWS object with your partner private and public keys using the RS256 asymmetric algorithm.
The complete function to generate the Authorization token is given below:
fun generateAuthorizationToken(): String{
        val payload:String = getStringFromFile("sample/payload/Api_path.json")
            .replace("{refId}", refId)
            .replace("{method}","GET")
            .replace("{path}","/wltex/cards/cardId/updates/")

        val jwsAlg = JWSAlgorithm.RS256
        val utc = System.currentTimeMillis()

        val jwsHeader = JWSHeader.Builder(jwsAlg)
            .contentType("AUTH")
            .customParam("partnerId", PARTNER_ID)
            .customParam("certificateId", "A123")
            .customParam("ver", "3")
            .customParam("utc", utc)
            .build()

        val jwsObj = JWSObject(jwsHeader, Payload(payload))

        val rsaJWK = RSAKey.Builder(partnerPublicKey as RSAPublicKey)
            .privateKey(partnerPrivateKey)
            .build()
        val signer: JWSSigner
        try {
            signer = RSASSASigner(rsaJWK)
            jwsObj.sign(signer)
        } catch (e: JOSEException) {
            e.printStackTrace()
        }
        return jwsObj.serialize()
    }
Preparing Card Data for Update
Once the update notification is sent, the Samsung Wallet server queries the Get Card Data API endpoint for the updated card data and then updates the wallet card with the latest data provided by the API. So before calling the update notification, make sure the card data provided by the API is up-to-date.
For our example, let us change the value of the seatNumber field from A-07 to E-05 before calling the Update Notification API.
Prepare the Request Header and Payload for the Update Notification
The POST request header contains the following fields: Authorization, x-smcs-partner-id, and x-request-id.
For our example, we set our partner ID as the x-smcs-partner-id, a randomly generated code as x-request-id, and generate a bearer token following the Authorization token generation process mentioned previously and use it as the Authorization field value.
Next, we set the JSON payload, according to the previously mentioned format:
{
  "card": {
    "type": "ticket",
    "data": [
      {
        "refId": "ref-001",
        "state": "UPDATED"
      }
    ]
  }
}
Since the fields field is optional, we have omitted it in this example.
Sending the Update Notification to the Samsung Wallet Server
Once everything is ready, we send the Update Notification POST request to the Samsung Wallet server. We can use any method to send the request, such as Postman, cURL, or a plain HTTP request. Make sure that the update notification is sent immediately after generating the Authorization token, as the token only has a TTL (time to live) of 30 seconds.
Once the update notification is sent, the user should immediately receive a “Card Information Updated” push notification informing them of the card update.
Afterwards, the next time the user opens the Samsung Wallet application, the card details are up-to-date and the user can see their new seat number in their card.
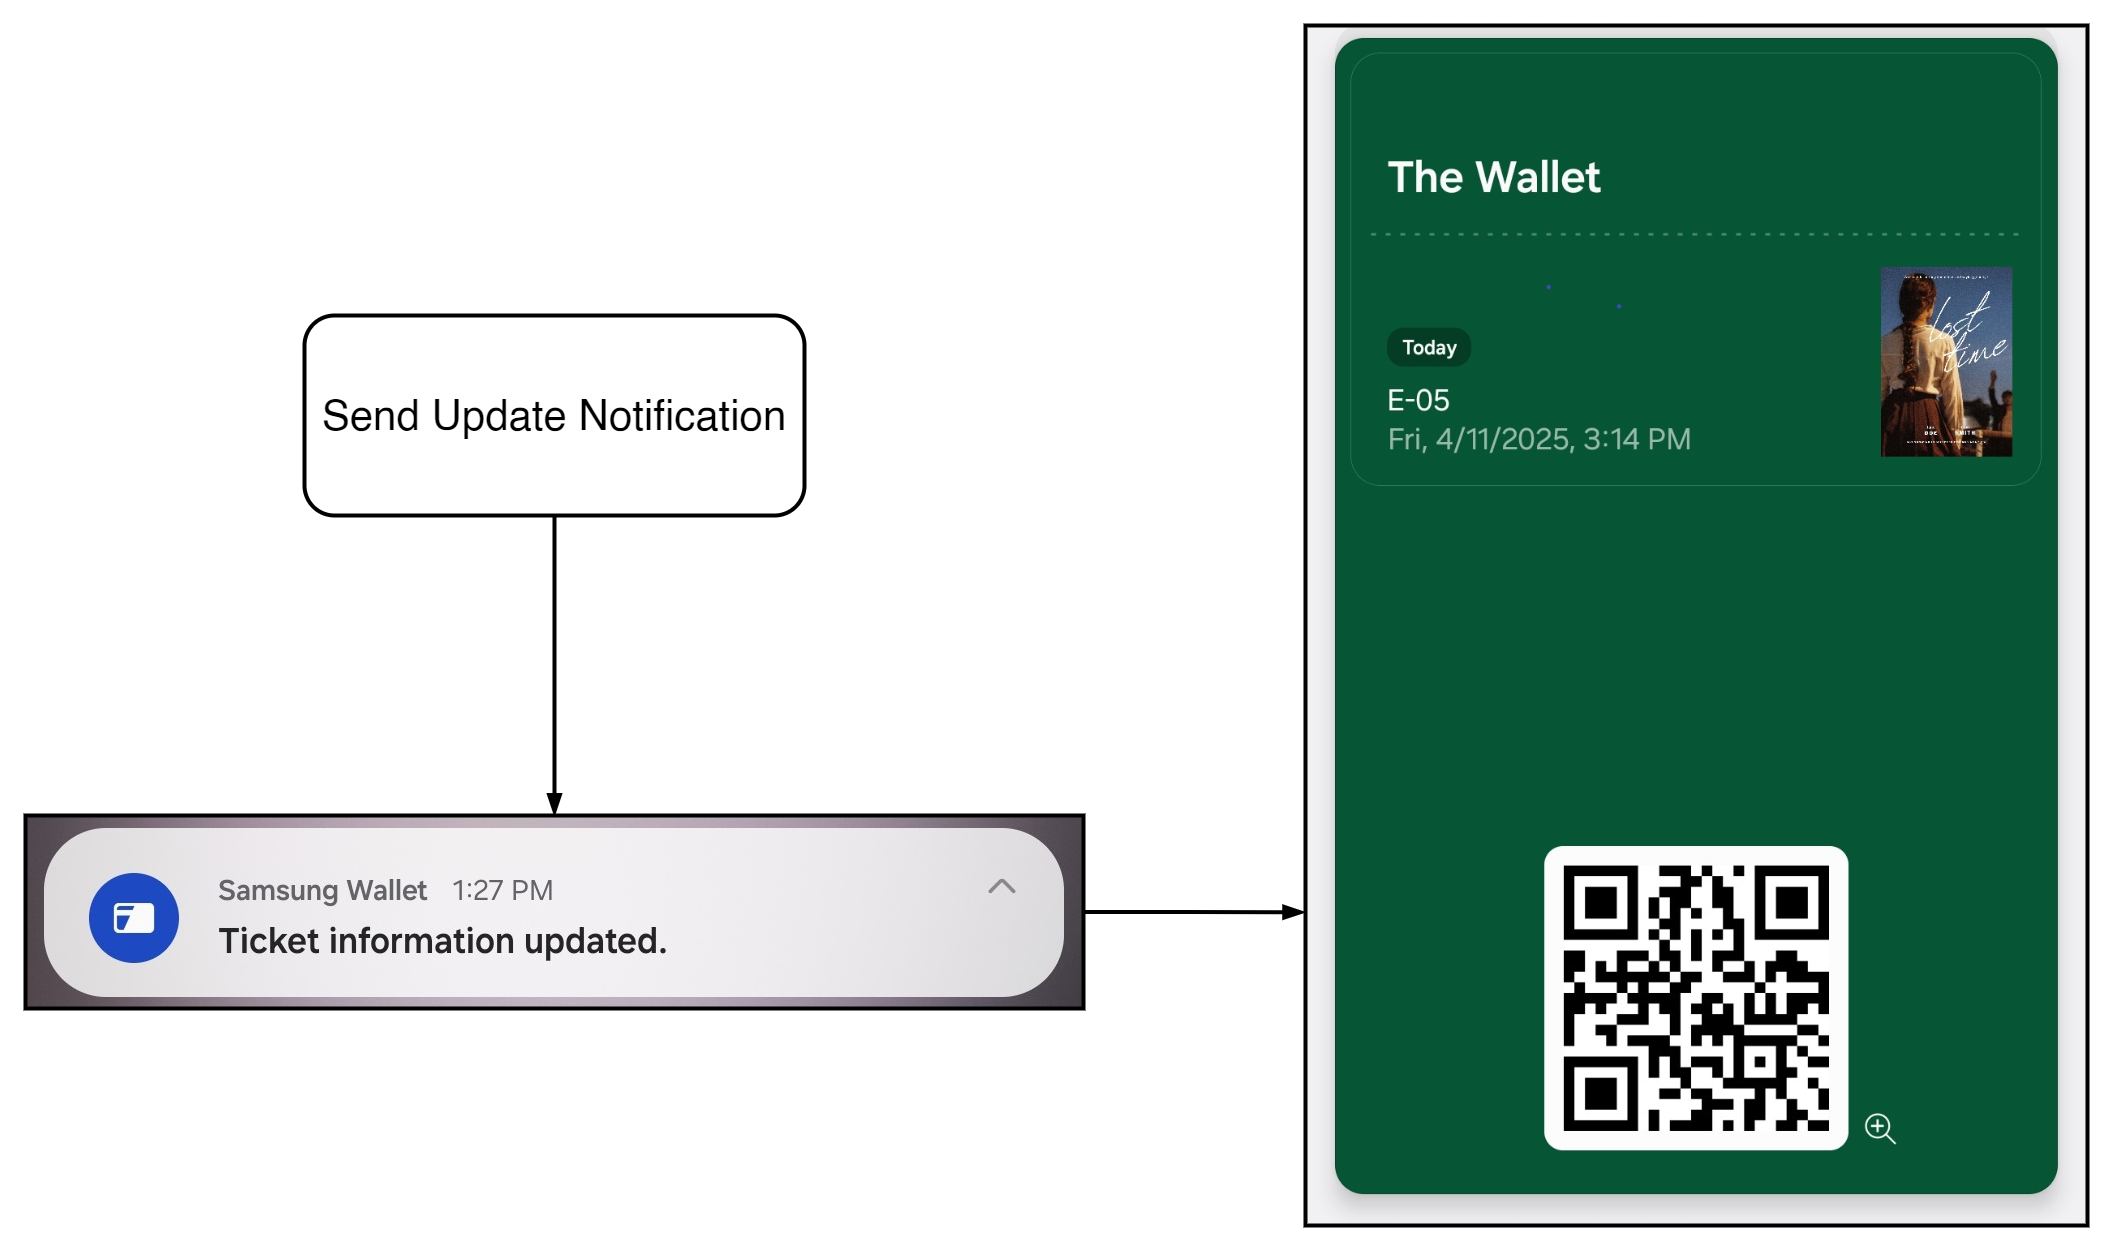
Figure 2: Updating card data using an update notification
Cancelling an Event Using a Cancel Notification
There are times when you might need to cancel an event and recall all the issued wallet cards for it. In such case, Samsung Wallet makes it possible to cancel all issued cards with a specific EventId and send a notification regarding the cancelation to all users with the cards associated with the event. Therefore, it is no longer necessary to modify issued cards one-by-one using their RefId. Instead the card issuer can cancel all cards under the event at one time.
The process of sending a cancel notification is the same as the update notification process, except for the following differences:
- The payload needs to contain the
EventIdinstead of theRefId - The state must always be
CANCELED - The POST request endpoint URL is:
{Samsung Wallet Server domain URL}/{cc2}/wltex/cards/{cardId}/cancels
You can find the complete specification for the Cancel Notification API in the Samsung Wallet documentation.
Now let us send a cancel notification following the same process as update notification:
- Configure the Authorization token.
- Prepare the payload with the EventId for cancellation.
- Send the POST request to the Samsung Wallet server for cancellation.
For our example, we add a few cards with the same event ID to our Wallet in different devices, then send a cancel notification following the specification. Once the cancel notification is sent, all Samsung Wallet cards with the given EventId are deleted automatically from all devices and the affected users receive a "Ticket Canceled" push notification.

Figure 3: Canceling an event using a cancel notification
Conclusion
In this article, we have learned how to configure our server to use the Get Card Data API, as well as how to use various Samsung Wallet Server APIs to add, update, delete, and cancel Samsung Wallet cards from user devices. If you have any further queries regarding this process, feel free to reach out to us through the Samsung Developers Forum.


