Verifying a User’s Identity from Your Application Using Samsung Wallet’s App2App SDK
Mobassir Ahsan
Engineer, Samsung Developer Program
Digital identity verification has become a rising topic in the current technological landscape. Samsung Wallet allows Samsung Galaxy device users to securely register their state-issued US driver's license in their device, letting them use it as a mobile driver's license (mDL). Through the "Verify with Wallet" (VWW) functionality, Samsung Wallet provides Android developers with the ability to authenticate a user's identity directly from their application by utilizing the user's registered mDL on the device. The implementation of the functionality is based on and is fully compliant with the ISO 18013-5 standard. In this article, we explore the complete process of implementing Verify with Wallet in an Android application.
Prerequisites
In order to complete the tasks in this article and implement a complete sample application for verifying a user's identity, you need the following:
- Valid US driver's license or state ID
- US region Samsung Galaxy device with mDL support
- Complete the Samsung Wallet Partner onboarding process
Understanding the Verify with Wallet process
Samsung Wallet offers a native Relying Party (RP) SDK for Android applications. RP SDK is an App2App SDK designed for enabling Samsung Wallet's mDL service in online use cases. By integrating this SDK, you can leverage the VWW functionality within their applications.
In your application, you need to create a JSON object for defining the request and a JSON payload for the Relying Party card. Then, you can utilize the RP SDK to create a valid mDoc request using the provided information. Finally, the request needs to be sent to the Samsung Wallet application.
In response, Samsung Wallet sends an encrypted response back to the application, which contains the requested information in a CBOR encoded format. The application can then decode the provided data and use it as necessary. Refer to the ISO 18013-5 standard, AAMVA mDL guidelines and the Samsung Wallet documentation for a better understanding of the VWW process.
Implementing the Verify with Wallet Functionality in Your Android Application
The process of implementing VWW in an Android application includes creating a Relying Party card for Samsung Wallet, downloading and integrating the RP SDK into the Android application and implementing the necessary functions in the Android application for completing the verification process.
Creating a Relying Party Wallet Card Template in the Samsung Wallet Partners Portal
In order to implement and use the VWW functionality, you need a wallet card of the Relying Party type for this purpose.
To create a Relying Party wallet card template:
- Go to the Samsung Wallet Partners Portal.
- Select Wallet Card > Create Wallet Cards.
- From Wallet Card Templates, select Relying Party.
- Select the applicable Service Location and Authentication Issuer from the Advanced setting section. Make sure to select the proper values for the card, otherwise the verification process may not work.

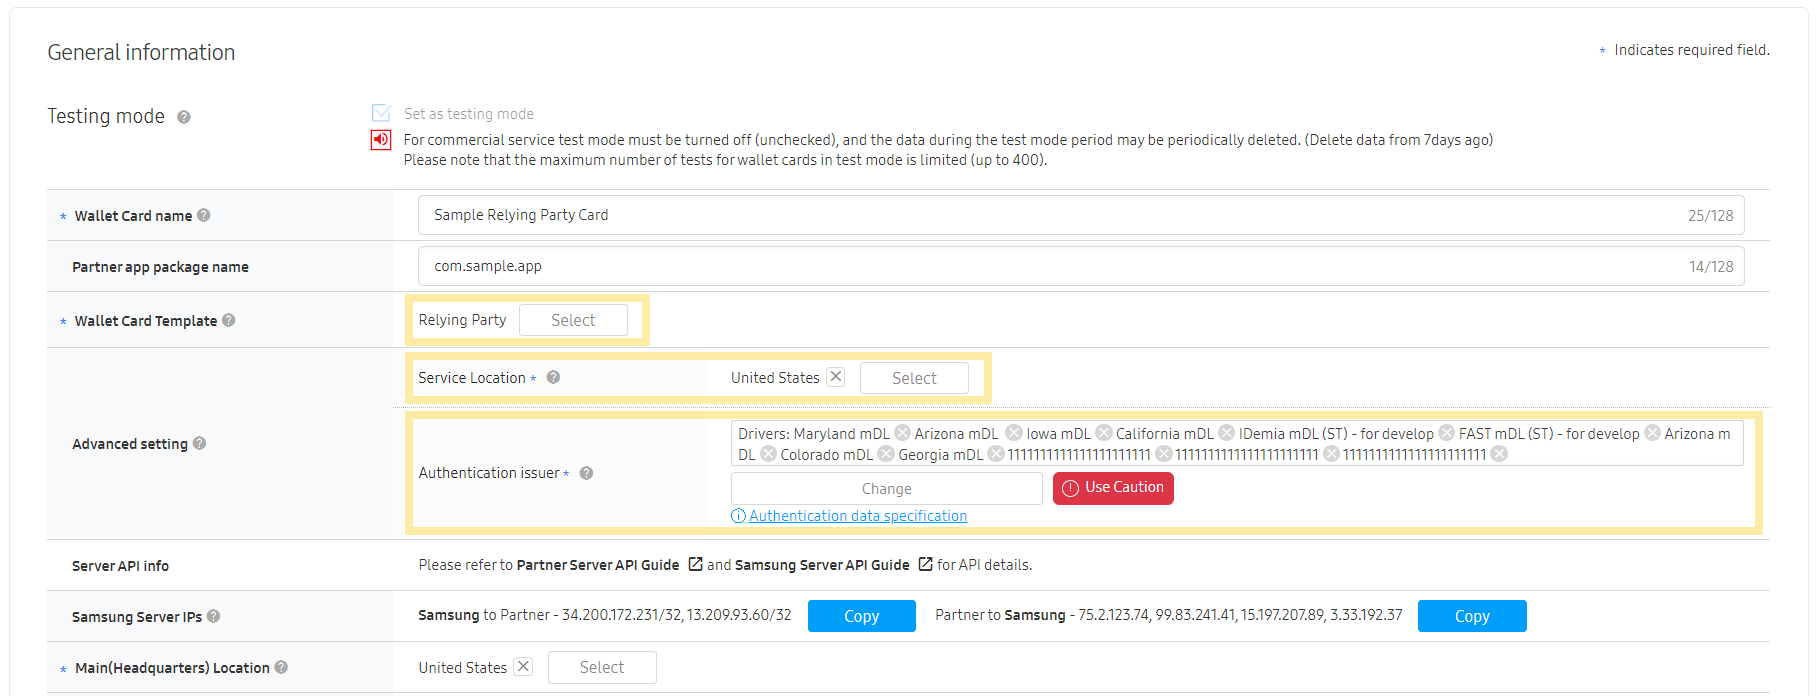
Figure 1: Creating a Relying Party card for VWW
Integrating the RP SDK in an Android Application
Once the Relying Party card template has been created, we can download and integrate the RP SDK to work with the Android application.
Step 1: Download the RP SDK for Android
To download the RP SDK:
- Download the ZIP file containing the latest RP SDK release AAR file from Samsung Wallet Code Resources on the Samsung Developer website.
- Extract the AAR file from the downloaded ZIP file.
- Copy and paste the downloaded
rp-sdk-x.xx-release.aarfile inside a new directory in the Android Studio project (for example,\libs\).
Step 2: Add Android Manifest Permissions
To implement the Verify with Wallet functionality, the application needs both the Internet access permission and the ability to query the installed Samsung Wallet application. To provide the application with these permissions, open the AndroidManifest.xml file in the Android Studio project and add the following lines:
<uses-permission android:name="android.permission.INTERNET" />
<queries>
    <package android:name="com.samsung.android.spay" />
</queries>
Step 3: Add Gradle Dependencies
In the application's build.gradle file, load the RP SDK AAR file and the necessary additional dependencies for using the SDK, as follows:
// Load RP SDK AAR file
implementation(files("libs/rp-sdk-1.05-release.aar"))

//CBOR decoding dependencies
implementation("com.upokecenter:cbor:4.0.1")
implementation("com.augustcellars.cose:cose-java:1.1.0")

// Other dependencies
implementation("com.google.code.gson:gson:2.11.0")
implementation("org.bouncycastle:bcprov-jdk15to18:1.66")
implementation("com.nimbusds:nimbus-jose-jwt:9.37.3")
implementation("io.reactivex.rxjava2:rxjava:2.2.21")
implementation("io.reactivex.rxjava2:rxkotlin:2.4.0")
implementation("io.reactivex.rxjava2:rxandroid:2.1.1")
implementation("com.squareup.okhttp3:okhttp:4.11.0")
After these steps, the RP SDK is ready for use in your Android application.
Configuring the Android Application for Verify with Wallet
Next, we need to complete the implementation of the Verify with Wallet functionality in your Android application.
Step 1: Build a Card Payload for the Relying Party Card
First, we need to create a request payload for the Relying Party card following the specification.
private fun buildApp2AppPayload(): String {
    return PAYLOAD
        .replace("{refId}", UUID.randomUUID().toString())
        .replace("{createdAt}", System.currentTimeMillis().toString())
        .replace("{updatedAt}", System.currentTimeMillis().toString())
}

private val PAYLOAD = """
    {
      "card": {
        "type": "relyingparty",
        "data": [
          {
            "createdAt": {createdAt},
            "updatedAt": {updatedAt},
            "language": "en",
            "refId": "{refId}",
            "attributes": {
              "clientPackageName": "com.ahsan.verifyappsample",
              "clientType": "app",
              "fontColor": "#ffffff",
              "logoImage": "https://kr-cdn-gpp.mcsvc.samsung.com/mcp25/resource/2024/9/4/b940b7a2-0f55-42ce-8da7-025d50dbb6b7.png",
              "logoImage.darkUrl": "https://kr-cdn-gpp.mcsvc.samsung.com/mcp25/resource/2024/9/4/b940b7a2-0f55-42ce-8da7-025d50dbb6b7.png",
              "logoImage.lightUrl": "https://kr-cdn-gpp.mcsvc.samsung.com/mcp25/resource/2024/9/4/b940b7a2-0f55-42ce-8da7-025d50dbb6b7.png",
              "providerName": "Samsung Verification Sample"
            }
          }
        ]
      }
    }
""".trimIndent()
Step 2: Build the AppLink
The AppLink is a tokenized URL that is similar to the CData tokens used for Samsung Wallet cards. The Samsung Wallet RP SDK includes a function to generate the AppLink using the payload and the partner credentials (private key, public key, partner ID, card ID, certificate ID, etc.).
To build the AppLink, you can simply call the rpClientApis.buildAppLink() function with the required parameters:
val rpClientApis = RpClientApis(this)

val appLink = rpClientApis.buildAppLink(
    partnerId = PARTNER_ID,
    cardId = CARD_ID,
    payload = buildApp2AppPayload(),
    samsungPublicKey = SAMSUNG_CERTIFICATE,
    partnerPublicKey = PARTNER_CERTIFICATE,
    partnerPrivateKey = PARTNER_PRIVATE_KEY,
    partnerCertificateId = CERTIFICATE_ID,
    isStagingServer = true
)
Step 3: Build the Request Data
Finally, once the AppLink creation is complete, we can send the verification request using the RP SDK.
Before sending the request, we need to specify exactly which information we wish to retrieve. For this purpose, we need to create a JSON document following the ISO 18013-5 specification and specify the fields we wish to retrieve in the response. It is possible to request for the following fields in the request data under the "org.iso.18013.5.1" namespace:
- portrait
- family_name
- given_name
- document_number
- age_in_years
- resident_address
- birth_date
- issue_date
- expiry_date
- sex
- height
- weight_range
- weight
- eye_colour
- hair_colour
- organ_donor
- driving_privileges
- veteran
Additionally, it is also possible to request for the following 3 fields, under the "org.iso.18013.5.1.aamva" namespace:
- domestic_driving_privileges
- DHS_compliance
- EDL_credential
In our example, we only try to retrieve the following 4 fields: family_name, age_in_years, issue_date, and expiry_date. In the following code example, we build the request string accordingly:
val requestData = """
    {
      "docType": "org.iso.18013.5.1.mDL",
      "nameSpaces": {
        "org.iso.18013.5.1": {
          "family_name": true,
          "age_in_years": true,
          "issue_date": true,
          "expiry_date": true
        }
      }
    }
""".trimIndent()
Step 4: Create the OnResponseListener Class
When using the VWW RP SDK, it is necessary to create a listener class for both sending the request and for receiving and processing the response from the mDoc server.
For our example, let's create an empty placeholder OnResponseListener class which extends the RP SDK's OnResponseListener class.
class OnResponseListener(private val requestData: String)
: RpClientApis.OnResponseListener{
    override fun onGetMdocRequestData(deviceEngagementBytes: ByteArray): ByteArray? {
        TODO("Not yet implemented")
    }

    override fun onMdocResponse(encryptedResponseBytes: ByteArray) {
        TODO("Not yet implemented")
    }

    override fun onMdocResponseFailed(exception: Exception) {
        Log.e(TAG, "Response processing failed", exception)
    }
}
Initiating the Verification Request
To initiate the identity verification process, we need to establish a secure session and send a structured request to the Samsung Wallet application. We can use the previously created OnResponseListener class for this purpose.
Step 1: Define the onGetMdocRequestData() Function for Sending the Request Data
Inside the onGetMdocRequestData() function, we need to do 2 things for establishing a secure encrypted session:
- Generate an elliptic curve key pair
- Build session establishment bytes following the ISO-18013-5 specification.
Once the key pair is generated, we can use this key pair, the device engagement bytes, and the previously created request data for building the encrypted session establishment bytes. The device engagement bytes are provided automatically inside the onGetMdocRequestData() function by the RP client SDK.
private val secureRepository = SecureRepository()

override fun onGetMdocRequestData(deviceEngagementBytes: ByteArray): ByteArray? {
    val keyPair = secureRepository.generateEcKeyPair()
    val encryptedSessionEstablishmentBytes = secureRepository.buildSessionEstablishment(requestData, deviceEngagementBytes, keyPair)
    return encryptedSessionEstablishmentBytes!!
}
For further information regarding generating the key pair and building the session establishment bytes, check the provided sample code.
Step 2: Initiate a Verification Request with the AppLink
Once the onGetMdocRequestData() function is ready, we can use the request() function to initiate the verification request.
val sessionId = UUID.randomUUID().toString()
val WALLET_PACKAGE = "com.samsung.android.spay"

rpClientApis.request(
    WALLET_PACKAGE,
    sessionId,
    appLink,
    OnResponseListener(requestData)
)
Processing the Request Response
Once the mDoc request has been sent and processed successfully, the application should receive a ByteArray as response in the onMdocResponse() function inside the listener class. This ByteArray is an encrypted JSON object. Once decrypted, the response should look like the following:
{
  "documents": [
    {
      "issuerSigned": {
        "nameSpaces": {
          "org.iso.18013.5.1": [
            "pGhkaWdlc3RJRBkU-mZyYW5kb21UaGNkNGduZDl5Z2I1cTRjaDV4ZnpxZWxlbWVudElkZW50aWZpZXJrZXhwaXJ5X2RhdGVsZWxlbWVudFZhbHVlwHQyMDMxLTExLTIxVDA3OjAwOjAwWg",
            "pGhkaWdlc3RJRBknbWZyYW5kb21Udjg1NmsydzIzZzQ3OHk5cTQ0aHJxZWxlbWVudElkZW50aWZpZXJsYWdlX2luX3llYXJzbGVsZW1lbnRWYWx1ZRgr",
            "pGhkaWdlc3RJRBlvWWZyYW5kb21UbnRtdnJ5OXlucXcyZjY2bmp2NXRxZWxlbWVudElkZW50aWZpZXJqaXNzdWVfZGF0ZWxlbGVtZW50VmFsdWXAdDIwMjMtMTEtMDhUMDc6MDA6MDBa",
            "pGhkaWdlc3RJRBnXQWZyYW5kb21UOXJqd2NydjZ6cXpqZm1xajNkcnhxZWxlbWVudElkZW50aWZpZXJrZmFtaWx5X25hbWVsZWxlbWVudFZhbHVlZUFoc2Fu"
          ]
        },
        "issuerAuth": [
          "dCBa",
          {
            "33": "..."
          },
          "...",
          "..."
        ]
      },
      "deviceSigned": {…},
      "docType": "org.iso.18013.5.1.mDL"
    }
  ],
  "version": "1.0",
  "status": 0
}
The values inside the org.iso.18013.5.1 JSON Array are the information we requested, in the CBOR (Concise Binary Object Representation) format.
For example, if we decode the value: "pGhkaWdlc3RJRBlvWWZyYW5kb21UbnRtdnJ5OXlucXcyZjY2bmp2NXRxZWxlbWVudElkZW50aWZpZXJqaXNzdWVfZGF0ZWxlbGVtZW50VmFsdWXAdDIwMjMtMTEtMDhUMDc6MDA6MDBa", we find that this CBOR object contains the issue_date field and its value is 2023-11-08T07:00:00.000Z. Similarly, every value provided in the array is a CBOR object that can be decoded using CBOR decoders to find a key-value pair containing the requested information.
We can now receive the mDoc response in the onMdocResponse() function and decode it to retrieve the final requested values:
override fun onMdocResponse(encryptedResponseBytes: ByteArray) {
    val plainResponse = secureRepository.decryptMdocResponse(encryptedResponseBytes)
    Log.i(TAG, "plainResponse=${plainResponse?.toPrettyJson()}")
    val mDocContent = Mdoc18013Utils.parseMdocResponse(plainResponse!!)
    mDocContent.forEach { (key, value) ->
        Log.i(TAG, "$key: $value")
    }
}
Here, secureRepository.decryptMdocResponse() performs the decryption operation and converts the encrypted bytes into a plain JSON response. Afterwards, the Mdoc18013Utils.parseMdocResponse() function takes the plain response and decodes each CBOR-encoded element contained in the org.iso.18013.5.1 array and returns these values in a simplified dictionary of key-value pairs. If you wish to learn more about these functions, you can check out the provided sample code.
With this step, the sample application's implementation of Verify with Wallet is complete. You can now build and run the application. In the sample application, once the user clicks the "Verify with Samsung Wallet" button, the VWW procedure is initiated. Once the user confirms that they wish to share their information, the application will receive the requested information about the user.
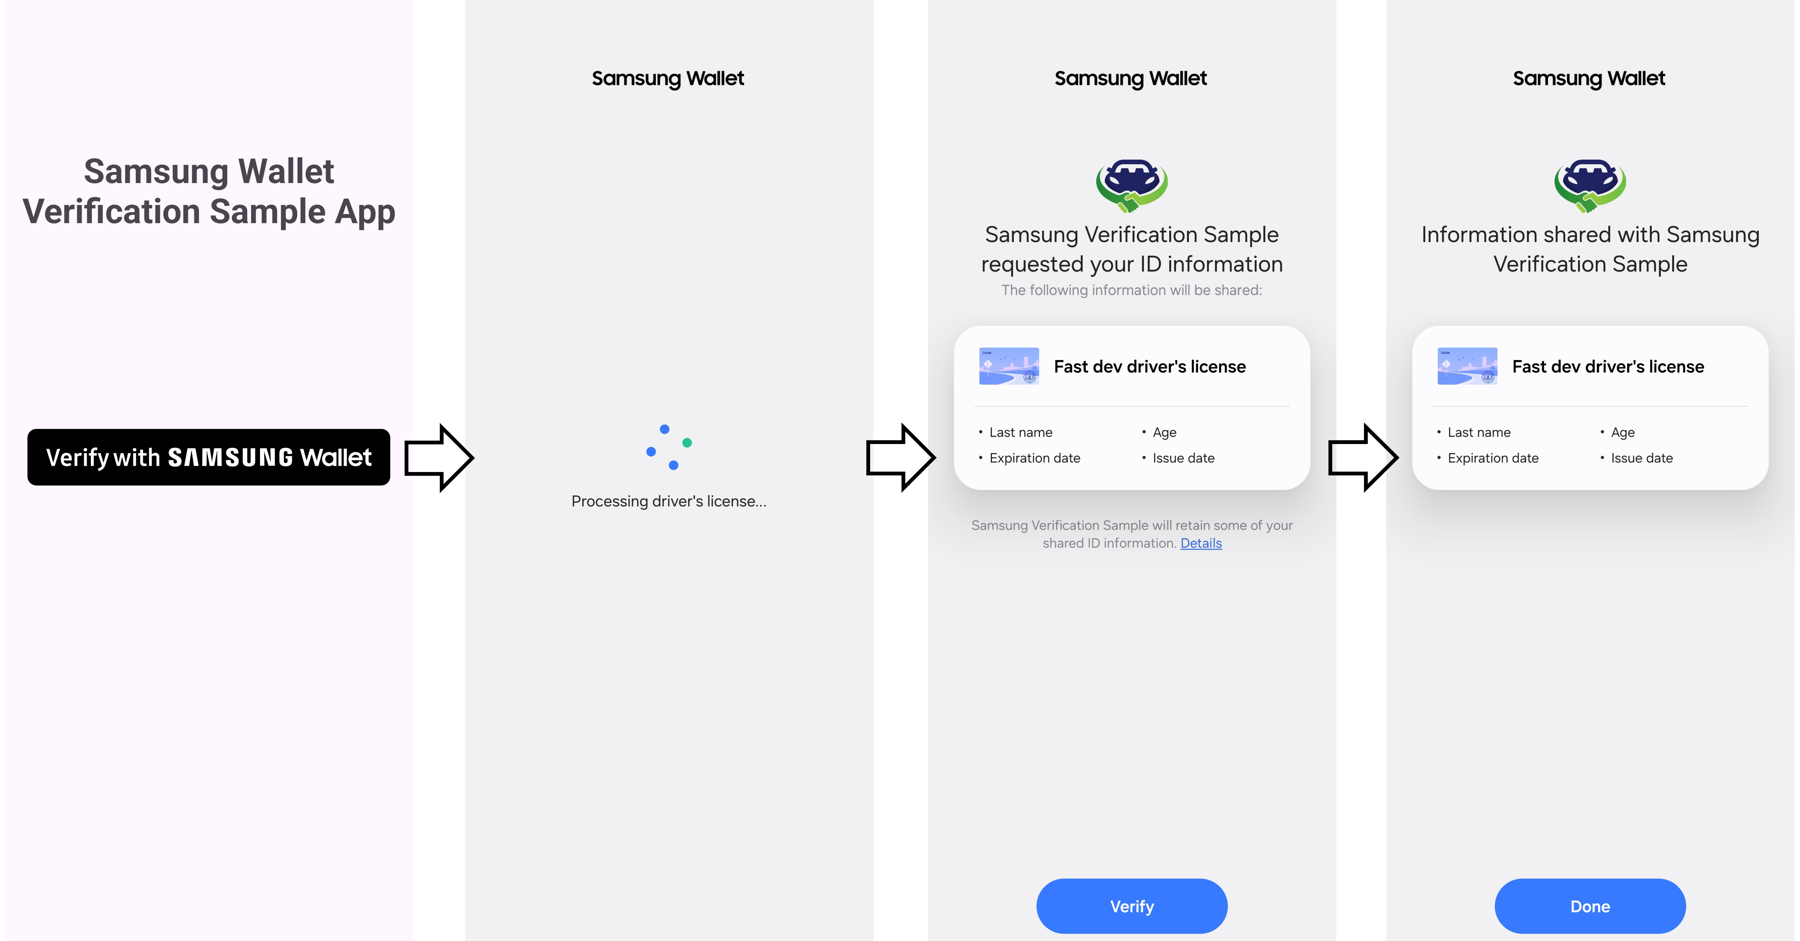
Figure 2: Complete the verification process using VWW
Conclusion
In this article, we have explored how you can integrate the Verify with Wallet RP SDK directly into your application and use it to verify the user's identity. Feel free to integrate the RP SDK in your own application and test the Verify with Samsung Wallet process as well. If you have any further queries regarding this process, feel free to reach out to us through the Samsung Developers Forum.
Related Resources
- ISO/IEC 18013-5:2021 - Personal identification — ISO-compliant driving licence — Part 5: Mobile driving licence (mDL) application
- Mobile Driver License - American Association of Motor Vehicle Administrators - AAMVA
- RP SDK download link
- Verify with Wallet API Guidelines
- Relying Party Card Specifications
- Sample Code Download Link


