Building a Watch Face with Watch Face Format
Imrul Anwar
Engineer, Samsung Developer Program
If you are looking for a visual approach to designing watch faces, Watch Face Studio is a great option. It offers an easy-to-use interface and doesn’t require any coding skills.
However, if you want to have more control, Watch Face Format is the way to go. It lets you define your watch face using XML. The declarative structure is designed specifically for Wear OS, giving you precise control over appearance and behavior. Watch faces built this way are easier to maintain and require fewer updates than those using the older Jetpack Watch Face libraries, since the platform handles key rendering and performance improvements automatically. This blog shows how to convert a Wear OS application project to a watch face that uses Watch Face Format in Android Studio.
Let’s walk through a simple project. You start by setting up the environment. Next, you set up the project and build the watch face using Watch Face Format. Then, you move on to customizing the watch face, defining its appearance, layout and components using the declarative structure.
Once the design is complete, you validate the memory footprint to ensure it stays within platform limits and check the XML structure to catch any potential issues.
Project Setup
- Create a new Empty Wear App. Go to File -> New -> New Project -> Wear OS -> No Activity from Android Studio. Make Sure Minimum SDK is 34 or higher since Watch Face Format version 2 is used.
- In Android Studio, switch the file structure to Project view by selecting Project from the dropdown menu at the top of the Project Tool Window.

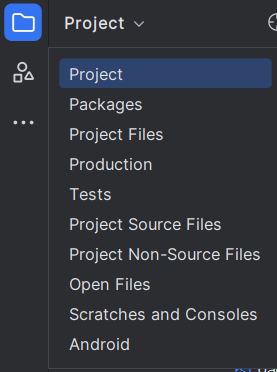
Figure 1: Project view
- Go to the AndroidManifest.xml file, remove the existing attributes from the <application> tag and add the following attributes:
android:label="@string/app_name" android:hasCode="false" tools:ignore="MissingApplicationIcon" - Click on app_name and press Shift+F6 to refactor it. Give it a more appropriate name, such as watch_face_name.
android:label="@string/watch_face_name" - Add the following attribute to the <manifest> tag because the tools attribute is being used in the <application> tag:
xmlns:tools="http://schemas.android.com/tools" - Inside the <application> tag, add the <property> and <meta-data> tags shown below. The <property> tag here specifies the Watch Face Format version:
<property android:name="com.google.wear.watchface.format.version" android:value="2" /> <meta-data android:name="com.google.android.wearable.standalone" android:value="true" /> - Optionally, you can add the following <property> tag to identify the publisher:
<property android:name="com.google.wear.watchface.format.publisher" android:value="publisher_name" /> - Your AndroidManifest.xml should now look like this:

Figure 2: AndroidManifest.xml file
- Right click on the res directory and add directories named xml, drawable, font and raw.
- Download the fonts and images used in the sample project.
- Add the downloaded preview and background images in the directory app\src\main\res\drawable.

Figure 3: background and preview image path
NoteThe preview image shows in the watch face catalog until it's added to favorites. It's best to use an image that closely matches the actual watch face. - Go to the directory app\src\main\res\xml and add a new file named watch_face_info.xml.
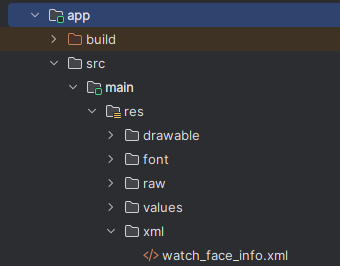
Figure 4: watch_face_info.xml file path
- Add the <WatchFaceInfo> tag to the empty file:
<WatchFaceInfo>
    <Preview value="@drawable/preview" />
    <MultipleInstancesAllowed value="false" />
    <Editable value="false" />
</WatchFaceInfo>
If you set MultipleInstancesAllowed to true, the watch face allows multiple instances on favorites with different styles for more personalized use. If the watch face supports style customization, set Editable to true. Since the sample project is not customizable, the value should be false.
- Place the downloaded font files in the app\src\main\res\font directory.
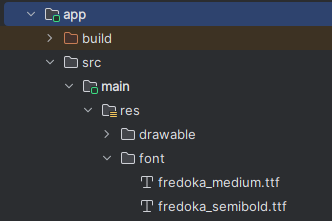
Figure 5: Fonts path
- Optionally, you may remove the directories listed below since we do not need any application icon and the java folder is empty:
- app\src\main\java
- app\src\main\res\mipmap-hdpi
- app\src\main\res\mipmap-mdpi
- app\src\main\res\mipmap-xhdpi
- app\src\main\res\mipmap-xxhdpi
- app\src\main\res\mipmap-xxxhdpi
- Go to the app\src\main\res\raw directory and add a new file named watchface.xml. This XML file contains the layout for the watch face.

Figure 6: watchface.xml file path
- Add the following <WatchFace> tag in the newly created file:
<WatchFace width="450" height="450" clipShape="CIRCLE"> <Metadata key="CLOCK_TYPE" value="DIGITAL"/> <Scene backgroundColor="#ff000000"> <!-- Content to be rendered --> </Scene> </WatchFace> - Open the application level build.gradle file.
- From the plugins block, remove the following:
alias(libs.plugins.kotlin.android) - From the android block, remove the compileOptions and kotlinOptions blocks because we are not using Java/Kotlin.
- From the root, remove the dependencies block since the watch face does not require any AndroidX Components or external libraries.
- Inside the buildTypes block, add this debug block and replace the release block with the following one:
debug {
    isMinifyEnabled = true
}
release {
    // TODO:Add your signingConfig here to build release build
    isMinifyEnabled = true
    // Ensure shrink resources is false, to avoid potential for them
    // being removed.
    isShrinkResources = false

    signingConfig = signingConfigs.getByName("debug")
}
Your application level build.gradle file should now look like this:

Figure 7: Application level build.gradle file
- Now open the project level build.gradle file.
- From the plugins block, remove the following and sync the project.
alias(libs.plugins.kotlin.android) apply falseNow the project is set up.
Building the Watch Face
- First, add a background image inside the <Scene> tag in the watchface.xml file. The background image is not visible in Ambient mode:
<PartImage x="0" y="0" width="450" height="450" name="Background" alpha="255"> <Variant mode="AMBIENT" target="alpha" value="0"/> <Image resource="background"/> </PartImage> - Add a <DigitalClock> tag below the <PartImage> tag:
<DigitalClock x="36" y="173" width="377" height="85" alpha="255">
    <TimeText x="0" y="0" width="377" height="85" format="hh:mm:ss" hourFormat="SYNC_TO_DEVICE" align="CENTER" alpha="255">
        <Variant target="alpha" value="0" mode="AMBIENT"/>
        <Font family="fredoka_semibold" size="100" weight="NORMAL" slant="NORMAL" color="#ff4e4b8f"/>
    </TimeText>
    <TimeText x="0" y="0" width="377" height="85" format="hh:mm" hourFormat="SYNC_TO_DEVICE" align="CENTER" alpha="0">
        <Variant target="alpha" value="255" mode="AMBIENT"/>
        <Font family="fredoka_semibold" size="100" weight="NORMAL" slant="NORMAL" color="#ff4e4b8f"/>
    </TimeText>
</DigitalClock>
Two <TimeText> tags are used. One shows the full time with seconds in Active mode, and the other shows only hours and minutes in Ambient mode. This helps save battery life when the watch is in Ambient mode.
- Add a <Text> tag to show the Date using Tag Expressions:
<PartText x="48" y="264" width="355" height="35" name="Date" alpha="255"> <Text align="CENTER" ellipsis="FALSE"> <Font family="fredoka_medium" size="35" weight="NORMAL" slant="NORMAL" color="#ff4e4b8f"> <Template>%s, %s %s <Parameter expression="[DAY_OF_WEEK_S]"/> <Parameter expression="[MONTH_S]"/> <Parameter expression="[DAY]"/> </Template> </Font> </Text> </PartText> - Here is how the date format is defined:
- %s, %s %s is the structure (for example, “Mon, Jun 25”)
- [DAY_OF_WEEK_S] -> abbreviated day (for example, "Mon")
- [MONTH_S] -> abbreviated month (for example, "Jun")
- [DAY] -> numeric day (for example, "25")
Set up Device and Terminal
If you are not using an emulator, make sure your watch is connected to your computer using Wireless Debugging. For full setup instructions, refer to this blog.
To run the adb command directly from your terminal without navigating to its directory each time, do the following:
On Windows:
Add the path to your adb.exe file to your system’s PATH environment variable. By default, this path is usually:
C:\Users\<your_username>\AppData\Local\Android\Sdk\platform-tools
Execute the following command (replace <adb_path> with the actual path):
setx PATH "%PATH%;<adb_path>"
On macOS (zsh):
Open your .zshrc file:
nano ~/.zshrc
Add the following path in the file:
export PATH="$PATH:$HOME/Library/Android/sdk/platform-tools"
Save the file and restart the terminal.
Run the Project
- To generate and install a debug build APK, open the Terminal tool window and run the following command:
gradlew installReleaseNoteTo prepare your APK for distribution, make sure to build a signed release version of your application. Unsigned or debug builds are not suitable for publishing. - To set the watch face directly from the command line, you can execute the following command:
adb shell am broadcast -a com.google.android.wearable.app.DEBUG_SURFACE --es operation set-watchface --es watchFaceId <your_package_name >To find the package name, look for applicationId in your application level build.gradle file.
Alternatively, you can apply the watch face from the watch or phone manually.
Memory Footprint and XML Validator
Watch Face Format has memory constraints depending on the mode. In ambient mode, you are limited to 10 MB of memory. In interactive mode, the memory limit is set at 100 MB. For more details, check out the Wear OS app quality guidelines.
- In the root directory, create a new directory named libs.
- Download memory-footprint.jar and wff-validator.jar from here and put them in the libs directory.
- Generate the app-debug.apk file before executing the next command.
- To evaluate the memory footprint, execute the following command in the terminal:
java -jar libs\memory-footprint.jar --watch-face app\build\outputs\apk\debug\app-debug.apk --ambient-limit-mb 10 --active-limit-mb 100Here you have set the ambient and active memory limit for the watch face and tested against it.
To know more about each option, you can execute the following command:
java -jar libs\memory-footprint.jar --help - When the memory footprint test has been passed, you see a message like this:

Figure 8: Memory Footprint result
- To validate the watchface.xml file, execute the following command:
java -jar libs\wff-validator.jar 2 app\src\main\res\raw\watchface.xmlThis command validates the watchface.xml file against Watch Face Format version 2.
- If the watchface.xml file is valid, you see a message like this:

Figure 9: WFF validation result
Sample Project for Test
You can download the sample project using the link below to test it out on your device.
Here is a preview of the project you have just created:
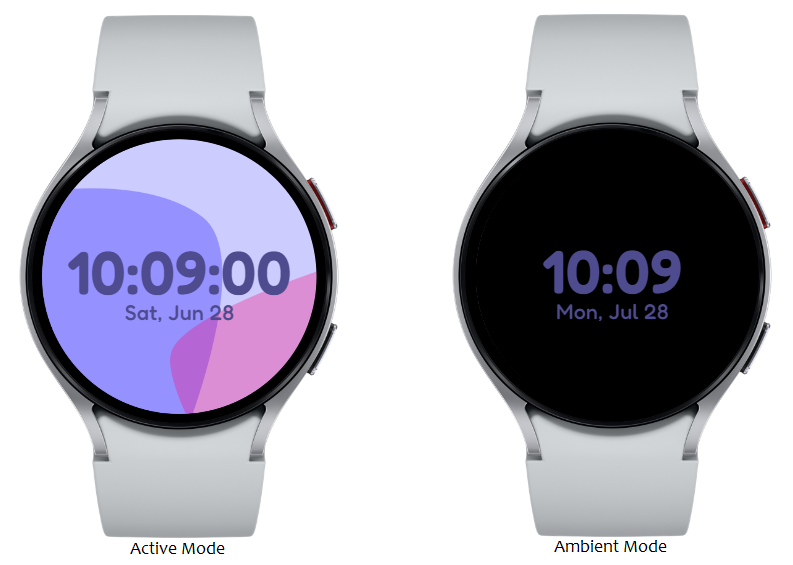
Figure 10: Watch Face Preview on a Galaxy Watch
Conclusion
If you are someone who prefers hands-on control and customization, the Watch Face Format is a solid choice to create a watch face. It is ideal for developers who enjoy building things manually and want to fine-tune their watch face experience from the ground up. For a more user-friendly option, you might want to explore Watch Face Studio.
If you have questions or need help with the information presented in this blog, you can share your queries on the Samsung Developers Forum. You can also contact us directly through the Samsung Developer Support Portal.


