Measure blood oxygen and heart rate on Galaxy Watch
Objective
Create a health app for Galaxy Watch, operating on Wear OS powered by Samsung, utilizing Samsung Health Sensor SDK to trigger and obtain results of simultaneous blood oxygen (SpO2) and heart rate measurements.
Overview
Samsung Health Sensor SDK provides means of accessing and tracking health information contained in the health data storage. Its tracking service gives raw and processed sensor data such as accelerometer and body composition data sent by the Samsung BioActive sensor. The latest BioActive sensor of Galaxy Watch runs powerful health sensors such as photoplethysmogram (PPG), electrocardiogram (ECG), bioelectrical impedance analysis (BIA), sweat loss, and SpO2.

See Samsung Health Sensor SDK descriptions for detailed information.
Set up your environment
You will need the following:
- Galaxy Watch4 or newer
- Android Studio (latest version recommended)
- Java SE Development Kit (JDK) 11 or later
Sample Code
Here is a sample code for you to start coding in this Code Lab. Download it and start your learning experience!
Measuring Blood Oxygen and Heart Rate Sample Code (190.1 KB)
Connect your Galaxy Watch to Wi-Fi
-
Go to Settings > Connection > Wi-Fi and make sure that Wi-Fi is enabled.
-
From the list of available Wi-Fi networks, choose and connect to the same one as your PC.
Turn on developer mode and adjust its settings
-
On your watch, go to Settings > About watch > Software and tap on Software version 5 times.

-
Upon successful activation of developer mode, a toast message displays as on the image below.

-
Afterwards, Developer options is going to be visible under Settings.

-
Tap Developer options and enable the following options:
-
ADB debugging

-
In Developer options find Wireless debugging

-
Turn on Wireless debugging

-
Check Always allow on this network and tap Allow

-
Go back to Developer options and click Turn off automatic Wi-Fi

NoteThere may be differences in settings depending on your One UI version.
Connect your Galaxy Watch to Android Studio
-
Go to Settings > Developer options > Wireless debugging and choose Pair new device.

-
Take note of the Wi-Fi pairing code, IP address & Port.

-
In Android Studio, go to Terminal and type:
adb pair <IP address>:<port> <Wi-Fi pairing code>
-
When prompted, tap Always allow from this computer to allow debugging.

-
After successfully pairing, type:
adb connect <IP address of your watch>:<port>
Upon successful connection, you can see the following message in Android Studio's terminal:
connected to <IP address of your watch>
Now, you can run the app directly on your watch.
Turn on developer mode for Health Platform
-
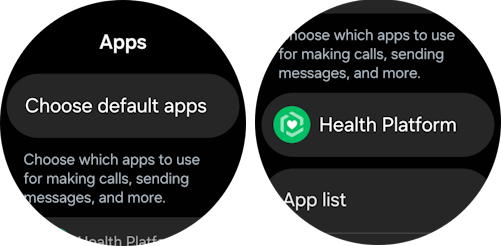
Swipe down from the top of the screen to open the Quick panel, then tap the settings icon.
-
Scroll down and tap Apps.
-
Select Health Platform.
-
Quickly tap Health Platform for about 10 times. Developer mode is enabled when [Dev mode] appears below Health Platform.
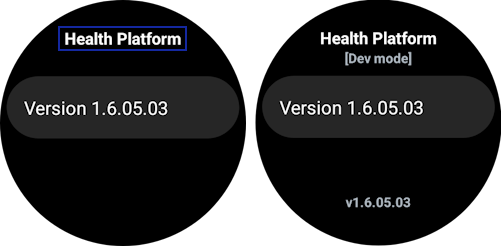
NoteYou can disable developer mode by quickly tapping the Health Platform until [Dev mode] disappears.
Start your project
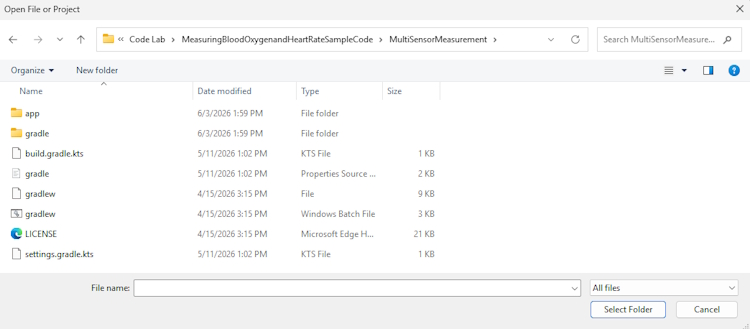
In Android Studio, click Open to open existing project.
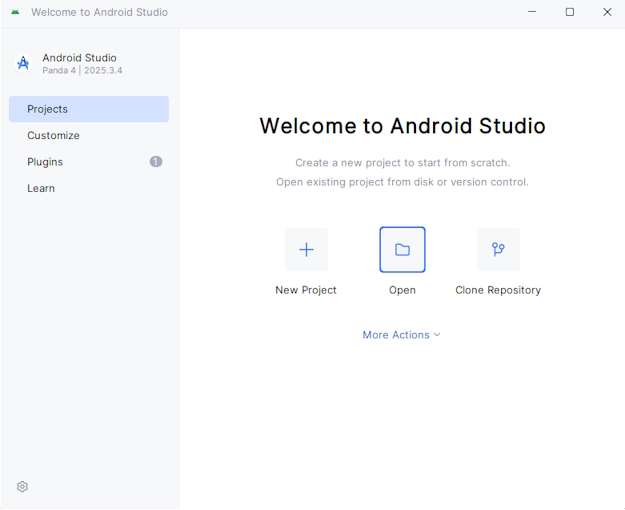
Locate the downloaded Android project from the directory and click Select Folder.
Establish service connection and check capabilities
For the device to track data with the Samsung Health Sensor SDK, it must connect to the service by HealthTrackingService API. After establishing a connection, verify if the required tracker type is available. To check this, get the list of available tracker types and verify that the tracker is on the list. In this Code Lab, you're going to utilize blood oxygen and heart rate trackers. The HealthTrackingService API usage is in the table below.
Initialize multiple trackers
Before the measurement starts, initialize the SpO2 tracker by obtaining the proper health tracker object.
In the TrackingManager.kt file, navigate to the initSpO2() method and create a blood oxygen HealthTracker instance.
- Retrieve the
HealthTracker object using the HealthTrackingService.getHealthTracker() API.
- Use the
HealthTrackerType.SPO2_ON_DEMAND type as parameter.
HealthTrackingService
HealthTrackingService initiates a connection to Samsung's health tracking service and provides a HealthTracker instance to track a HealthTrackerType. |
public HealthTracker |
getHealthTracker(HealthTrackerType healthTrackerType)
Provide a HealthTracker instance for the given HealthTrackerType. |
/*******************************************************************************************
 * [Practice 1] Create a SpO2 HealthTracker object:
 * - Retrieve the HealthTracker object.
 * - Use the provided variable 'spO2Tracker'.
 -------------------------------------------------------------------------------------------
 *
 * (Hint) Replace TODO 1 with the code as follows:
 * - Retrieve the HealthTracker object using healthTrackingService.getHealthTracker().
 * - Use the HealthTrackerType.SPO2_ON_DEMAND type as a parameter.
 * - Assign it to the 'spO2Tracker' variable.
 ******************************************************************************************/
fun initSpO2(): HealthTracker? {
    var spO2Tracker: HealthTracker? = null

    //TODO 1

    return spO2Tracker
}
Next, in the initHeartRate() function, create a heart rate HealthTracker instance.
- Retrieve the
HealthTracker object using the HealthTrackingService.getHealthTracker() API.
- Use the
HealthTrackerType.HEART_RATE_CONTINUOUS type as a parameter.
/*******************************************************************************************
 * [Practice 2] Create a heart rate HealthTracker object:
 * - Retrieve the HealthTracker object.
 * - Use the provided variable 'heartRateTracker'.
 -------------------------------------------------------------------------------------------
 *
 * (Hint) Replace TODO 2 with the code as follows:
 * - Retrieve the HealthTracker object using healthTrackingService.getHealthTracker().
 * - Use the HealthTrackerType.HEART_RATE_CONTINUOUS type as a parameter.
 * - Assign it to the 'heartRateTracker' variable.
 ******************************************************************************************/
fun initHeartRate(): HealthTracker? {
    var heartRateTracker: HealthTracker? = null

    //TODO 2

    return heartRateTracker
}
Start and stop trackers
For the client app to start obtaining the data through the SDK, set a listener method on HealthTracker. This method is called every time there is new data. After the measurement completes, the listener has to be disconnected.
To start measurement in the TrackingManager.kt file, navigate to the startTracker() function and set the TrackerEventListener as the listener of the HealthTracker object.
- Set the event listener on the
HealthTracker object using HealthTracker.setEventListener().
- Use the
HealthTracker.TrackerEventListener object instance as a parameter.
HealthTracker
HealthTracker enables an application to set an event listener and get tracking data for a specific HealthTrackerType. |
public void |
setEventListener(HealthTracker.TrackerEventListener listener)
Set an event listener to this HealthTracker instance. |
/*******************************************************************************************
 * [Practice 3] Start tracking by setting an event listener on the HealthTracker object.
 -------------------------------------------------------------------------------------------
 *
 * (Hint) Replace TODO 3 with the code as follows:
 * - Use the provided variables 'healthTracker' and 'trackerEventListener'.
 * - Set the event listener on the HealthTracker object using healthTracker.setEventListener().
 * - Use the 'trackerEventListener' object as a parameter.
 ******************************************************************************************/
fun startTracker(
    healthTracker: HealthTracker,
    trackerEventListener: TrackerEventListener
) {
    Log.i(LogTags.APP_TAG, "startTracker called")
    Log.d(LogTags.APP_TAG, "healthTracker: $healthTracker")
    Log.d(LogTags.APP_TAG, "trackerEventListener: $trackerEventListener")

    //TODO 3
}
To stop measurement, unset the TrackerEventListener from the HealthTracker object in the stopTracker() function.
- Unset the event listener on the
HealthTracker object using the HealthTracking.unsetEventListener function.
HealthTracker
HealthTracker enables an application to set an event listener and receive the Galaxy Watch's sensor data for a specific HealthTrackerType. |
public void |
unsetEventListener()
Stop the registered event listener for this HealthTracker instance. |
/*******************************************************************************************
 * [Practice 4] Stop tracking by removing the event listener from the HealthTracker object.
 -------------------------------------------------------------------------------------------
 *
 * (Hint) Replace TODO 4 with the code as follows:
 * - Use the provided variable 'healthTracker'.
 * - Unset the event listener on the HealthTracker object using healthTracker.unsetEventListener().
 ******************************************************************************************/
fun stopTracker(healthTracker: HealthTracker) {
    Log.i(LogTags.APP_TAG, "stopTracker called")
    Log.d(LogTags.APP_TAG, "healthTracker: $healthTracker")

    //TODO 4
}
Process obtained data
The response from the platform is asynchronous with the results you want to obtain. Follow the steps below to get blood oxygen and heart rate data.
Navigate to the readSpO2() function and retrieve SpO2 data from the DataPoint:
- Retrieve the blood oxygen status using the
DataPoint.getValue() function with ValueKey.SpO2Set.STATUS as a parameter.
- Retrieve the blood oxygen value using the
DataPoint.getValue() function with ValueKey.SpO2Set.SPO2 as a parameter.
DataPoint
DataPoint provides a map of ValueKey and value with a timestamp. |
public <T>T |
getValue(ValueKey<T> type)
Get a data value for the given key. |
/*******************************************************************************************
 * [Practice 5] Read values from the DataPoint object:
 * - Retrieve the SpO2 status.
 * - Retrieve the SpO2 value.
 -------------------------------------------------------------------------------------------
 *
 * (Hint) Replace TODO 5 with the code as follows:
 * - Set the provided local variable 'status' using dataPoint.getValue(ValueKey.SpO2Set.STATUS).
 * - Set the provided local variable 'spo2Value' using dataPoint.getValue(ValueKey.SpO2Set.SPO2).
 ******************************************************************************************/
fun readSpO2(dataPoint: DataPoint): SpO2 {
    var status: Int? = null
    var spO2Value: Int? = null

    //TODO 5

    return SpO2(status, spO2Value)
}
Next, navigate to the readHeartRate() function and read heart rate data from the DataPoint:
- Retrieve the heart rate status using the
DataPoint.getValue() function with ValueKey.HeartRateSet.HEART_RATE_STATUS as a parameter.
- Retrieve the heart rate value using the
DataPoint.getValue() function with ValueKey.HeartRateSet.HEART_RATE as a parameter.
- Retrieve the heart rate IBI value list using the
DataPoint.getValue() function with ValueKey.HeartRateSet.IBI_LIST as a parameter.
- Retrieve the IBI status list using the
DataPoint.getValue() function with ValueKey.HeartRateSet.IBI_STATUS_LIST as a parameter.
/*******************************************************************************************
 * [Practice 6] Read values from the DataPoint object:
 * - Retrieve the heart rate status.
 * - Retrieve the heart rate value.
 * - Retrieve the list of IBI for the heart rate data.
 * - Retrieve the list of IBI statuses for the heart rate data.
 -------------------------------------------------------------------------------------------
 *
 * (Hint) Replace TODO 6 with the code as follows:
 * - Set the provided local variable 'heartRateStatus' using dataPoint.getValue(ValueKey.HeartRateSet.HEART_RATE_STATUS).
 * - Set the provided local variable 'heartRate' using dataPoint.getValue(ValueKey.HeartRateSet.HEART_RATE).
 * - Set the provided local variable 'ibiList' using dataPoint.getValue(ValueKey.HeartRateSet.IBI_LIST).
 * - Set the provided local variable 'ibiStatusList' using dataPoint.getValue(ValueKey.HeartRateSet.IBI_STATUS_LIST).
 ******************************************************************************************/
fun readHeartRate(dataPoint: DataPoint): HeartRate {
    var heartRateStatus: Int? = null
    var heartRate: Int? = null
    var ibiList: List<Int>? = null
    var ibiStatusList: List<Int>? = null

    //TODO 6


    Log.i(
        LogTags.APP_TAG,
        "Heart rate: $heartRate, hr status: $heartRateStatus, ibi: $ibiList, ibi status: $ibiStatusList"
    )

    return HeartRate(heartRate, heartRateStatus, ibiList, ibiStatusList)
}
Run unit tests
For your convenience, you can find an additional Unit Tests package. This lets you verify your code changes even without using a physical watch. See instructions below on how to run unit tests:
- Right-click on com.samsung.health.sensorsdksample.multisensormeasurement(test) and execute Run 'Tests in 'com.samsung.health.sensorsdksample.multisensormeasurement' command.
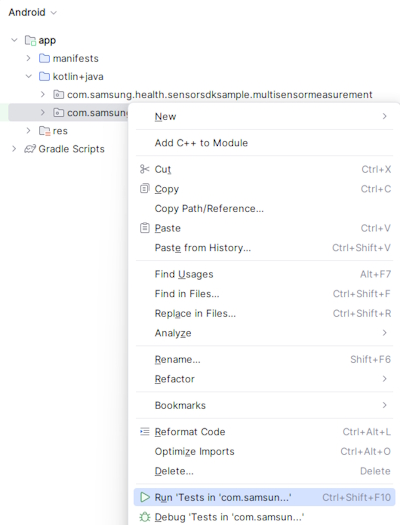
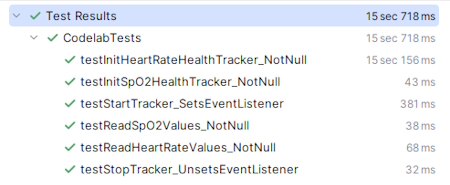
- If you completed all the tasks correctly, you can see that all the unit tests passed successfully.
Run the app
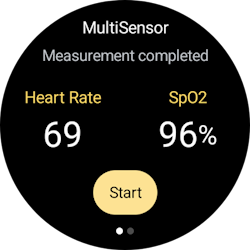
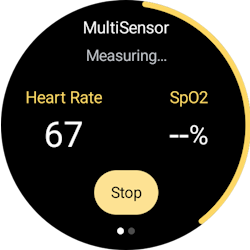
After building the APK, you can run the application on a connected device to see blood oxygen and heart rate values.
- Right after the app is started, it requests for user permission. Allow the app to receive data from heart rate and blood oxygen sensors.

- Afterwards, it shows the application's main screen and automatically display the heart rate. To get the blood oxygen (SpO2) value, tap on the Start button. To stop the measurement, tap on the Stop button.

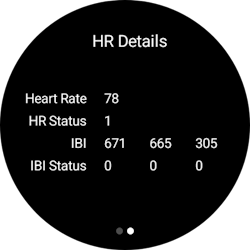
- Swipe right to view details of heart rate data.
You're done!
Congratulations! You have successfully achieved the goal of this Code Lab. Now, you can create a health app that measures blood oxygen and heart rate by yourself! If you're having trouble, you may download this file:
Measuring Blood Oxygen and Heart Rate Complete Code (189.6 KB)
To learn more, explore Samsung Health Sensor SDK.