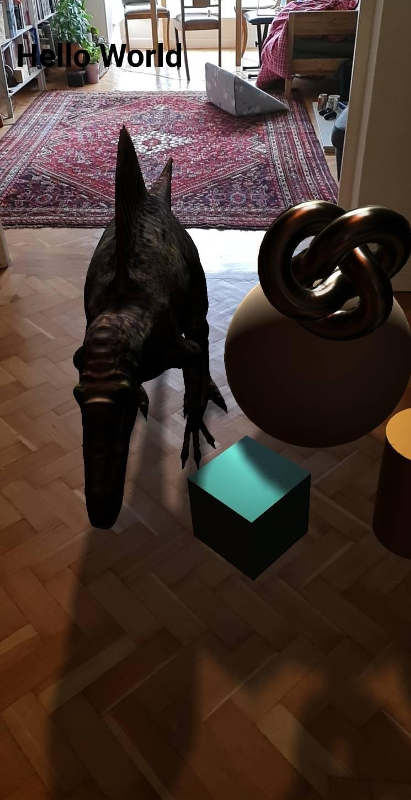
Use new Augmented Reality features with just a few lines of code with WebXR and AFrame!
Ada Rose Cannon
Web Developer Advocate
These 4 new features are easy to use and will greatly improve your AR experience
AFrame has had the ability to work in AR for a long time but it was pretty difficult to do it well requiring developers to interface with WebXR directly. Recent upgrades to AFrame make it easier provide new components so you can do high quality AR on the Web easier than ever before.
To get started quickly remix the example the below, for more information about how the different pieces work carry on reading:
The upgrades to AFrame support Augmented Reality features which are new to the web. Documentation for these is being added to MDN at the moment by the Open Web Docs team, if you can’t find the API documentation yet it should be coming soon. These four features are:
Lighting Estimation
The WebXR Lighting Estimation API enables your virtual lights to emulate real lights and for reflective surfaces to reflect the real world. (Read more on MDN)
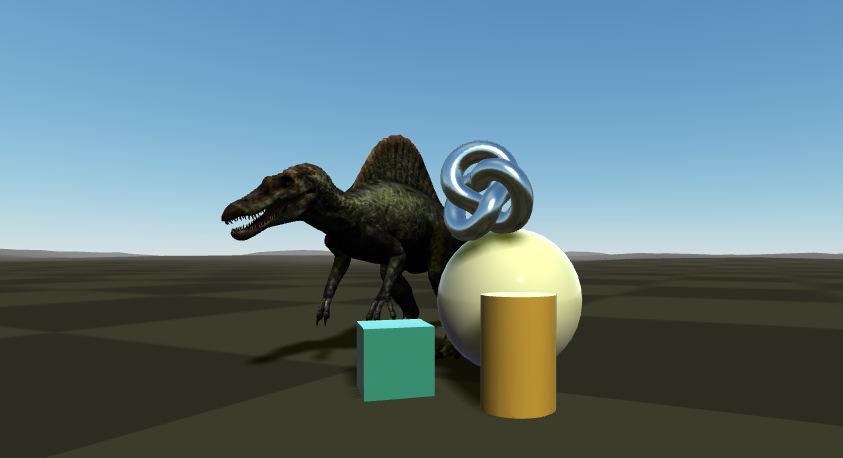
The AFrame background component provides the reflectivity for 3D models both in VR and AR. In VR it generates the reflective map using the virtual scene for AR it uses the lighting esitmation API.
To use it add background to your <a-scene> element and your scene will immediately get an upgrade in how the 3D models look. If your scene uses shadows then they will also act as if they come from the same direction as the light source.
Hit Test
The WebXR Hit Test API can work out where the real world intersects with the virtual world. It does this by firing a ray in virtual space and telling you where that ray hits the real world letting you use that information in your application usually to place an object at that location.
AFrame now has the ar-hit-test component. You tell this component what object it should move and when the user interacts with your AR scene it will position the object there.
Use it by adding ar-hit-test="target:#some-element" to your <a-scene> tag. It also provides events allowing you to report it’s progress or turn it off once the user has placed an object.
sceneEl.addEventListener('enter-vr', function () {
  if (this.is('ar-mode')) {
    message.textContent = '';

    this.addEventListener('ar-hit-test-start', function () {
      message.innerHTML = `Scanning environment, finding surface.`
    }, { once: true });

    this.addEventListener('ar-hit-test-achieved', function () {
      message.innerHTML = `Select the location to place the furniture. By tapping on the screen or selecting with your controller.`
    }, { once: true });

    this.addEventListener('ar-hit-test-select', function () {
      message.textContent = 'Object placed!';
    }, { once: true });
  }
});
Anchors
The WebXR Anchors API is a feature to improve tracking. You can place an “anchor” in the real world and the AR system will try to keep that anchor in place letting you know when it needs to be moved.
AFrame handles this for you automatically! If you place an object using the ar-hit-test component a WebXR Anchor will be automatically generated and the object will be kept in place in the real world ensuring your objects stay in place even as the AR hardware gains a better understanding of the environment.
You don’t need to make any code changes to take advantage of this you get it for free.
DOM Overlay
AFrame has had DOM Overlay support for a while. Through the WebXR object but now it is simpler than ever to use as AFrame now provides default styling for it. To use it add an element after </a-scene> such as <div id=”overlay”>and set webxr="overlayElement:#overlay" on <a-scene> .
Now when the user enters AR this element will be displayed over your entire scene so you can add display information such as titles or interactive elements such as buttons and links.
When the user taps on the HTML elements they will receive events but in addition the AFrame scene will also receive a select event. This will trigger things like the hit-testing component.
This is unwanted behaviour when the user is interacting with buttons, text inputs, sliders or scrolling elements. You can disable this behaviour by cancelling the XR select event using the following code:
myButton.addEventListener('beforexrselect', e => {
  e.preventDefault();
});
Get started now!
Use the link below to remix you own version which you can build on to make your own augmented reality experiences.
Glitch — Remix AR-Starter-Kit
Combining automated deployment, instant hosting & collaborative editing, Glitch gets you straight to coding so you can… glitch.com
An example project
To see a more fully fledged AR project check out the source code for my RollAR-Coaster, which uses 3D models to let the user build a Roller Coaster in their own home!
Demo:
RollAR Coaster
An augmeted reality roller coaster you can design yourself in your own home. ada.is


