Integration of Samsung IAP Services in Android Apps
Jakia Sultana
Engineer, Samsung Developer Program
Selling digital content is a popular business all over the world. If you are interested in selling your digital items in the Samsung ecosystem, then you need to learn about the Samsung In-App Purchase (IAP) SDK. You can implement Samsung IAP in your Android, Unity, and Unreal Applications.
Since server to server communication is more secure and reliable, payment transaction should be verified from the IAP server. This is the second of two blogs on this topic. In the first part, we discussed how to integrate Samsung’s IAP server API into your app’s server. In this blog, we will learn how to communicate with your server through an Android app.
Please go through the documentation of Samsung IAP SDK to integrate Samsung IAP SDK in your app. Then build your own app server for server verification which is covered in the first part of this blog. To know about server API, read Samsung IAP Server API.
Get Started
Let’s learn through a simple Android game. This game has an item which can only be used for a certain period of time. So, it is a subscription type item. If a user buys this item, then the item will be available after purchase verification.
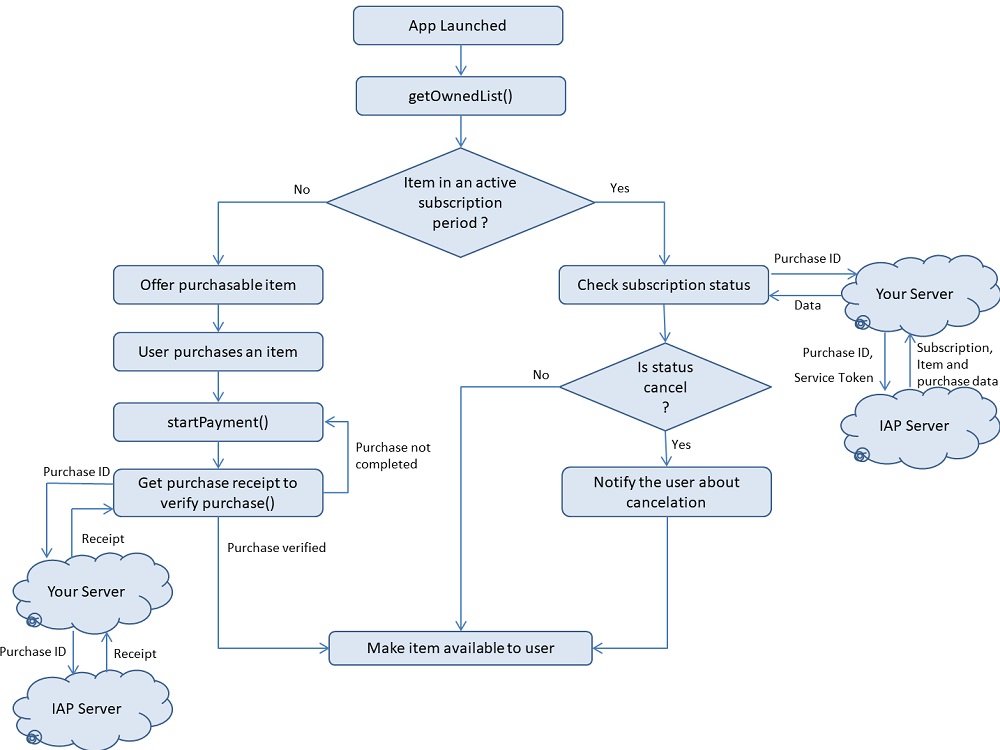
When the app is launched, the app checks if this item is already subscribed or not. There can be one of two results:
- The item is not subscribed, then the app offers to subscribe this item.
- The item is subscribed then the app gets the current status of this subscription through
getSubscriptionStatusServer API. The subscription status can be active or cancel. Subscription can be canceled for various reasons. If the IAP server returns the subscription status as ‘cancel’ then the app notifies it to the user.
Implementation of these two cases are discussed in the next sections.
Implement Android IAP
At first, integrate Samsung IAP SDK in your Android app and register it in the seller office to test In-App items. When the app is launched, call getOwnedList() API. It returns a list of in-app items that the app user currently has from previous purchases. If the item is not in this list, then the app offers to purchase the item.
To purchase any item, call startPayment(). This API notifies the end user if the purchase succeeded or failed. If the purchase is successful, then do the server verification. If your app’s server validates the purchase, then make the item available to the user, otherwise request user to purchase it again.
public void onPayment(ErrorVo _errorVo, PurchaseVo _purchaseVo) {
    if (_errorVo != null) {
        if (_errorVo.getErrorCode() == IapHelper.IAP_ERROR_NONE) {
            if (_purchaseVo != null) {
                if (mPassThroughParam != null && _purchaseVo.getPassThroughParam() != null) {
                    if (mPassThroughParam.equals(_purchaseVo.getPassThroughParam())) {
                        if (_purchaseVo.getItemId().equals(ITEM_ID_SUBSCRIPTION)) {
                            mMainActivity.setBackgroundPurchaseId(_purchaseVo.getPurchaseId());
                            new PurchaseVerification(mMainActivity).execute(_purchaseVo.getPurchaseId());
                        }
                    }
                }
            }
         }
     }
}
If the item is available in this list, then detailed information of this item such as purchase ID will be available in the OwnedProductVo type ArrayList. To call getSubscriptionStatus Server API, we need the purchase ID of the item. So, send this ID to your app’s server to get the status of the subscribed item.
public void onGetOwnedProducts(ErrorVo _errorVo, ArrayList<OwnedProductVo> _ownedList) {
        if (_errorVo != null) {
            if (_errorVo.getErrorCode() == IapHelper.IAP_ERROR_NONE) {
                if (_ownedList != null) {
                    for (OwnedProductVo item : _ownedList) {
                        if (item.getItemId().compareTo(ItemName.ITEM_ID_SUBSCRIPTION) == 0) {
                            // Check whether subscription is canceled or not.
                            new SubscriptionDetails(mMainActivity).execute(item.getPurchaseId());
                        }
                    }
                }
            } else {
                Log.e(TAG, "onGetOwnedProducts ErrorCode [" + _errorVo.getErrorCode() +"]");
            }
        }
    }
Connect Your App with Your App Server
Create an asynchronous task for communicating with the server. This task has two parts. One is to send purchase ID to your app server and the other is to receive the result from the app server. Use doInBackground() method for these two tasks. Return this result to your main UI through onPostExecute() method.
Create a class which extends AsyncTask<String,Void,String> for server verification. Then write the following code in doInBackground() method to send the purchase ID:
CookieHandler.setDefault( new CookieManager( null, CookiePolicy.ACCEPT_ALL ) );
try{
   URL url = new URL("http:// "); //URL of your app’ server
   URLConnection connection = url.openConnection();
   connection.setDoOutput(true);
   connection.setDoInput(true);
   OutputStreamWriter out = new OutputStreamWriter(connection.getOutputStream();
   String y = "";
   for(int i = 0;i < x.length;i++)
   {
        y = y + x[i];
   }
   out.write(y);
   out.close();
   }catch(Exception e){
   }
Receive to the server verification result using the following code:
String output = "";
BufferedReader in = new BufferedReader(new InputStreamReader(connection.getInputStream()));
String s = "";
while((s = in.readLine())!= null)
{
       output = output + s;
       in.close();
}
return output;
Now, create an Interface called ServerResponse and implement it in an Activity where you want to show the result from your app’s server.
public interface ServerResponse {
    void processFinish(String output);
}
After receiving the result from the server, return the result to your main UI through onPostExecute() method.
protected void onPostExecute(String result) {
    serverresponse.processFinish(result);
}
Test your app
Let’s test the app. Upload your web app onto a server. Then use that URL in your app to check server verification in doInBackground() method. Keep in mind that Samsung In-App Purchase can’t be tested in an emulator of Android Studio. So use a Samsung device to test your app. Read the Test Guide before starting to test your app. A simple Android game is attached at the end of this article where app to server communication is implemented.
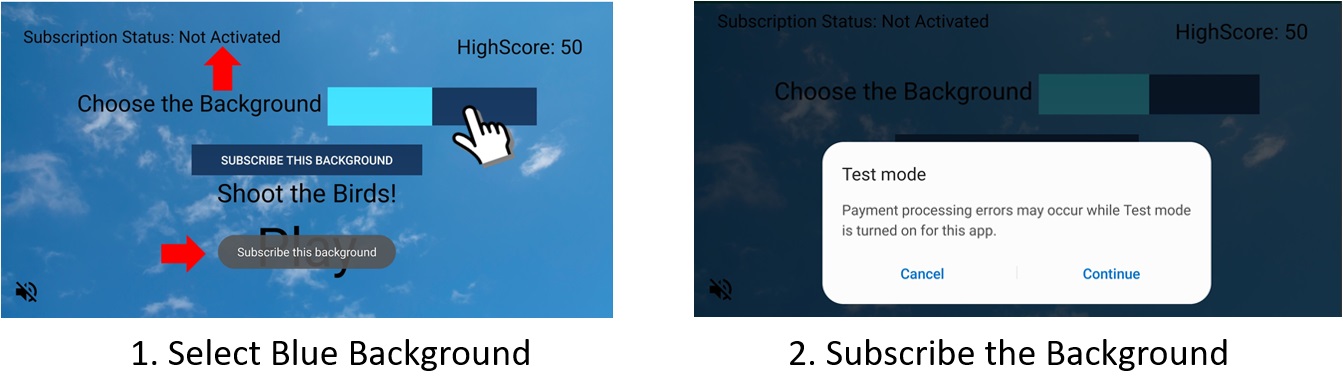
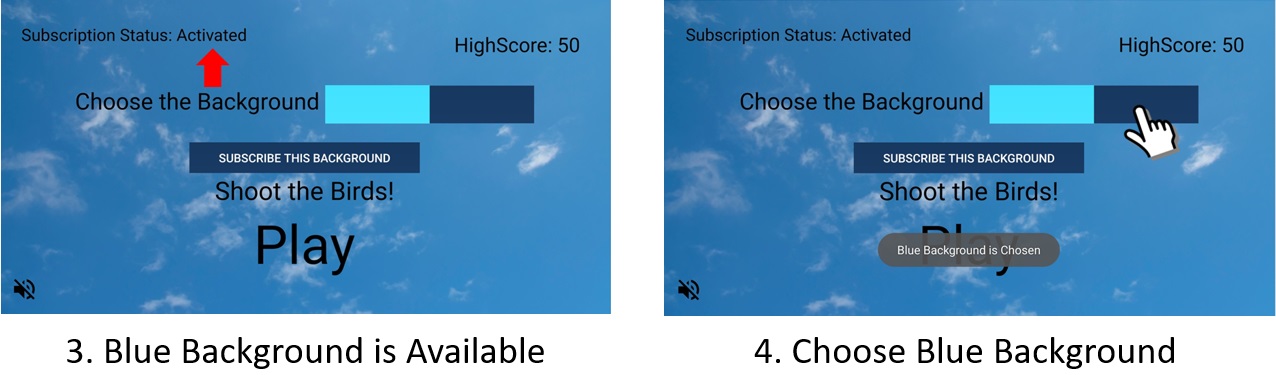
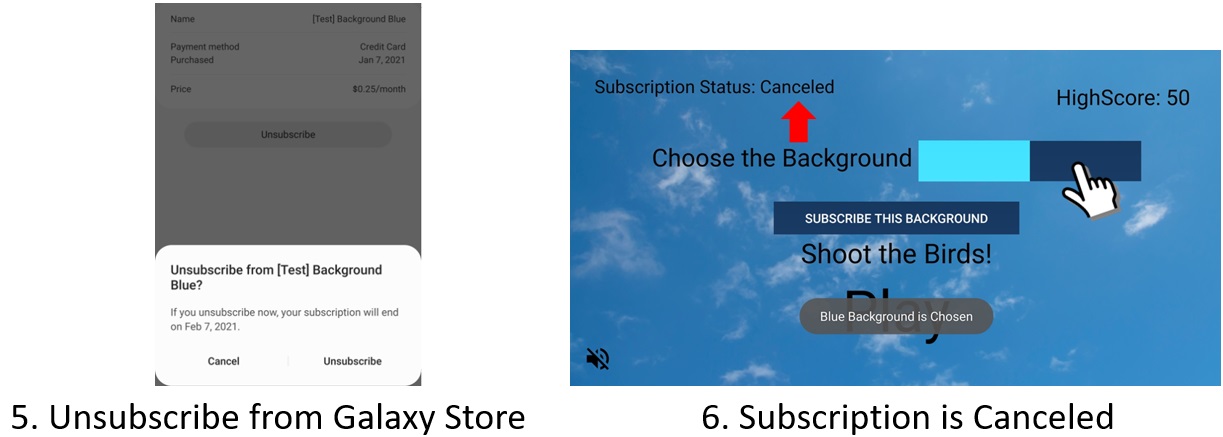
This game has a blue background image which can be subscribed. If this item is not in an active subscription period, then the app offers to subscribe the background. If the user purchases the item, then the game verifies the purchase through the server. If the purchase is verified, then it shows that the subscription status is activated and the app makes the item available. If the user unsubscribes the item from the Galaxy Store, subscription status becomes ‘cancel’. However, as the active subscription period has not ended yet, the item is still available in the app.
Wrapping Up
In these two blogs, we have covered the full communication between your app, server and IAP server. Now you will be able to implement purchase verification through your server. If your app is free but has some premium contents, then you can monetize your app. Samsung In-App Purchase provides many ways to earn money from your app. Go to Galaxy Store Games to find out more details about it.
Follow Up
This site has many resources for developers looking to build for and integrate with Samsung devices and services. Stay in touch with the latest news by creating a free account or by subscribing to our monthly newsletter. Visit the Marketing Resources page for information on promoting and distributing your apps. Finally, our developer forum is an excellent way to stay up-to-date on all things related to the Galaxy ecosystem.


