Verifying User Identity on Your Website Using Samsung Wallet's Web2App APIs
Mobassir Ahsan
Engineer, Samsung Developer Program
In a previous blog article, we learned how we could utilize Samsung Wallet's RP SDK in order to verify a user's identity from an Android application. In this tutorial, we learn how to verify a user's identity directly from a website using Samsung Wallet and its Web2App API in a Spring Boot web server.
Prerequisites
The process described has the following prerequisites:
- A valid US driver's license or state ID for the user whose identity is to be verified
- The Samsung Galaxy device used needs to be registered for the US region and have mDL support
- Complete the Samsung Wallet Partner onboarding process
- Create a Wallet Card template with the Relying Party type in the Samsung Wallet Partners Portal
Implementing the Verify with Wallet functionality in your website
The Verify with Wallet (VWW) process utilizing the Web2App method consists of two distinct parts.
- The "Verify with Samsung Wallet" button. This button contains the VWW link with the RP card data tokenized as the
CData. The user can click this VWW link to initiate the verification process. - The partner server containing the
/keyand/authendpoints. The partner server processes the requests sent from the Samsung Wallet application and handles the complete VWW process.
Frontend configuration
In order to initiate the Verify with Wallet process, we need to implement a "Verify with Samsung Wallet" button in a webpage.
Implementing the button is a very simple process similar to creating a traditional "Add to Wallet" button. We can make use of the data transmit link approach and create a button that contains the VWW link: https://a.swallet.link/vww/v1/{cardId}#Clip?cdata={cdata}
Replace {cardId} with the ID of your own card. Meanwhile, the CData value needs to be generated in real time. This is done using a process similar to generating CData for ATW operation, only with the payload contained being different according to the specification for the Relying Party card type. Check out the sample code for the complete process of CData generation and using it in the button.
Backend configuration
Once the button implementation is complete, you need to configure your server to handle the exchange of information between your server and Samsung Wallet application. The VWW process requires the partner to define 2 API endpoints:
/rp/v1.0/{cardId}/{refId}/key: Establishes a secure session and prepares the request data for the process./rp/v1.0/{cardId}/{refId}/auth: Processes encrypted authentication data and mDL data received from the Wallet application.
The workflow for the information exchange is as follows:
- Once the VWW button is clicked, the Samsung Wallet application opens.
- Samsung Wallet checks if the device has a driver's license already enrolled in the device.
- If an mDL already exists on the device, the Samsung Wallet application calls the
/keyendpoint to establish a session. - After establishing session with the partner server and retrieving the mDoc request, the Samsung Wallet application prompts the user to confirm if they wish to share their information with the partner.
- After the user confirms that they wish to proceed, the application finally sends the requested information to the
/authAPI to complete the VWW process.
Define the /key endpoint
When the user clicks the "Verify with Samsung Wallet" button, the Samsung Wallet application first checks if a driver's license is enrolled. If a license is found, the application generates "device engagement bytes" in accordance with the ISO-18013-5 specification. These bytes are then transmitted to the server's /key API endpoint to establish a verification session.
The POST request body is JSON with a single field called data. This field value is the JWT containing encrypted device engagement bytes.
{"data": "………"}
In the /key API endpoint,
- Accept the POST request sent to the path
/{cardId}/{refId}/key - Extract the data field from the body as the JWT and decrypt it to receive the device engagement bytes.
- Establish a session using the device engagement bytes.
- Create the mDoc request data and send it back to the Samsung Wallet application as response to the POST request.
The complete process is shown below:
@PostMapping("{cardId}/{refId}/key")
fun receiveKey(
    @PathVariable cardId: String,
    @PathVariable refId: String,
    @RequestBody body: String
): ResponseEntity<String> {
    val cData = JsonParser.parseString(body).asJsonObject.get("data").toString()
    val base64EngagementBytes = JwtGen.decryptBase64Engagement(cData)
    val mDoc18013 = createMDoc10813(base64EngagementBytes)
    val cdataResponse = "{\"data\": \"${JwtGen.generateRequestJwt(mDoc18013)}\"}"
    return ResponseEntity.ok().contentType(MediaType.APPLICATION_JSON).body(cdataResponse)
}
Decrypt the device engagement bytes from the request body
The data field value received in the /key API contains the required device engagement bytes encoded in the JWT format. Simply decrypt the JWT in order to retrieve the device engagement bytes. Here the decryptBase64Engagement() function is defined as follows:
fun decryptBase64Engagement(data: String): ByteArray {
    val signedJWT: SignedJWT = SignedJWT.parse(data)
    val payload = signedJWT.payload
    val jwe = JWEObject.parse(payload.toString())
    val partnerPrivateKey = KeyUtil.readPrivateKey(PARTNER_PRIVATE_KEY)
    val decrypter = RSADecrypter(partnerPrivateKey)
    jwe.decrypt(decrypter)
    val base64Engagement = jwe.payload.toJSONObject().get("data").toString()
    val base64EngagementBytes = Base64.getUrlDecoder().decode(base64Engagement)
    return base64EngagementBytes
}
Simply perform the JWT decryption operation using your private key to get the decrypted JWE payload in the JSON format. In the JSON-formatted payload, the data field contains the device engagement bytes encoded in the base64URL string format. Decode the string using a base64URL decoder and you get the final device engagement bytes.
Create a shared session using device engagement bytes
The createMDoc10813(base64EngagementBytes) function creates a shared session between the /key API and /auth API using a companion object. Having a shared session between the two endpoints is mandatory in order to decrypt the information provided by the Samsung Wallet application later on.
Inside the companion object, we also need to generate an elliptic curve keypair in order to establish the encrypted session. The companion object is defined as shown below:
companion object{

    val keyPair = KeyUtil.generateEcKeyPair()
    var mDoc18013: Mdoc18013? = null
    fun createMDoc10813(base64EngagementBytes: ByteArray): Mdoc18013 {
        if (mDoc18013 == null ) {
            mDoc18013 = Mdoc18013(keyPair, base64EngagementBytes )
            return mDoc18013!!
        }
        else{
            return mDoc18013!!
        }
    }

    fun getMDoc10813(): Mdoc18013 {
        return mDoc18013!!
    }
}
The elliptic curve keypair is generated using a simple KeyPairGenerator class instance.
fun generateEcKeyPair(): KeyPair {
    val keyPairGenerator = KeyPairGenerator.getInstance("EC")
    val ecGenParameterSpec = ECGenParameterSpec("secp256r1")
    keyPairGenerator.initialize(ecGenParameterSpec)
    return keyPairGenerator.generateKeyPair()
}
Prepare the mDoc request data
Preparing the mDoc request data is the most crucial part of the VWW operation. The request data defines the data that needs to be retrieved from mDL. The generateRequestJwt() function can be divided into several parts:
- Define and encode the request data payload.
- Encrypt the device request.
- Create session establishment data using the encrypted device request bytes.
- Create a signed JWT.
Below, we go through these steps one at a time.
Define the request data payload and encode it to a CBOR Byte Array
// Define requested data fields
val requestData = """
    {
      "docType": "org.iso.18013.5.1.mDL",
      "nameSpaces": {
        "org.iso.18013.5.1": {
          "family_name": true,
          "age_in_years": true,
          "issue_date": true,
          "expiry_date": true,
          "document_number": false,
          "issuing_authority": false
        },
        "org.iso.18013.5.1.aamva": {
          "DHS_compliance": false
        }
      }
    }
""".trimIndent()

// CBOR encoding process with tagging
val firstEncoded = CBORObject.FromJSONString(requestData).EncodeToBytes()
val thirdEncoded = CBORObject.FromObjectAndTag(firstEncoded, 24).EncodeToBytes()
val itemRequestBytesList = listOf(thirdEncoded)

// Create mDoc items requests array
val docRequestsArray = CBORObject.NewArray()
itemRequestBytesList.forEach {
    val docRequest = CBORObject.NewMap()
    docRequest.set("itemsRequest", CBORObject.DecodeFromBytes(it))
    docRequestsArray.Add(docRequest)
}
// Create device request using docRequestArray
val deviceRequest = CBORObject.NewMap()
deviceRequest.set("version", CBORObject.FromObject("1.0"))
deviceRequest.set("docRequests", docRequestsArray)
Encrypt the device request
val encryptedDeviceRequestBytes = mDoc18013.encryptDeviceRequest(deviceRequest.EncodeToBytes())
Create session establishment data using the encrypted device request bytes
val establishment = CBORObject.NewMap()
establishment.set("eReaderKey", CBORObject.FromObjectAndTag(mDoc18013.getEReaderKey(),24))
establishment.set("data", CBORObject.FromObject(encryptedDeviceRequestBytes))
val establishmentString = Base64.getUrlEncoder().encodeToString(establishment.EncodeToBytes())
Create a signed JWT using the establishmentString as the JWE payload
val jweObj = JWEObject(JWEHeader.Builder(JWEAlgorithm.RSA_OAEP_256, EncryptionMethod.A128GCM).build(), Payload(establishmentString))
val encryptor = RSAEncrypter(samsungPublicKey as RSAPublicKey)
jweObj.encrypt(encryptor)

val jwsHeader = JWSHeader.Builder(JWSAlgorithm.RS256)
    .contentType("AUTH")
    .customParam("partnerId", "412255212345678910")
    .customParam("certificateId", "A123")
    .customParam("ver", "3")
    .customParam("utc", System.currentTimeMillis())
    .build()
val jwsObj = JWSObject(jwsHeader, Payload(jweObj.serialize()))
val rsaJwk = RSAKey.Builder(partnerPublicKey as RSAPublicKey).privateKey(partnerPrivateKey).build()
val jwsSigner = RSASSASigner(rsaJwk)
jwsObj.sign(jwsSigner)
return jwsObj.serialize()
Now, we can send this JWT back as the response from the /key API.
If everything is done properly, the Samsung Wallet application should receive the verification request along with the list of requested fields. After processing and verifying the request, the Samsung Wallet application needs to prompt the user to verify their identity. Once the user verifies their identity using the application, it sends the requested information back to the /auth API endpoint.
Next, let's define the /auth API endpoint to retrieve the requested information.
Define the /auth API endpoint
Similar to the previously defined /key API endpoint, the /auth API endpoint also receives a single JSON payload with a single field called data, which contains the requested information in a JWT encoded format.
{"data": "………"}
Decrypt the JWT payload from the request body
We can extract the data field and decrypt the JWT following the same process used in the /key API.
@PostMapping("{cardId}/{refId}/auth")
fun receiveAuth(
    @PathVariable cardId: String,
    @PathVariable refId: String,
    @RequestBody body: String
): HttpStatus {

  val responseData = JsonParser.parseString(body).asJsonObject.get("data").toString()
  val signedJWT: SignedJWT = SignedJWT.parse(responseData)
  val payload = signedJWT.payload
  val jwe = JWEObject.parse(payload.toString())
  val partnerPrivateKey = JwtGen.partnerPrivateKey
  val decrypter = RSADecrypter(partnerPrivateKey)
  jwe.decrypt(decrypter)

// Process and decrypt the data until the requested information is retrieved
  return HttpStatus.OK
}
After the decryption operation, we get another JSON object in the decrypted JWE payload. In this JSON payload, the data field contains the encoded data of the information we requested. To decode and decrypt this data:
- Decode the extracted
datafield value using Base64URL decoder. This gives us the encrypted mDoc response in a CBOR byte array. - Decode the CBOR object from the byte array and get the mDoc data from the
datafield. - Decrypt the mDoc data using the
mDoc18013.decryptMdocResponse()function to retrieve the plain response in the JSON format.
/key API. Otherwise, the decryption operation fails.
val mDoc18013 = getMDoc10813()
val cborData = jwe.payload.toJSONObject().get("data").toString()
val decodedData = Base64.getUrlDecoder().decode(cborData)
val mDocResponse = CBORObject.DecodeFromBytes(decodedData)
val mDocData = mDocResponse.get("data")
val decryptMdocResponseBytes = mDoc18013.decryptMdocResponse(mDocData.GetByteString())
val plainResponse = CBORObject.DecodeFromBytes(decryptMdocResponseBytes).ToJSONString()
After these steps, we finally have the mDoc response in a plain JSON format.
{
  "status": 0,
  "version": "1.0",
  "documents": [
    {
      "docType": "org.iso.18013.5.1.mDL",
      "deviceSigned": {},
      "issuerSigned": {
        "issuerAuth": ["......."],
        "nameSpaces": {
          "org.iso.18013.5.1": [
            "pGhkaWdlc3RJRBkhfWZyYW5kb21Uczc4ZnY4c2NoNGMyZHR5MnlyOTZxZWxlbWVudElkZW50aWZpZXJsYWdlX2luX3llYXJzbGVsZW1lbnRWYWx1ZRgs",
            "pGhkaWdlc3………"
          ],
          "org.iso.18013.5.1.aamva": [
            "pGhkaWdlc3RJRBlLD2ZyYW5kb21Uczh5cmptbTU4OHMyNzY4emozNm5xZWxlbWVudElkZW50aWZpZXJuREhTX2NvbXBsaWFuY2VsZWxlbWVudFZhbHVlYUY"
          ]
        }
      }
    }
  ]
}
Here, the values inside the org.iso.18013.5.1 and org.iso.18013.5.1.aamva are the fields we initially requested in the Key API. Simply decode these CBOR-encoded fields to retrieve the information you requested. For example, the "pGhkaWdlc3RJRBkhfWZyYW5kb21Uczc4ZnY4c2NoNGMyZHR5MnlyOTZxZWxlbWVudElkZW50aWZpZXJsYWdlX2luX3llYXJzbGVsZW1lbnRWYWx1ZRgs" value informs us that element name is age_in_years and its value is "44," meaning the subject is 44 years old. We can extract the rest of the requested information by decoding the other provided values in the same way.

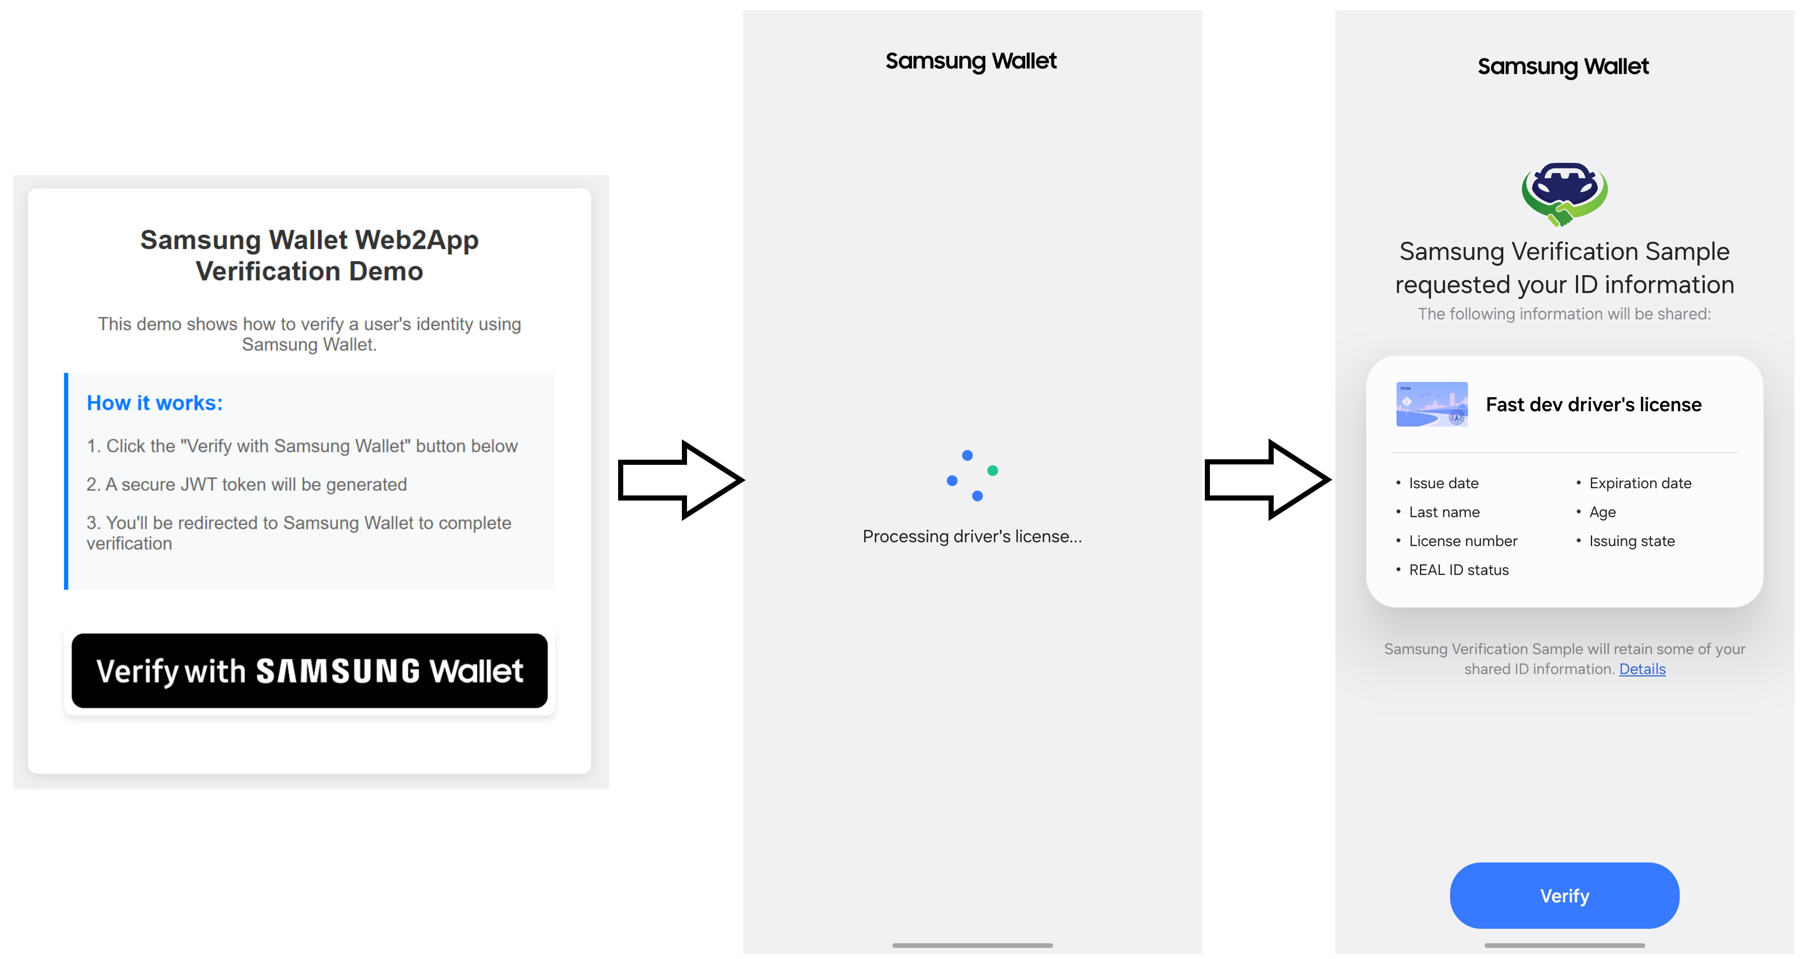
Figure 1: Verifying user identity using VWW Web2App process
Summary
In this tutorial, we learned how we can implement user identity verification on a website utilizing Samsung Wallet's Verify with Wallet functionality. By making use of the Web2App method discussed in this article, you can allow users to securely confirm and verify their digital identity using their mobile driver's licenses.
Related resources
- ISO/IEC 18013-5:2021 - Personal identification — ISO-compliant driving licence — Part 5: Mobile driving licence (mDL) application
- Mobile Driver License - American Association of Motor Vehicle Administrators - AAMVA
- Verify with Wallet API Guidelines
- Relying Party Card Specifications
- Sample Code Download Link


