To help standardize and streamline how payments are done on the web, the Worldwide Web Consortium (W3C) has introduced a Payment Request API to provide an interface between a merchant web page and a mobile payment app, like Samsung Pay, to facilitate payment transactions. Samsung Internet browser leverages the W3C Payment Request API to support Samsung Pay as a payment method for web purchases. Chrome also supports a Samsung Pay web payment method.
Why integrate Samsung Pay into your website?
Samsung Pay is accepted at more retail locations than any other mobile payment service available because of its unique ability to transact with newer NFC-supported payment terminals and legacy payment terminals. It continues to enjoy the best user reviews among mobile payment apps.
Now available for mobile website integration, Samsung Pay is secure, easy to set up, simple to use, and pre-installed on all new Samsung Galaxy-class smartphones. When integrated with your website, Samsung Pay presents your users with a common checkout process that leverages Samsung Pay’s secure purchase authentication technology, eliminating manual entry or re-entry of card details and shipping destinations. Checkout is streamlined, conversions are maximized, and the exposure of sensitive data is kept to the absolute minimum.
Simplifying the transaction process
The benefits of the new process, certainly from an end-user perspective, is that the previous tedium ― request, authorization, payment, and result ― can now be handled in a single step. For the web developer, it entails a single JavaScript API call. For Samsung Pay users, there’s no change at all in the way a payment card is selected and authenticated.
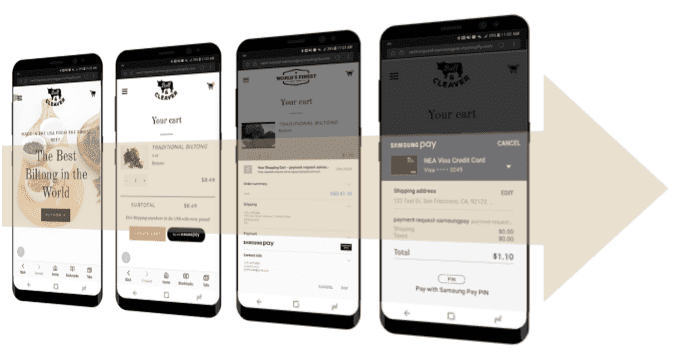
After selecting the desired merchandise from the merchant’s web site, the user initiates checkout, selects Samsung Pay as the preferred payment method, authenticates with a fingerprint or PIN, and voila ― payment complete. That’s the user experience at its most basic. When properly implemented, the API also supports editing the billing/shipping address in Samsung Pay and selecting a different enrolled card before approving the transaction with a fingerprint scan or entering a PIN.
In terms of convenience, it’s a remote shopper’s dream ― no complicated, input-intensive forms to fill out, no fumbling for a plastic card to enter the account number, card expiration, and security code, and no worrying that someone other than the legitimate cardholder is attempting to make the payment. Meanwhile, Samsung Pay’s tokenized payload securely protects the transaction from intercept and replay attacks.
About this guide
Intended for web developers with a working knowledge of JavaScript and JSON, this guide takes you through the complete process of onboarding as a Samsung Pay merchant partner, creating/registering the W3C service for your domain, adding the W3C Payment Request object to your website, then testing and releasing your merchant website offering Samsung Pay as a payment method.
Let's get started.
Determining your gateway integration mode
The API methods for integrating Samsung Pay with your website depend on the type of payment token your payment gateway (PG) handles — either gateway tokens or network tokens. Samsung Pay supports requests for both types. For instance, if Stripe is your PG, you will want to request a gateway token from Samsung Pay. On the other hand, if you’re using First Data, you’ll want to request an encrypted network token bundle, for which you handle the token decryption yourself or work with the PG (First Data in this case) to handle decrypting the token bundle.
The process begins when your merchant website makes a payment request and passes all required information to the browser, which then determines compatibility between the accepted payment methods for your website and the methods (apps) installed on the target device.
Let’s take a brief look at how each integration mode — gateway token and network token — works with Samsung Pay.
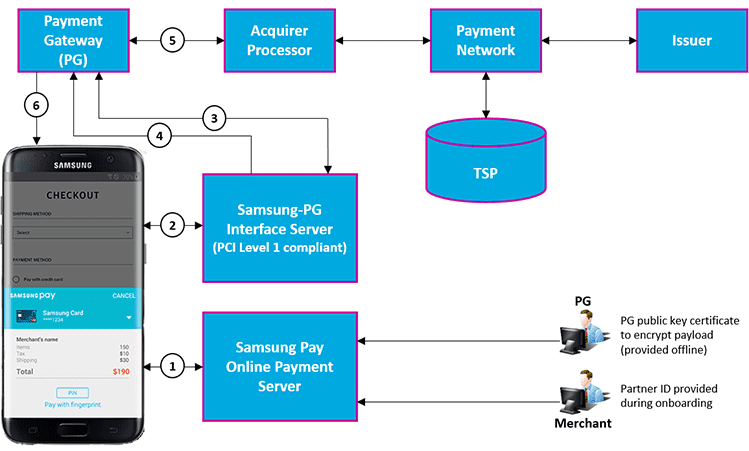
Gateway Token Mode
Although Samsung Pay doesn’t process the payment, your merchant website will still need to invoke the appropriate payment gateway APIs to charge and process the token returned by your PG. Hence, when Samsung Pay returns a gateway token from Stripe, for example, the recommended flow looks like this:
User selects Samsung Pay as the payment method at checkout in the merchant's website and the Samsung Pay app requests partner verification from the Samsung Pay Online Payment Server.
Encrypted payment information and the Partner ID are passed to the Samsung-PG Interface Server.
Samsung-PG Interface Server sends a transaction authorization request to the PG on behalf of the Merchant; PG authenticates the Partner ID before generating a transaction Reference ID.
Samsung-PG Interface Server returns the payment token to the PG (i.e., the gateway token it received from the Samsung Pay app in Step 2).
PG continues payment processing with the acquirer and payment network.
The result (approved/declined) is returned to the merchant website on the device for display to the user.
In this mode, Samsung Pay makes a call to your PG on your behalf and returns a chargeable gateway token.
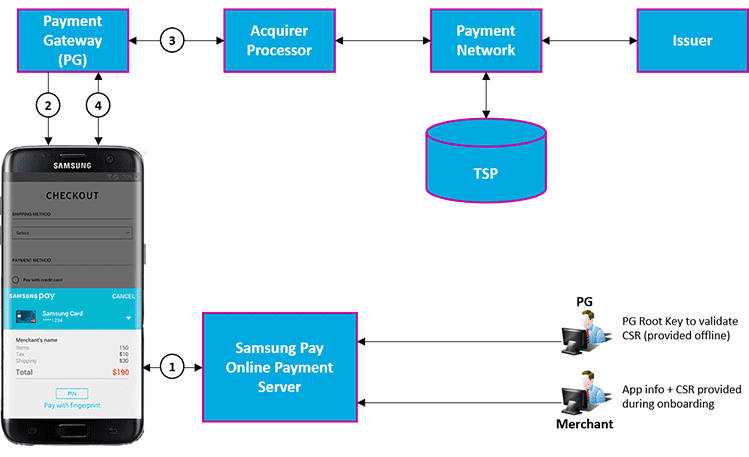
Network Token Mode
Under Network Token mode, the Samsung Pay API returns an encrypted network token bundle, which you can then either decrypt yourself or leverage the APIs of your PG (First Data, for example) to handle decryption and charge the token.
User selects Samsung Pay as the payment method at checkout in the merchant's website and the Samsung Pay app requests partner verification from the Samsung Pay Online Payment Server.
Encrypted payment information is passed from the Samsung Pay app to the PG through the merchant app via the PG SDK.
Applying the merchant's private key, PG decrypts the payment information structure and processes the payment through the acquirer and payment network.
Upon receiving authorization or rejection, PG notifies the merchant website through its PG SDK.
To simplify integration of network tokens, you can pass the encrypted payload directly to your PG and let it handle decryption. In general, decrypting the payload yourself is more complex and involves private key management. See your particular PG’s documentation for details.
Once you determine which mode your PG supports, you're ready to register with the portal. First, however, there are a number of prerequisites you'll need to satisfy.
Prerequisites
Registering with the Samsung Pay Developers portal and adapting the appropriate Payment Request APIs for your website in accordance with the guidance contained herein will help to ensure a successful implementation. To that end, the following requirements apply:
Release Contents
Minimum Samsung Pay app version
2.8.xx
Minimum Samsung Internet browser version
5.4
Minimum Chrome browser version
61
Supported device models
Samsung Galaxy-class smartphones running minimum version of the wallet app and browser
Through the Samsung Pay Developers portal you can access valuable resources to help you manage the Samsung Pay features you incorporate into you partner app, including the ability to:
Create multiple Samsung Pay service groups so you can use different services without the need to create multiple accounts
Invite co-workers to the portal to help you manage Samsung Pay features for your website
Register your website with Samsung Pay
Configure your Samsung Pay W3C service(s)
To create a member account on the Samsung Pay Developers portal:
Open a browser like Chrome, go to https://pay.samsung.com/developers, click SIGN UP and confirm/acknowledge that you accept the Samsung Pay terms and conditions and understand the privacy policy, then do one of the following:
a. If you already have a valid Samsung Account, click SIGN UP and enter your Samsung Account ID and Password.
b. If you do not have a Samsung Account, click CREATE A SAMSUNG ACCOUNT to create one.
Open the account activation email you receive and click the ACCOUNT ACTIVATION link.
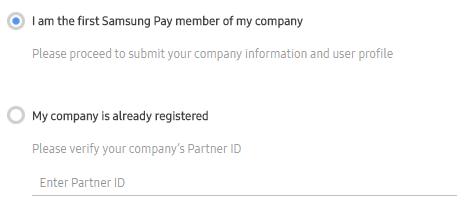
If you’re the first Samsung pay member of your company to register, select the first option, click NEXT, and complete a company and user profile. If, on the other hand, you were given a Samsung Pay Partner ID by a co-worker, select the second option — My company is already registered — and enter your company’s Partner ID in the field provided, then click NEXT.
After you receive notification by email that your membership is approved, typically within 2 business days, return to https://pay.samsung.com/developers, click SIGN IN and enter your Samsung Account ID and Password for site access as a new member.
Registering your domain for the W3C service
Your domain is the URL associated with your website, whether in test or production. The service type specifically associates W3C with your domain. Once you create the service, you will be prompted to configure the domain you want associated with it.
To create a new service:
Go to My Projects > Service management and click CREATE A NEW SERVICE.
Select For test to define the service for initial integration with Samsung Pay, then click NEXT.
Select W3C mobile web payments as the service type and click NEXT.
Enter a SERVICE NAME and select “United States” as the SERVICE COUNTRY.
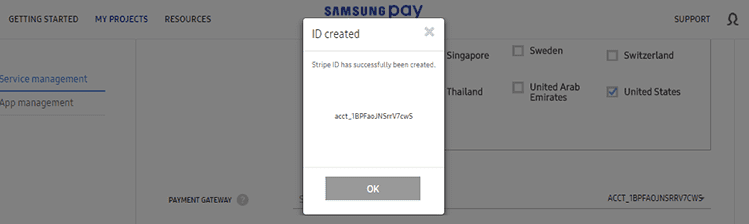
Select a PAYMENT GATEWAY from the list of supported PGs.
If your payment gateway uses the network token mode, upload the certificate signing request (CSR) you obtained from your PG. Supported formats are .CSR or .PEM. Contact your PG for details. Otherwise, key management is already established for PGs supporting Samsung Pay’s gateway token mode; hence, click CONNECT WITH to create a new service connection with the PG and click OK.
Enter the payment domain name(s) for your website in the SERVICE DOMAIN field and click ADD. For example, if your domain is mywebstore.com but the checkout page is hosted on the subdomain payments.mywebstore.com, you’ll need to enter payments.mywebstore.com as the SERVICE DOMAIN in the portal. For each additional domain name, click ADD.
NoteWhen entering the domain name on the portal, do not include an https:// prefix.
Confirm your agreement with the terms and conditions, then click NEXT.
Adding W3C Payment Requests objects to your website
In order to accept payments from Samsung Pay, your website must adhere to the W3C Payment Request API specification. You can get started with the basics by completing the steps that follow and making the appropriate substitutions for your website.
Step 1: Feature Detect
Prior making a W3C payment request, it’s wise to run a feature detect to ensure the browser in use supports the W3C Payment Request API. If not, you should fall back to your traditional/normal checkout page.
Example
if(window.PaymentRequest) {
  // Use Payment Request API
} else {
  // Fallback to traditional checkout
  window.location.href = ‘/checkout/traditional’;
}
Step 2: Create the PaymentRequest constructor
The first step is to create a PaymentRequest object by calling the PaymentRequest constructor, which has the following parameters:
methodData – contains a list of payment methods that the website supports (e.g., Visa, Amex, Samsung Pay)
details – contains information about the shopping cart purchases (e.g., total, tax, fees, etc.)
options – details pertaining to shipping address, user contact information, etc.
Example
var request = new PaymentRequest(
  methodData, // required payment method data
  details, // required information about transaction
  options // optional parameter for things like shipping, etc.
);
Step 3: Add Samsung Pay to the methodData parameter
The methodData parameter contains a list of payment methods supported by the merchant. To support Samsung Pay, you’ll need to add it as a supported payment method.
Notebasic-card is an optional supportedMethod for credit and debit cards saved in the browser, the card details of which are returned directly to the website from the browser. Before configuring this method, make sure your website and PG can handle generic payment information received from the browser and process with required PCI compliance, if applicable. See the [W3C Basic Card Payment specification][7] for additional details.
Be aware, however, that if you intend to support a branded Samsung Pay button, only Samsung Pay can be enabled as a payment method within the PaymentRequest object; basic-card or any other payment method cannot be included. If you already offer a generic Payment Request method, you can continue to do so — and include Samsung Pay as a payment method within that PaymentRequest object. From a user experience standpoint, the two distinct pathways look like this:
Standard W3C implementation
A standard W3C implementation adds Samsung Pay to your standard PaymentRequest object as one of many supportedMethods available for user selection. Tapping CHECKOUT (or its equivalent) launches the standard browser payment sheet for user selection of the payment method and/or to add a debit/credit card to the list of options. Selecting Samsung Pay as the payment method and tapping PAY launches the Samsung Pay payment sheet.
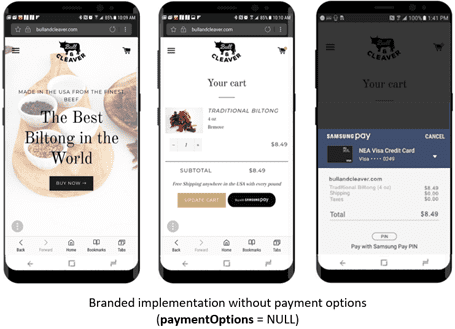
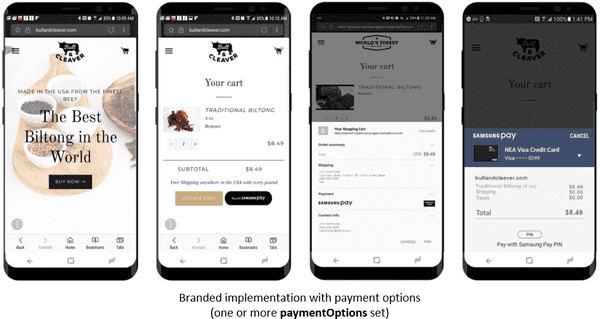
Branded Samsung Pay implementation
A branded implementation displays a "Buy with Samsung Pay" button in place of your standard CHECKOUT button. Tapping the button will skip directly to the Samsung Pay payment sheet for authentication unless you specify paymentOptions. If paymentOptions is not NULL, the browser payment sheet is launched. See paymentOptions in Step 7 for additional guidance.
First launching your website's CHECKOUT page is recommended for branded implementations. This is because the Samsung Pay payment sheet only provides the user's billing address, which means your website will need to capture the user's preferred shipping address, where applicable for physical delivery of purchased goods. If no shipping address and/or other options are needed, set the paymentOptions parameter to NULL. As mentioned above, if you populate paymentOptions, the browser payment sheet is automatically launched.
Keeping the foregoing implementations in mind, let's look at how to construct the methodData argument for the Network Token mode and Gateway Token mode, respectively.
The fields in methodData comprise:
supportedMethods – required; specifies https://spay.samsung.com/ (i.e., the Samsung Pay app) and other methods suppored by your website
data – values specific to the method; for Samsung Pay, these include:
version : specifies the data structure being used by the merchant; should always be set to 1 until further notice (required)
productID : the Service ID obtained from the Samsung Pay partner portal (required for partner verification; see Step #8 under Registering your domain for the W3C service)
merchantGatewayParameter : this is the userId value registered with your PG (required for gateway token mode)
In addition, userId should be set in the request parameter for MADA token.
If a merchan request MADA Token, this field is mandatory as this filed should be included in the payload.
For MADA token, there is a 15-character length limit.
paymentProtocol : defaults to “PROTOCOL_3DS,” the only protocol currently supported by Samsung Pay (optional)
allowedCardNetworks : specifies the card brands/networks accepted by the merchant and supported by the PG (required)
merchantName : the name of the merchant to be displayed on the payment sheet; must be identical to the merchant name registered on the Samsung Pay partner portal (required)
orderNumber : unique value for merchant use as an external reference ID (optional)
billingAddressRequired : determines if a billing address must be filled-in by the user (optional; default = false)
Shown next are examples of the methodData parameter for each of the supported token modes. (Please note that Samsung Pay's W3C support for card brands is currently limited to MasterCard, Visa and American Express. Discover is scheduled for support soon.)
Example – Network Token mode
var methodData = [
		{ supportedMethods: ['https://spay.samsung.com'],
			data: {
				'version': '1', // always 1 until further notice
				'productId': '2bc3e6da781e4e458b18bc', // Service ID from partner portal
				'allowedCardNetworks': ['mastercard','visa'],
				'merchantName': 'Shop Samsung (demo)',
				// merchantName must be identical to merchant name on portal
				'orderNumber': '1233123',
			}
		}]
Example – Gateway Token mode
var methodData = [
		{ supportedMethods: ['https://spay.samsung.com'],
			data: {
				'version': '1', // always 1 until further notice
				'productId': '7qr7h9ws1872bc3e6da781', // Service ID from partner portal
				'merchantGatewayParameter': {"userId": "acct_ 17irF7F6yPzJ7wOR"},
				'allowedCardNetworks': ['mastercard','visa'],
				'merchantName': 'Shop Samsung (demo)',
				//merchantName must be identical with merchant name on portal
				'orderNumber': '1233123',
			}
		}]
Step 4: Fill out the transaction details parameter
The details parameter contains information about the transaction. There are two major components: a total, which reflects the total amount and currency to be charged, and an optional set of displayItems that indicate how the final amount was calculated. This parameter is not intended to be a line-item list, but is rather a summary of the order’s major components: subtotal, discounts, tax, shipping costs, etc.
Example
var details = {
	displayItems: [
		{
		label: "Total of all items",
		amount: { currency: "USD", value : "65.00" }, // US$65.00
		},
		{
		label: "Friends & family discount",
		amount: { currency: "USD", value : "-10.00" }, // -US$10.00
		pending: true // The price is not yet determined
		}
	],
	total: {
		label: "Total",
		amount: { currency: "USD", value : "55.00" }, // US$55.00
	}
}
Step 5: Check eligibility to display Samsung Pay button
If you do not support basic-card and you try to call show() in Step 6 when Samsung Pay or any other supportedMethod is not present on the device, the returned promise will reject with the following error:
DOMException: The payment method is not supported
You can, however, check beforehand to see if the user has an available/supported method set up. This is done with the canMakePayment() method, which tells you whether the user has a payment method that can fulfill the current payment request.
Example – canMakePayment()
const paymentRequest = new PaymentRequest(supportedPaymentMethods, transactionDetails, options);

// If canMakePayment() isn’t available, default to assume the method is supported.
const canMakePaymentPromise = Promise.resolve(true);

// Feature detect canMakePayment()
if (request.canMakePayment) {
	canMakePaymentPromise = paymentRequest.canMakePayment();
}

canMakePaymentPromise.then((result) => {
	if (!result) {
		// The user does not have a supported payment method.
		// TODO: Redirect to traditional checkout flow.
		return;
	}
	// TODO: The user has a payment - call show().
})
.catch((err) => {
	// TODO: Either fall back to traditional checkout or call show().
});
NoteBranded Samsung Pay buttons can be found on the [Samsung Pay Developers][8] portal under the Resources tab. Direct CDN links will be available soon.
Step 6: Call the show() method to display the payment sheet
The payment sheet can be activated by calling its show() method. This method invokes the browser’s native UI so the user can examine the details of the purchase, add or change the information, and submit it for payment. A Promise, indicated by its then() method and callback function, resolves what will be returned when the user accepts or rejects the payment request.
Example – show()
request.show().then(function(paymentResponse) {
	// Process paymentResponse here
	paymentResponse.complete("success");
}).catch(function(err) {
	console.error("Uh oh, something bad happened", err.message);
});
Step 7: Handle the PaymentResponse
Once the user approves the payment request by verifying the payment option and shipping option (if provided), the show() method’s promise resolves, resulting in a PaymentResponse object comprised of the following fields:
methodName : string indicating the chose payment method (e.g., Visa)
details : dictionary containing information for methodName
shippingAddress : shipping address of the user, if requested
shippingOption : ID of the selected shipping option, if requested
payerEmail : email address of the payer, if requested
payerPhone : telephone number of the payer, if requested
payerName : name of the payer, if requested
Here, it’s important to remember that the response from the Payment Request API must be submitted by the merchant in accordance with the PG’s integration model and APIs. In all cases, the Samsung Pay response is encapsulated within the PaymentResponse.details parameter, which comprises the following fields:
paymentCredential – contains the payment credential information necessary for processing the transaction with the PG. In network token mode, this field includes 3DS data. In gateway token mode, it includes token information.
Network Token mode
type : use “S”
version : 1.0.0; standard for payment authentication (aka Mastercard SecureCode, Verified by Visa, and American Express SafeKey)
data : encrypted payload value
Gateway Token mode
reference : token ID reference
status : authorized or rejected/declined
billingAddress – contains the billing address and related attributes for the cardholder, possibly including:
country : [ISO3166] alpha-2 code; canonical form is upper case. For example, “US”
addressLine[n] : most specific part of the address; can include a street name, a house number, apartment number, a rural delivery route, descriptive instructions, or a post office box number
region : top level administrative subdivision of the country; can be a state, a province, an oblast, or a prefecture
city : city/town portion of the address
dependentLocality : dependent locality or sub-locality within a city; fused for neighborhoods, boroughs, districts, or UK dependent localities
postalCode : postal code or ZIP code, also known as PIN code in India
sortingCode : bank sorting code; for example, in the British and Irish banking industries, the sort code is a six-digit number, is usually formatted as three pairs of numbers, for example 12-34-56, identifying both the bank and the branch where the account is held
languageCode : [BCP47] language tag for the address, in canonical form; used to determine the field separators and the order of fields when formatting the address for display
organization : organization, firm, company, or institution at this address
recipient : name of the recipient or contact person. This member may, under certain circumstances, contain multiline information; for example, it might contain “care of” information
phone : telephone number of the recipient or contact person
paymentInfo – contains the payment information, including:
card_last4digits : last four digits of the card’s DPAN
cardBrand : currently, either MasterCard or Visa
orderNumber : merchant’s unique external reference ID supplied in the original request’s methodData parameter.
If the user pays with a credit card using the basic-card method, then the details response returned directly to your website from the browser will contain cardholderName, cardNumber, expiryMonth, expiryYear, cardSecurityCode, billingAddress.
Once payment information is received from Samsung Pay, the website should submit the payment information to the merchant’s PG for transaction processing. The UI will show a spinner while the request takes place. When a response is received, the website should call complete() to close the UI. The website is then free to show an order complete or order confirmation page for user feedback.
As previously mentioned, you can simplify integration of network tokens by passing the encrypted payload directly to your PG and letting it handle decryption. In all cases, how you handle a submitted network token depends on the payment gateway. Refer to your particular PG’s documentation for details.
PaymentOptions is an optional parameter in thePaymentRequest constructor. Depending on your particular requirements, you may want additional information, such as the user’s shipping address for physical goods purchased and contact details for guest users. PaymentOptions currently comprises the following:
requestPayerName : true if payer name is required; otherwise, false
requestPayerEmail : true if payer email address is required; otherwise, false
requestPayerPhone : true if payer telephone number is required; otherwise, false
requestShipping : true if shipping address is required; otherwise, false
shippingType : available label options “shipping/pickup/delivery” for indicating to user; solely for display purposes
Once you have the code saved and loaded, you’re ready to test. Be sure to test your website or test domain on a device running Samsung Internet browser and with the Samsung Pay wallet app already set up and ready to go in accordance with the prerequisites cited above.
If you use a separate subdomain for your test environment, be sure to add it as an eligible SERVICE DOMAIN for the service you configured under Registering your domain for the W3C service. Remember that any/all subdomains for production must also be added to the service, up to a maximum of 10 service domains.
Again, please note that Samsung Pay’s Webpay API currently supports MasterCard and Visa only. Support for American Express and Discover is under development and will be available soon.
Be sure to test using the Samsung Internet and Chrome mobile browser apps.
To test
Select Samsung Pay as the payment method by clicking on the branded Samsung Pay button (branded implementations) or the Samsung Pay radio button (standard W3C implementations). This should launch the Samsung Pay payment sheet.
Authenticate payment.
Validate your results end to end.
Isolate issues in the log, debug, and test again. Contact your Samsung Pay RM to coordinate assistance with troubleshooting.
Recommended test cases
Check if the Samsung Pay is available in the payment option on the website
Verify Samsung Pay logo on Browser sheet
Verify order summary on the payment sheet
Verify “Edit” and “Pay” buttons on payment sheet
Verify purchased item in the summary
Verify the billing address on the payment sheet
Change the billing address
Try to change the card in payment sheet when only one card is enrolled in Samsung Pay
Try to change the card when multiple cards is enrolled in Samsung Pay
Verify the payment amount
Verify the payment options
Verify the payment completion screen
Verify merchant name on the payment sheet
Verify merchant domain name on the payments sheet
Verify “Cancel” and “Pay” buttons on Browser sheet
Try to make payment with large amount (larger than max allowed amount) and verify the behavior
Make a payment using Samsung Pay with a card already added for the merchant’s website (basic-card)
Verify Transaction notification after W3C purchase
Verify Transaction notification after refund
Set payment options for shipping address and verify that browser payment sheet launches and captures shipping address input/changes by user
Verify that the shipping cost is updated based on a shipping address change and is reflected in the updated total amount
Release
Once your tests are successful and you are satisfied with the results, take the following steps to ready your integrated (with Samsung Pay) website for release:
Go to the Samsung Pay Developers portaland create a new release service sharing identical attributes with the service you successfully tested.
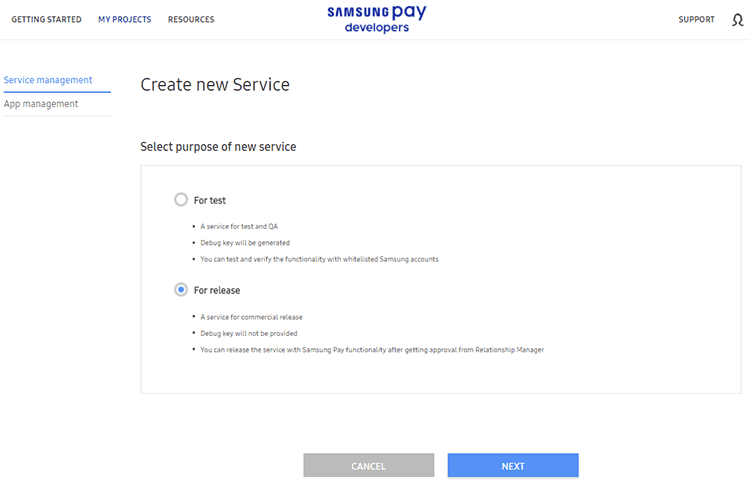
a. Click on Service management, then click CREATE NEW SERVICE.
b. Select For release (pictured), then click NEXT.
c. Select W3C mobile web payments as the service type, then click NEXT.
d. Enter a "release" SERVICE NAME and select "United States" as the SERVICE COUNTRY.
e. Select United States as the SERVICE COUNTRY.
f. Select your PAYMENT GATEWAY from the drop-down menu, then click CONNECT WITH (for Gateway Token mode) or provide a valid CSR (for Network Token mode).
g. Enter your SERVICE DOMAIN and click ADD. (For each additional domain name, click ADD.)
Remember, when entering domain names on the portal, do not include a "https"//" prefix.
h. Confirm your agreement with the terms and conditions, then click NEXT.
Retrieve the Service ID from the Service details page and enter (copy-paste) it into your website's methodData object in place of the current testing Service ID.
When your service is approved by your Samsung Pay RM — as indicated in the STATUS column of your Service management dashboard — you're ready to release your integrated website to the public.
We use cookies to improve your experience on our website and to show you relevant
advertising. Manage you settings for our cookies below.
Essential Cookies
These cookies are essential as they enable you to move around the website. This
category cannot be disabled.
Company
Domain
Samsung Electronics
developer.samsung.com, .samsung.com
Analytical/Performance Cookies
These cookies collect information about how you use our website. for example which
pages you visit most often. All information these cookies collect is used to improve
how the website works.
Company
Domain
Samsung Electronics
.samsung.com
Functionality Cookies
These cookies allow our website to remember choices you make (such as your user name, language or the region your are in) and
tailor the website to provide enhanced features and content for you.
Company
Domain
Samsung Electronics
developer.samsung.com, google.account.samsung.com
Preferences Submitted
You have successfully updated your cookie preferences.