The following section includes tips on how to add extra features to a Samsung DeX app – such as assigning a menu action to a mouse right click. For the best Desktop experience, apps should meet these optional compatibility features. However, they are not required to launch in Desktop Mode.
Mouse Right Click
Enabling mouse right-click allows for easier interaction with apps. For example, it can be useful for showing desktop-like action such as a contextual menu.
If an app uses the EditTextView of the Google API, it does not need to implement additional features for using mouse right click. In EditTextview, the following actions are available:
Mouse right-click: show Contextual Menu.
Mouse left-double click on text: select the text.
If an app is not using EditTextView of the Google API, this code snippet enable mouse right click.
Enabling mouse-wheel zoom allows for easier interaction with apps that require Multi-Touch zoom (pinch zoom in and out) to operate efficiently. For example, maps or games. To enable Multi-Touch, an app must receive the wheel up/down event MotionEvent.ACTION_SCROLL in Activity.dispatchTouchEvent(MotionEvent event) and apply the pinch-zoom function of the app with step by step information of the wheel scroll.
For example:final float vScroll = event.getAxisValue(MotionEvent.AXIS_VSCROLL);
- vScroll is -1.0, wheel down.
- vScroll is 1.0, wheel up.
    @Override public boolean onGenericMotion(View v, MotionEvent event) {
        int action = event.getAction();

        if (action == MotionEvent.ACTION_SCROLL) {
                float wheelY = event.getAxisValue(MotionEvent.AXIS_VSCROLL, i);

		if(wheelY > 0.0f) {
			// wheel down
		} else {
			// wheel up
		}
		return true;
        }
    }
Mouse Icon change
This allows the mouse icon to change when pointed at a clickable object. To change the mouse icon, set android:state_hovered="true" on the required views.
Mouse scrolling works automatically if apps use ListView, GridView, or ScrollView / HorizontalScrollView of the Google SDK. See Android's App Scroll Bar reference guide for more details.
Change the size of an application window, on supported devices (running Android 7.1.1 +), while connected to Samsung DeX.
Set window size in DeX mode
Method 1. Adding Meta-data in the AndroidManifest.xml
The following meta-data can be used to customize the launch window size for an app in DeX mode. This meta-data could be declared in element. If the meta-data launchwidth and launchHeight is set to 0, the activity will be launched in full screen in Samsung DeX mode.
ActivityOptions uses the setLaunchBounds API to launch an app in fullscreen mode. For example, set LaunchBounds as (0, 0, 0, 0) to launch the app in fullscreen in Samsung DeX mode. The code below demonstrates how to set the LaunchBounds.
Samsung DeX provides the ability to add a delay on the translucent header and footer bar in an application. When the mouse hovers over the top or bottom of the screen, this bar will appear without a delay by default. This customization method allows for a more immersive full screen experience with Samsung DeX.
Meta Data
Value
Remarks
com.samsung.android.dex. transient_bar_delay
int (msec)
This value indicates the delay until the translucent bar is displayed * Translucent bar: header/taskbar in Samsung DeX full screen mode.
Presentation class allows an app to show content on a secondary display. This may not be ideal for Samsung DeX apps, and can be disabled if needed. See Android's App Presentation reference guide for more details.
Disable fixed orientation for camera
If an app requires fixed orientation for camera use, it may not translate well to Samsung DeX Desktop mode. Fixed orientation for camera can be disabled, if needed. See Android's Camera reference guide for more details.
Some tip for Real-time camera rotation control
When connected to Samsung DeX, you can change the orientation of the camera image to best suit how your device is physically set up.
For example, if you have your camera mounted in landscape mode, you can display the image in portrait mode.
Figure 11: Orientation of Camera
You may also encounter orientation changes are needed in the following scenarios:
The camera app is launched on the DeX screen in Samsung DeX Dual mode.
The camera app is launched on the presentationView in screen mirroring mode.
Surface Configuration
Check the preview direction after excute camera app on the DeX screen
Use SurfaceView Class(surfaceHolder)
[Auto rotate is set to ON] -> Whenever rotate device to 90 degree and -90 degree, preview screen is also rotated in the right direction. [Auto rotate is set to OFF] -> Rotation issue is occurred.
Use TextureView Class
Rotation issue is occurred.
So, applications to utilize the camera in Samsung DeX can change the direction of a device and rotate the preview/capture screen with the Camera API.
Camera API version
surface
How to rotate
Camera HAL 1 (android.hardware.camera1)
surfaceView Class (surfaceHolder)
use setDisplayOrientation(int degree) supported by camera1 API
Camera HAL 3 (android.hardware.camera2)
surfaceView Class (surfaceHolder)
Camera2 API does NOT support to setDisplayOrientation(int degree). In only case of Auto rotate set to ON, > Whenever rotate device to 90 degree and -90 degree, preview screen is also rotated in the right direction.
textureView Class
Application can use setRotation(float rotation) or setTransform(Matrix transform) supported by textureview(view)
How to implement this solution
Check the mode that the app run.
whether Samsung DeX dual mode enabled or not / the presentationView in screen mirroring mode enabled or not.
// Checkable whether device is in dual mode or standalone mode

Object desktopModeManager = mContext.getApplicationContext().getSystemService("desktopmode");
if (desktopModeManager != null) {

	  try {
           Method getDesktopModeStateMethod =
           desktopModeManager.getClass().getDeclaredMethod("getDesktopModeState");
           Object desktopModeState = getDesktopModeStateMethod.invoke(desktopModeManager);
           Class desktopModeStateClass = desktopModeState.getClass();
           Method getEnabledMethod = desktopModeStateClass.getDeclaredMethod("getEnabled");
           int enabled = (int) getEnabledMethod.invoke(desktopModeState);
           boolean isEnabled = enabled == desktopModeStateClass.getDeclaredField("ENABLED").getInt(desktopModeStateClass);

            Method getDisplayTypeMethod = desktopModeStateClass.getDeclaredMethod("getDisplayType");
            int displayType = (int) getDisplayTypeMethod.invoke(desktopModeState);
            isDualMode = isEnabled && displayType == desktopModeStateClass.getDeclaredField("DISPLAY_TYPE_DUAL").getInt(desktopModeStateClass);
            isStandaloneMode = isEnabled && displayType == desktopModeStateClass.getDeclaredField("DISPLAY_TYPE_STANDALONE").getInt(desktopModeStateClass);

           // Check isEnabled, isDualMode or isStandaloneMode as you want

       } catch (NoSuchFieldException | NoSuchMethodException |
	IllegalAccessException | InvocationTargetException e) {

		 // Device does not support DeX 3.0
       }
}

else {

		 // Device does not support Samsung DeX or is called too early on boot
}

// check whether presentation is enabled or not

import android.hardware.display.DisplayManager;
import android.view.Display;
DisplayManager displayManager = (DisplayManager) context.getSystemService(Context.DISPLAY_SERVICE);
Display[] presentationDisplays = displayManager.getDisplays(DisplayManager.DISPLAY_CATEGORY_PRESENTATION);
if (presentationDisplays.length > 0) {
      isPresentation = true;
}
whether the app is running in the Samsung DeX screen or the device screen.
   // Checkable whether the camera app is executing on DeX screen or device screen
   Configuration config = mContext.getResources().getConfiguration();
   try{
       Class configClass = config.getClass();
       int SEM_DESKTOP_MODE_ENABLED =
	    configClass.getField("SEM_DESKTOP_MODE_ENABLED").getInt(configClass);
       int semDesktopModeEnabled =
	    configClass.getField("semDesktopModeEnabled").getInt(config);
       if(SEM_DESKTOP_MODE_ENABLED == semDesktopModeEnabled)
       {
	    isDeXMode = true;
       } else {
	   isDeXMode = false;
       }
   } catch (NoSuchFieldException | IllegalAccessException e) {
   }
Get the sensor value for the device's rotation.
import android.view.OrientationEventListener;
private OrientationEventListener mOrientationListener = null;
private static final int ORIENTATION_CHANGE_MARGIN_IN_DEGREE = 15;
public static final int ANGLE_0 = 0;
public static final int ANGLE_180 = 2;
public static final int ANGLE_270 = 3;
public static final int ANGLE_90 = 1;
public static final int ANGLE_NONE = -1;
..
...

mOrientationListener = new OrientationEventListener(context) {
     @Override
     public void onOrientationChanged(int orientation) {
          angle = calculateAngle(orientation);
     }
};
..
...

mOrientationListener.enable();

// mapping the value(0,1,2,3) for the range of angle.

private int calculateAngle(int orientation) {

		// Default rule.
		// -1, -45(315) <= orientation < 45, return value = 0
		// 45 <= orientation < 135, return value = 90
		// 135 <= orientation < 225, return value = 180
		// 225 <= orientation < 315, return value = 270
		// +- MARGIN to prevent frequent orientation changes.

		int newAngle = 0;
		if (orientation == ANGLE_NONE) {
				newAngle = ANGLE_NONE;
		} else if ((315 - ORIENTATION_CHANGE_MARGIN_IN_DEGREE) <= orientation || orientation < (45+ ORIENTATION_CHANGE_MARGIN_IN_DEGREE)) {
				newAngle = ANGLE_0;
		} else if ((45 - ORIENTATION_CHANGE_MARGIN_IN_DEGREE) <= orientation && orientation < (135+ ORIENTATION_CHANGE_MARGIN_IN_DEGREE)) {
				newAngle = ANGLE_270;
		} else if ((135 - ORIENTATION_CHANGE_MARGIN_IN_DEGREE) <= orientation && orientation < (225+ ORIENTATION_CHANGE_MARGIN_IN_DEGREE)) {
				newAngle = ANGLE_180;
		} else if ((225 - ORIENTATION_CHANGE_MARGIN_IN_DEGREE) <= orientation && orientation < (315+ ORIENTATION_CHANGE_MARGIN_IN_DEGREE)) {
				newAngle = ANGLE_90;
		}
		return newAngle;
}
Modify the preview screen with your desired value, as shown in the image above
To check the value you currently have currently set, use setvaluable(isPreview_Amend)
// If using dual mode or presentation mode and the app run in DeX screen,
// amend the preview screen with the direction of the screen in real time.
// set valuable(isPreview_Amend) to true to check whether the value has been modified.

    mOrientationListener = new OrientationEventListener(mContext) {
     @Override
     public void onOrientationChanged(int orientation) {
		if(isDeXMode) {
			 if ((isDualMode == true) || (isPresentation == true)) {
	angle = calculateAngle(orientation);
	if (angle == 0) {
		   mCamera.setDisplayOrientation(90); 	//using camera1 api
		   //mTextureView.setRotation(0);       //using camera2 api and texture view
		   isPreview_Amend = true;
	} else if (angle == 1) {
		  mCamera.setDisplayOrientation(0);	//using camera1 api
		  //mTextureView.setRotation(270);   //using camera2 api and texture view
		  isPreview_Amend = true;
	} else if (angle == 2) {
		  mCamera.setDisplayOrientation(270);	//using camera1 api
		  //mTextureView.setRotation(180);   //using camera2 api and texture view
		  isPreview_Amend = true;
	} else if (angle == 3) {
		  mCamera.setDisplayOrientation(180);	//using camera1 api
		  //mTextureView.setRotation(90);     //using camera2 api and texture view
		  isPreview_Amend = true;
	}
			}
		}
       }
};

mOrientationListener.enable();
In case of Dual mode or Presentation, amend the preview screen via the direction of the screen in real time.
set the valuable(isPreview_Amend) to true for checking whether it is amended or not.
Rotate the capture screen using values: “angle” and “isPreview_Amend”
If the value of isPreview_Amend is true, the capture screen must be rotated with the value of the angle.
If the value of isPreview_Amend is false, the capture screen must be rotated with the value of orientation.
In case of using Camera HAL1(android.harware.camera1),
	//Rotate the capture screen

	Camera.PictureCallback jpegCallback = new Camera.PictureCallback()
	{

	//Rotate the image to the device screen

	Matrix matrix = new Matrix();

	//If the preview screen of camera is rotated, the value of isPreview_Amend is “true”
	//In this case, the capture screen must be rotated.

	if(isPreview_Amend == true) {
		if(angle == 1) {
		       matrix.postRotate(0);
		}
		else if(angle == 2){
		       matrix.postRotate(270);
		}
		else if(angle == 3){
		       matrix.postRotate(180);
		}
	}else

	//If the value of isPreview_Amend is false, the capture screen must be rotated
	//with the value of orientation.

	{
	 matrix.postRotate(orientation);
	}
	}
In case of using Camera HAL3(android.harware.camera2) and textureView,
App developers working with 3rd party camera apps must implement the correct settings according to the 3rd parties app structure.
Appendix 1
The values to utilize for the preview / capture screen for a camera application
int mDisplayOrientation ( = mActivity.getWindowManager().getDefaultDisplay().getRotation() )
The value of rotation angle for device
Camera.CameraInfo info.facing
Rear camera : 0, front camera : 1
Camera.CameraInfo info.orientation
Angle difference between mDisplayOrientation and preview screen
Call the API, Camera setDisplayOrientation(int degree), with above calculated values for the angle of preview/capture screen.
Note: In the case where the camera app is selected through the Samsung DeX desktop display, this implementation is not allowed. The above values will remain fixed as the monitor should not have the ability to be rotated.
Appendix 2
Use cases to modify the Screen Mirroring based on the device rotation
Enabling a device to rotate
Each has the correct value according to the rotation angle of the device.
Disabling a device to rotate and set it to have a portrait orientation
The values of the orientation and the angle must be set to “portrait” and “0”.
Disabling a device to rotate and set it to have a landscape orientation
The values of the orientation and the angle must be set to "landscape" and “90”.
Note: In the case where the camera app is selected through the Samsung DeX desktop display, have the values of “portrait” and “0”. These will remain fixed as the monitor should not have the ability to be rotated.
Follow these instructions to provide a desktop experience with the Samsung Internet Browser.
By default, open web pages in “Desktop View” instead of "Mobile View"
Mozilla/5.0 (Linux; Android $ver; $model) AppleWebKit/537.36 (KHTML, like Gecko) SamsungBrowser/$app_ver Chrome/$engine_ver Mobile Safari/537.36
? Current values: android_ver = 7.0 app_ver = 5.2 , engine_ver = 51.0.2704.106\
User Agent String for Samsung Internet “Desktop View: Based on Chrome Linux UA with additional SamsungBrowser/$ver keyword
Allow users to switch to mobile when needed.
Mozilla/5.0 (Linux; Android $ver; $model) AppleWebKit/537.36 (KHTML, like Gecko) SamsungBrowser/$app_ver Chrome/$engine_ver Mobile Safari/537.36
? Current values: android_ver = 7.0 app_ver = 5.2 , engine_ver = 51.0.2704.106\
User Agent String for Samsung Internet “Mobile View”
Support Mouse Events
In Samsung DeX mode, mouse events are processed as mouse events (In mobile mode, mouse events are transferred to touch events). However, because Touchpad is a supported input device in Samsung DeX, touch events are also supported.
Removing mouse event listeners on touch supported browsers might limit mouse usage on your web site.
HTML < video > autoplay attribute works in Desktop Mode (not supported in mobile mode)
Manage Your Cookies
We use cookies to improve your experience on our website and to show you relevant
advertising. Manage you settings for our cookies below.
Essential Cookies
These cookies are essential as they enable you to move around the website. This
category cannot be disabled.
Company
Domain
Samsung Electronics
developer.samsung.com, .samsung.com
Analytical/Performance Cookies
These cookies collect information about how you use our website. for example which
pages you visit most often. All information these cookies collect is used to improve
how the website works.
Company
Domain
Samsung Electronics
.samsung.com
Functionality Cookies
These cookies allow our website to remember choices you make (such as your user name, language or the region your are in) and
tailor the website to provide enhanced features and content for you.
Company
Domain
Samsung Electronics
developer.samsung.com, google.account.samsung.com
Preferences Submitted
You have successfully updated your cookie preferences.
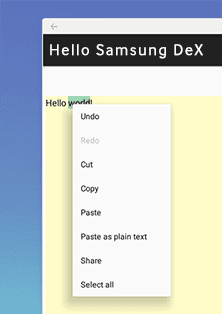
 Figure 11: Orientation of Camera