Building a Flutter Application with Samsung Pay: End-to-End Guide
Jakia Sultana
Engineer, Samsung Developer Program
Integrating payments into a mobile app is a security-critical and UX-sensitive task. While Flutter simplifies cross-platform development, platform-specific payment systems like Samsung Pay still require careful handling.
Samsung provides an official Samsung Pay SDK Flutter Plugin, which allows Flutter applications to integrate Samsung Pay without writing custom platform channels. However, for production-grade integration, using the plugin correctly is essential, especially when it comes to checking Samsung Pay readiness.
In this blog, you learn how to build a sample Flutter application by using the official Samsung Pay SDK Flutter Plugin and following Samsung-recommended best practices. You can download the complete sample project at the end of this blog.
Why Use the Official Samsung Pay SDK Flutter Plugin?
Integrating payment systems requires careful handling of platform constraints, security, and long-term maintainability. The Samsung Pay SDK Flutter Plugin addresses these concerns by providing an official abstraction over the native Samsung Pay SDK, enabling Flutter applications to leverage Samsung Wallet features without direct interaction with platform-specific APIs.
By exposing supported Dart APIs and managing native SDK communication internally, the Flutter plugin removes the need for custom MethodChannel implementations and reduces integration risk. For Flutter applications targeting Samsung Galaxy devices, this approach offers the most stable and maintainable path to Samsung Pay integration.
The following diagram illustrates the high-level architecture of the Samsung Pay integration.
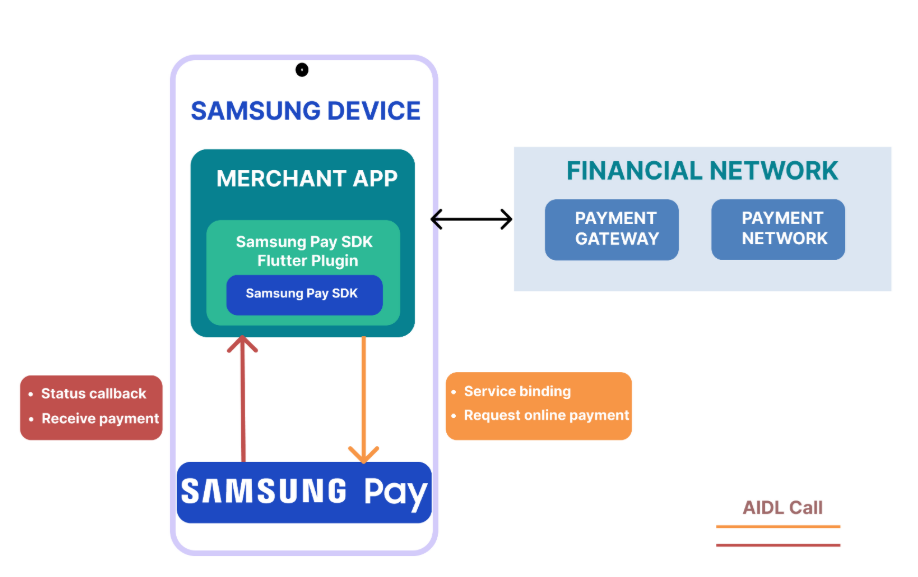
Figure 1: Samsung Pay integration architecture
Prerequisites
Before starting, ensure the following requirements are met:
- You are an approved Samsung Pay partner (approval typically takes a few days)
- A service is created in the Samsung Pay partner portal. Find details from here.
- The latest version of Android Studio is installed
- The Flutter SDK is installed and configured
- The Samsung Pay SDK Flutter Plugin is downloaded
Set Up the Integration Code
To start the integration process, add the Samsung Pay SDK Flutter Plugin to your project dependencies:
dependencies:
  samsung_pay_sdk_flutter:
    path: ./samsungpaysdkflutter_v1.03.00/samsungpaysdkflutter
Next, configure the Samsung Pay SDK API level by setting a valid Samsung Pay SDK API version (latest version: 2.22) by opening android > app > src > main > AndroidManifest.xml and adding the API level in the metadata inside the <application> tag.
<meta-data
    android:name="spay_sdk_api_level"
    android:value="2.22" />
<!-- Use the most recent SDK version to leverage the latest APIs -->
Initialize Samsung Pay in Flutter
Create an instance of SamsungPaySdkFlutter with valid PartnerInfo (which contains the service ID and service type). If you are a merchant, then the service type must be set to INAPP_PAYMENT.
The following code snippet initializes the Samsung Pay SDK using your service ID and in-app payment configuration.
import 'package:samsung_pay_sdk_flutter/samsung_pay_sdk_flutter.dart';

static final SamsungPaySdkFlutter sdk = SamsungPaySdkFlutter(
  PartnerInfo(
    serviceId: SERVICE_ID,
    data: {
      SpaySdk.PARTNER_SERVICE_TYPE: ServiceType.INAPP_PAYMENT.name
    }
  )
);
Check Samsung Pay Availability
Samsung Pay readiness must be checked before calling any API of the Samsung Pay SDK Flutter Plugin. There are several reasons why Samsung Pay might not be in the ready state, such as an unsupported device, unsupported region, or incomplete Samsung Wallet setup, so this check is mandatory.
SamsungPayConfig.sdk.getSamsungPayStatus(
  StatusListener(
    onSuccess: (status, bundle) {
      // Status "2" means Samsung Pay is READY
      onResult(status == "2");
    },
    onFail: (errorCode, bundle) {
      // If status check fails, Samsung Pay is not ready
      onResult(false);
    }
  )
);
Create Payment Information with a Custom Payment Sheet
To initiate a transaction, you must create a payment request using a custom payment sheet.
The AmountBoxControl object is mandatory for building a CustomSheet. It provides the monetary details of the transaction.
AmountBoxControl amountControl = AmountBoxControl(
    Strings.AMOUNT_CONTROL_ID, Strings.currency
);

// Add product item to the payment sheet
amountControl.addItem(
  product.productId,
  product.name,
  product.price,
  ""
);

// Set total amount (product price + additional fees)
// You can add tax, shipping, or other fees here
amountControl.setAmountTotal(
  product.price + 5.00, // Add $5 for shipping/fees as example
  SpaySdk.FORMAT_TOTAL_PRICE_ONLY
);
Next, add the amountBoxControl to the CustomSheet instance.
CustomSheet customSheet = CustomSheet();
customSheet.addControl(amountControl);
Finally, create the payment information by populating the CustomSheetPaymentInfo instance
// Configure merchant information for the payment
CustomSheetPaymentInfo paymentInfo = CustomSheetPaymentInfo(
  merchantName: "Samsung Pay Flutter App",
  customSheet: customSheet
);

// Set merchant details
paymentInfo.merchantId = "123456";
paymentInfo.setMerchantName("Sample Merchant");
paymentInfo.setMerchantCountryCode("US");
Request Payment
To start the payment process, call the startInAppPayWithCustomSheet() API. This API requires CustomSheetPaymentInfo and CustomSheetTransactionInfoListener instances set up in the last step.
When this API is called, a custom payment sheet is displayed on the merchant application screen. The user can select a registered card for the payment and change the billing and shipping addresses if needed. Payment results are delivered to the CustomSheetTransactionInfoListener.
The onCardInfoUpdated() callback is triggered when the user changes the payment card. In this callback, the updateSheet() method must be called to update current payment sheet.
CustomSheetTransactionInfoListener listener = CustomSheetTransactionInfoListener(
  onCardInfoUpdated: (PaymentCardInfo cardInfo, CustomSheet sheet) {
    // Called when user changes the selected card on payment sheet
    // You can update the sheet here if needed (e.g., change fees based on card)
    SamsungPayConfig.sdk.updateSheet(sheet);
  },
  onSuccess: (paymentInfo, paymentCredential, extraData) {
    // Payment completed successfully
    // paymentCredential contains the encrypted card details to send to your backend
    print("Payment Successful!");
    print("Payment Credential: $paymentCredential");
    onSuccess();
  },
  onFail: (errorCode, bundle) {
    // Payment failed or user cancelled
    print("Payment Failed: $errorCode");
    onFail(errorCode);
  }
);
Lastly, call startInAppPayWithCustomSheet() API to start the payment:
SamsungPayConfig.sdk.startInAppPayWithCustomSheet(paymentInfo, listener);
Testing Samsung Pay Integration
Follow the steps below to test Samsung Pay integration
- Configure the STG environment: Add tester accounts to your service and generate a debug expiration date for the test accounts.
- Install Samsung Wallet test application: To test your application in the staging environment, the latest version of the Samsung Wallet test application is required. You can install it from the Samsung Pay Partner portal. However, to test your app in production mode, you need to use a market released application.
- Test cards: To thoroughly test your application, you must add at least one payment card to the Samsung Wallet application. Samsung provides test cards for this purpose. Keep in mind that the test cards only work in staging environments, not in production.
- Run the application: After setting up the environment, build the application and test it on any supported Galaxy device.

Figure 2: Samsung Pay Flutter sample application
Release Your Application
After successful testing, submit your application for release approval through the Samsung Pay Developers Portal. Once approved, your app can be published for your users.
Conclusion
Using the official Samsung Pay SDK Flutter Plugin makes it simpler to create a secure and reliable payment integration for Flutter applications on Galaxy devices. By following Samsung-recommended practices, such as checking Samsung Pay readiness and handling custom payment sheets correctly, you can build a production-ready and maintainable payment experience.
Additional Resources
- Samsung Pay Documentation provides an overview of the key features and highlights the benefits of using Samsung Pay.
- Samsung Pay Partner Onboarding is an end-to-end guide of becoming a partner to release your app.
- Samsung Pay – Code Lab is an interactive, hands-on tutorial that teaches you to how to integrate Samsung Pay SDK.
- Samsung Developer Forums is an open community for developers where you can post your query and get support from other developers.
- Samsung Developer Tech Support Channel is a 1-on-1 support channel where you can get assistance from the Samsung engineers.
- Download the complete sample project here.


