If you already have a Samsung Account, click LOG IN otherwise, click SIGN UP and create an account. A company business email address that won't change over time is recommended as the primary Samsung Account User ID for managing your portal projects.
Agree to the site's terms and conditions and acknowledge that you understand the Samsung Pay Partners Privacy Policy, then click CREATE A SAMSUNG ACCOUNT.
Fill out the onscreen account creation form, making sure to correctly type the Security Code, then click Continue.
Click SIGN UP, enter your Samsung Account ID (email address) and Password, then click Sign in.
Look in your email inbox for a Welcome message with an ACCOUNT ACTIVATION link and click the link.
This opens the developers site registration page. Complete the company and user profile described in the next step to become a registered Samsung Pay developer partner.
Register your membership
While becoming a member of the Samsung Pay developer community, you need to provide some information about your company - contact information, type of business, size, etc. This information is entered into a company and user profile, which you can subsequently update as changes occur.
If you are the first one in your company to join Samsung Pay Developers, you will be the principal contact. As such, you will be given permissions to manage projects and invite others in your company to collaborate. If you are an invited co-worker, you'll need your company's Partner ID to register.
Follow these steps to register:
If you are the first Samsung pay member of your company to register, select the first option "I am the first Samsung Pay member of my company". If you were given a Samsung Pay Partner ID by a co-worker, select the second option "My Company is already registered" and enter your company's Partner ID in the field provided.
Click NEXT.
Complete the company information form and agree to the terms and conditions of use, then click SAVE AND NEXT. If you cannot complete the profile at this time, click SKIP AND VERIFY LATER.
Complete the user information form, then click DONE; or, if you cannot provide the information at this time, click SKIP AND VERIFY LATER.
Upon review of the information provided, your Samsung Pay relationship manager (RM) may request additional details. Once your membership registration is approved, you'll be granted access to currently restricted areas of the Samsung Pay Portal and you can invite members of your team to collaborate on your Samsung Pay projects. Until then, take advantage of valuable resources like the Samsung Pay SDK and SDK Programming Guide from the following link:
When you receive the email notifying you of membership approval, you're ready to get started. In your browser, return to the Samsung Pay Portal and SIGN IN
Set up your partner project
When you integrate your project with Samsung Pay, it is important to have a clear understanding of what is involved. For starters, consider the difference between apps and services.
App: An app can be your Issuer app or Merchant app.
Service: A service is a combination of your app, its service type, a CSR and a service ID. Your app will pass these information to Samsung Wallet for partnership verification.
You can create different service for the same package for multiple purpose testing. Note that,only one application can be added under one service ID. For example:
App deployment scenario
Unique service-app combinations
Global issuer app using a different CSR (encryption key) for services in different regions to interact with local servers
Service 1 = (com.issuer.walletapp, CSR1_US)
Service 2 = (com.issuer.walletapp, CSR2_PLCC_ABCMart)
Same issuer app for all customers but different CSRs for managing different card services (B2B vs PLCC)
Service 1 = (com.issuer.walletapp, CSR1_Regular)
Service 2 = (com.issuer.walletapp, CSR2_PLCC_ABCMart)
Multiple merchant apps using the same PG
Service 1 = (com.merchant.electronicsapp, CSR_PG1)
Service 2 = (com.merchant.groceryapp, CSR_PG1)
Global merchant app using a different PG for each country
Service 1 = (com.merchant.electronicsapp, CSR_PG1)
Service 2 = (com.merchant.electronicsapp, CSR_PG2)
Multiple web sites using the same PG
Service 1 = (electronicssite.merchant.com, CSR_PG1)
Service 2 = (grocerysite.merchant.com, CRS_PG1)
Global merchant web site using a different PG for each country
Service 1 = (electronicsapp.merchant.com, CSR_PG1)
Service 2 = (electronicsapp.merchant.com, CSR_PG2)
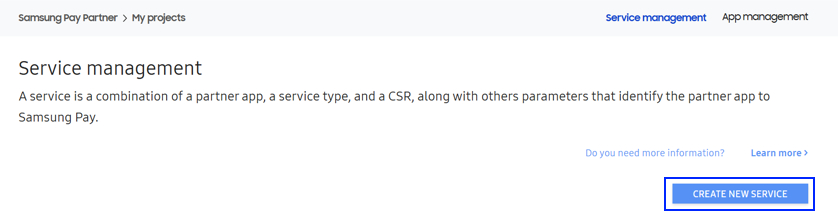
Create new service
To create a new service follow the below steps:
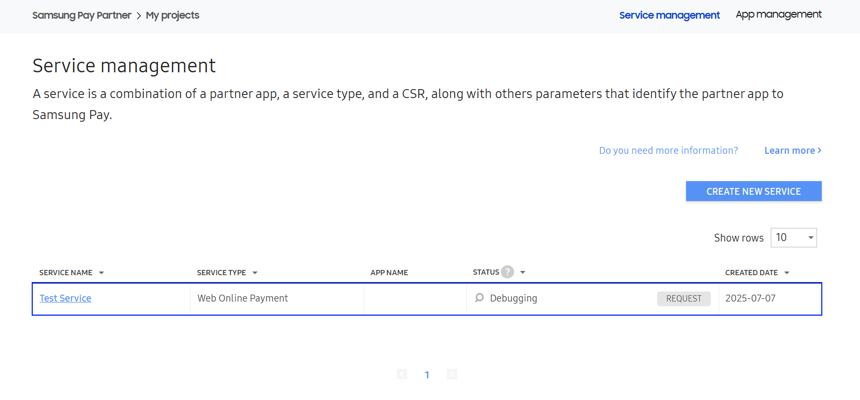
Go to My Projects > Service management or click Services management in the navigation panel on the left, then click CREATE NEW SERVICE.
Select For test or For release to define the service for integration with Samsung Pay, then click NEXT. Note that, Samsung Pay will verify all services requested only for release purpose. This is to ensure all Samsung Pay features are functioning correctly and follows Samsung Pay guideline.
Select your desired service type:
Web Online Payment Service
W3C mobile web payments
In-App Online Payment Service
App to App card enrollment
Click SAVE AND NEXT.
Web online payment service
Enter the new SERVICE NAME.
Select your SERVICE COUNTRY.
Select your PAYMENT GATEWAY from the list of supported payment gateways.
If your payment gateway uses the network token mode, upload the certificate signing request (CSR) you obtained from your PG. Supported formats are .CSR or .PEM. Contact your PG for details.
Confirm your agreement with the portal's terms and conditions (click the link to read and print), then click DONE.
Thus, you have completed service configuration for Web Online Payment.
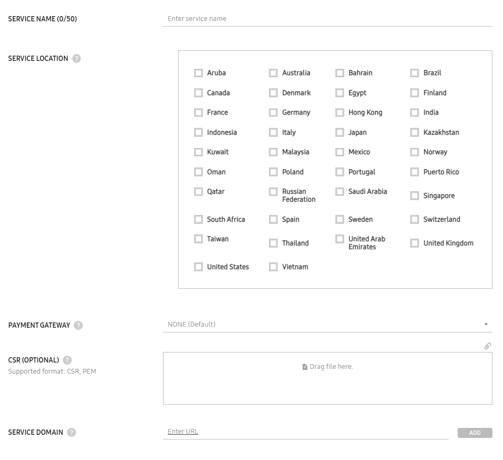
W3C mobile web payments service
Enter the new SERVICE NAME.
Select your SERVICE COUNTRY.
Select your PAYMENT GATEWAY from the list of supported payment gateways.
If your payment gateway uses the network token mode, upload the certificate signing request (CSR) you obtained from your PG. Supported formats are .CSR or .PEM. Contact your PG for details.
Enter the payment domain name(s) for your website in the SERVICE DOMAIN field and click ADD. For example, if your domain is mywebstore.com but the checkout page is hosted on the subdomain payments.mywebstore.com, you will need to enter payments.mywebstore.com as the SERVICE DOMAIN in the portal. For each additional domain name, click ADD.
Confirm your agreement with the portal's terms and conditions (click the link to read and print), then click DONE.
Thus, you have completed service configuration for W3C mobile web payments.
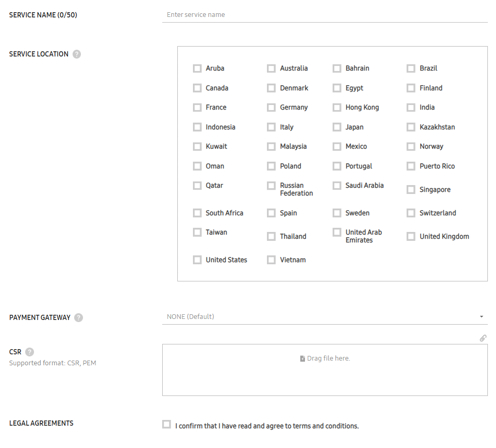
In-App online payment service
Enter the new SERVICE NAME.
Select your SERVICE COUNTRY.
Select your PAYMENT GATEWAY from the list of supported payment gateways.
Drag and drop the CSR you share with your payment gateway in the box provided (or click the paperclip to browse).
Confirm your agreement with the portal's terms and conditions (click the link to read and print), then click SAVE AND NEXT.
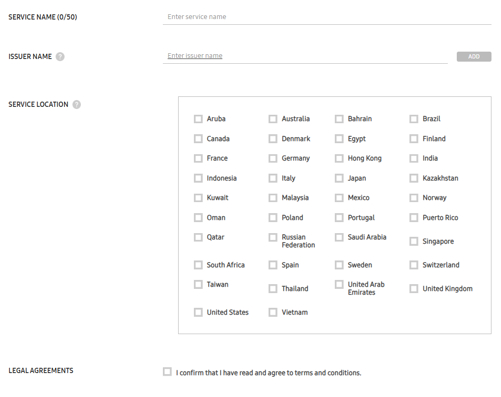
App to App card enrollment Service
Enter the new SERVICE NAME.
Select your SERVICE COUNTRY.
Add ISSUER NAMEs. These correspond to your Financial Institution/bank's name(s) registered with the card networks. Be sure to click the ADD button after each entry.
Note that, the issuer name on the Samsung Pay Portal and the actual issuer name of the card must match. If you cannot confirm the actual issuer name of the card, just add your card to Samsung Wallet app and see its details information. Open Wallet App > Tap on the card > Three-dot menu > Customer services option. Under the title you will find the issuer name.
Confirm your agreement with the portal's terms and conditions (click the link to read and print), then click SAVE AND NEXT.
For Android SDK (In-App Online Payment Service and Push Provisioning Service), you have to go through two additional steps- providing app information and test environment setup.
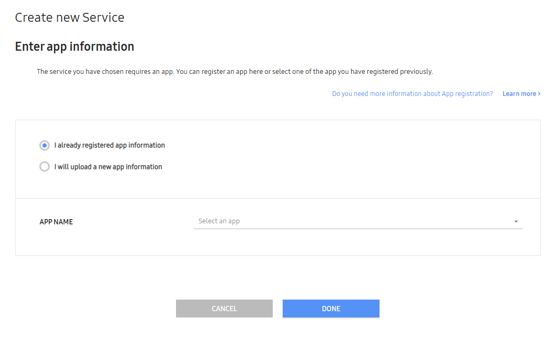
Providing app information:
If you have already registered an app following Register a partner app for Android SDK section, select I already registered app information. Then select the desired APP NAME from the app list.
You can add a new app on the fly by selecting I will upload new app information.
Click NEXT.
Test environment setup:
Go to My Projects > Service management.
Partners can create or update an existing service.
a. To create a service, click Create New Service, and select your chosen service type. Fill the respective service information fields. Once filled, click Save and Done to proceed to the next section.
b. To update a service, click an existing service to redirect to the Service details page.
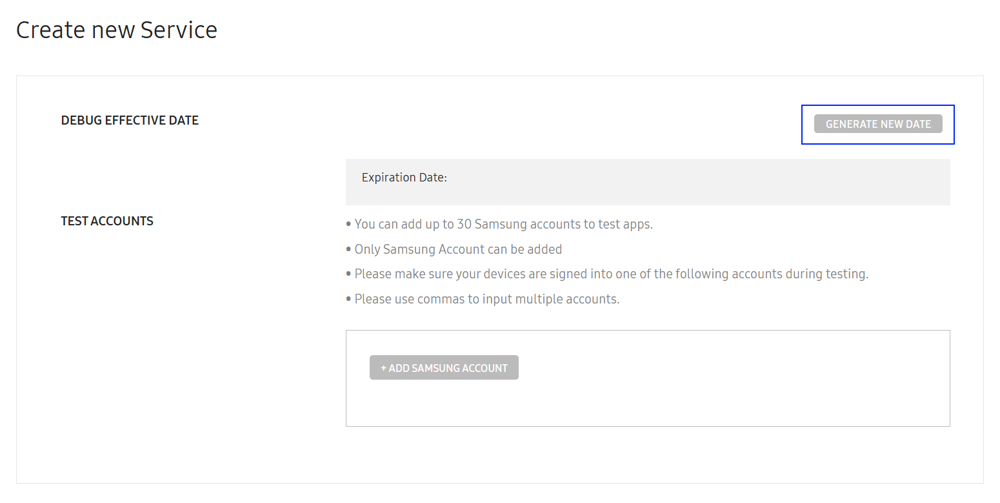
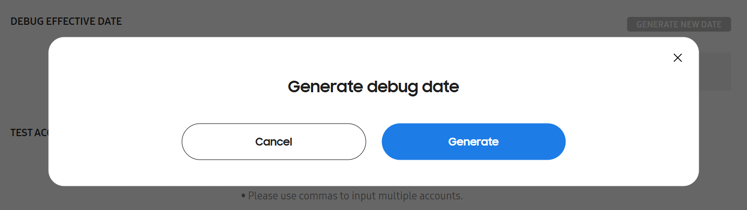
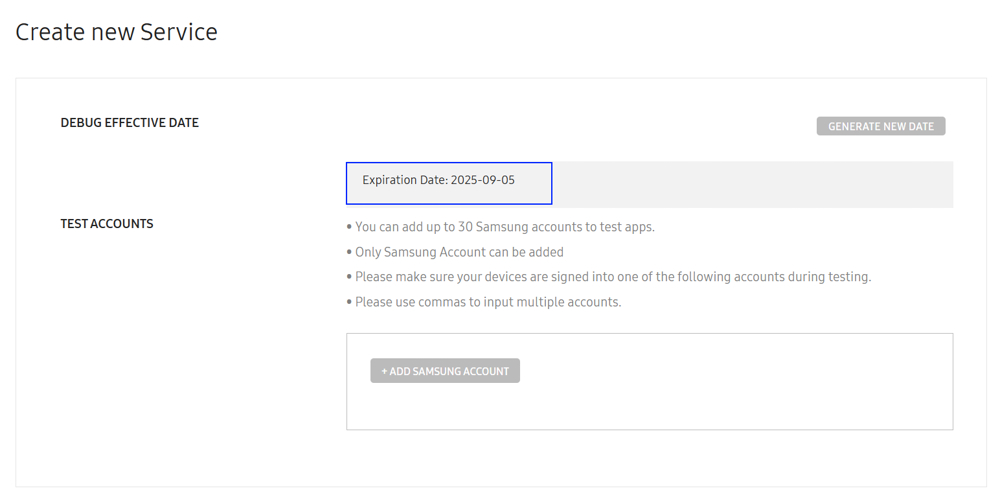
In Debug Effective Date, click Generate New Date to generate the debug expiration date of the test accounts.
For existing services, Generate New Date button is a feature to extend the debug effective date. In Service details page, partners can extend test date by clicking the button on the prompt alert.
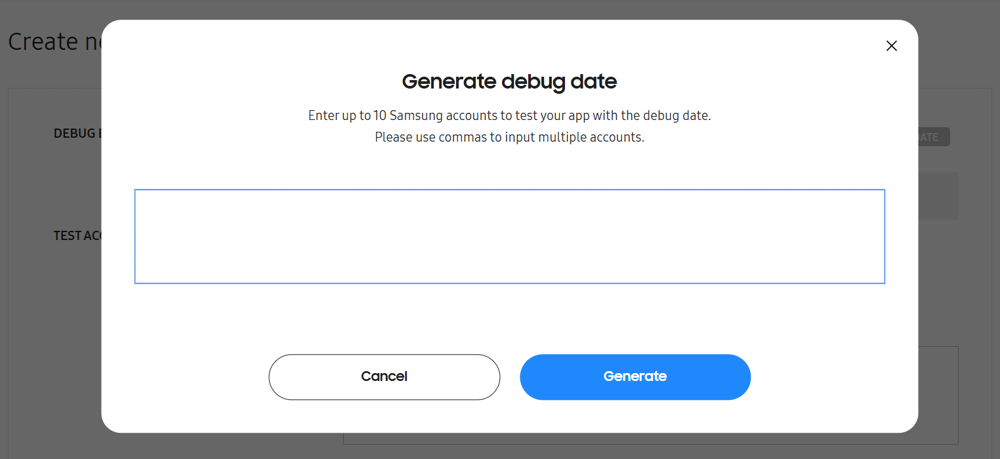
Before generating the date, a prompt alert is displayed to add email addresses of the test accounts.
The test accounts must be Samsung accounts associated with a registered Samsung Pay app on a supported device. You may add up to 30 test accounts.
NoteUse commas to input multiple accounts.
Example: test1@samsung.com,test2@samsung.com,test3@samsung.com
After adding the test accounts, click Generate to generate the debug expiration date of the test accounts.
Alternatively, partners can add test accounts by clicking Add Samsung Account button, and input the test account email addresses.
Once the test environment information is filled out, click Done to save the service configuration.
The service is displayed in the Service management dashboard with a Debugging status. Partners can use their service with SDK and test accounts until the generated Debug Effective Date.
Register a partner app for Android SDK
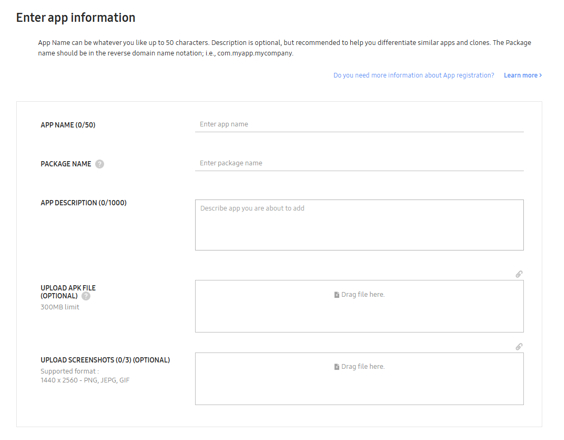
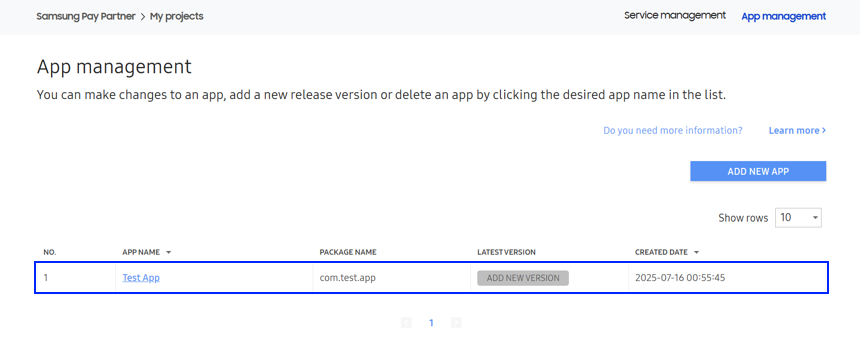
Go to MY PROJECTS > App management in the navigation panel on the left, then click ADD NEW APP.
Enter the APP NAME.
Enter its PACKAGE NAME to specifically identify this app.
Enter an APP DESCRIPTION (optional; helpful for version control).
Upload the APK file by dragging and dropping it in the corresponding box. Click the paperclip icon to browse.
Upload representative screenshots showing UI branding elements/buttons in a supported format (PNG, JPEG, GIF) indicating Samsung Pay as a supported payment option in your app. Steps 5 and 6 are required for release versions of your app; not required for initial integration testing.
Click CREATE, then click NEXT at the bottom of the plug-in configuration page.
Your newly added app is now listed in your App Management dashboard. You can view its details by clicking its APP NAME. Then, on the App details page, you can edit the APP NAME and DESCRIPTION by clicking the corresponding pencil icon.
Manage Your Cookies
We use cookies to improve your experience on our website and to show you relevant
advertising. Manage you settings for our cookies below.
Essential Cookies
These cookies are essential as they enable you to move around the website. This
category cannot be disabled.
Company
Domain
Samsung Electronics
developer.samsung.com, .samsung.com
Analytical/Performance Cookies
These cookies collect information about how you use our website. for example which
pages you visit most often. All information these cookies collect is used to improve
how the website works.
Company
Domain
Samsung Electronics
.samsung.com
Functionality Cookies
These cookies allow our website to remember choices you make (such as your user name, language or the region your are in) and
tailor the website to provide enhanced features and content for you.
Company
Domain
Samsung Electronics
developer.samsung.com, google.account.samsung.com
Preferences Submitted
You have successfully updated your cookie preferences.