Automate Your Galaxy Store Application Deployment Using the Galaxy Store fastlane Plugin
Mobassir Ahsan
Engineer, Samsung Developer Program
If you have released your Android application to Google Play using fastlane and its supply tool, you can now also release it to Galaxy Store from the same pipeline. With the Galaxy Store fastlane plugin, you can upload a new binary, update the store listing, and submit an update for review, eliminating the need for manual uploads through the Seller Portal. Once you've handled the initial registration, you can leave the web interface behind and manage everything from your terminal.
In this tutorial, you will learn how to automate Galaxy Store releases from start to finish using GitHub Actions and the Galaxy Store fastlane plugin.
To follow this tutorial, you require an application already published on Google Play that uses fastlane for releases.
Prerequisites
To follow this tutorial, you need the following
- A Galaxy Store Seller Portal account with commercial seller status.
- An Android project that already has fastlane set up for Google Play using supply
- Ruby (3.1 or newer) and Bundler installed to configure and run the lanes
When you have completed all the prerequisites, proceed to the next step.
Prepare your Application for Publishing in the Seller Portal
You need to upload your application to Galaxy Store and get the required tokens in order to automate application updates.
- Register your application in the Seller Portal.
- Publish at least one version of your application manually using Galaxy Store.
- Create a service account and request an access token.
- Get the 12-digit content ID for the application.
After completing these steps, we can move onto the main part of this guide, implementing fastlane for Galaxy Store. Follow the next steps to ensure that your application is properly configured for complete Galaxy Store automation.
Add the Credentials to GitHub
The GitHub Actions workflows will require the following secret and variable values to be set in order to work with the Galaxy Store fastlane plugin
| Name | Type | Value |
|---|---|---|
GALAXY_STORE_ACCESS_TOKEN
|
Secret | The access token |
GALAXY_STORE_SERVICE_ACCOUNT_ID
|
Secret | The service account ID |
GALAXY_STORE_CONTENT_ID
|
Variable | The 12-digit content ID |
Store the access token and service account ID as secrets and the content ID as a variable. To add them using the GitHub website UI:
- In your GitHub repository, go to Settings > Secrets and variables > Actions.
- On the Secrets tab, click the New repository secret button.
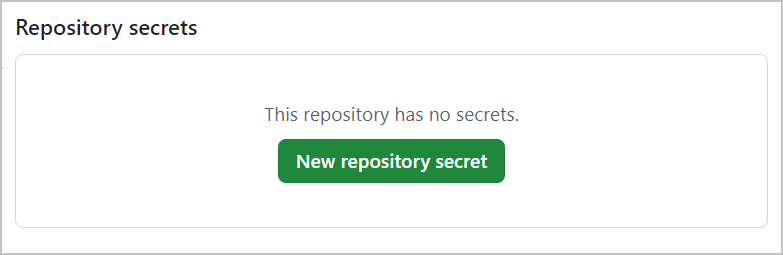
Figure 1: Adding repository secrets
- In the New Secret screen, input "GALAXY_STORE_ACCESS_TOKEN" as the name, and then paste your Galaxy Store access token as the secret. Click Add Secret to add the access token to your repository.
- Repeat steps 2 and 3 for GALAXY_STORE_SERVICE_ACCOUNT_ID.
- Switch to the Variables tab, and click the New repository variable button.
- Enter GALAXY_STORE_CONTENT_ID as the name and your application’s content ID as the value, and then click Add variable to finish adding the content ID.
Now the secrets and variables are set in the repository and ready to use directly in GitHub Actions. Next, we need to configure the fastlane implementation and add our Galaxy Store lanes to the deployment workflow.
Add the Galaxy Store fastlane Plugin
Next, we need to add the Galaxy Store fastlane plugin to our project.
Open the terminal and navigate to the project’s root folder. Then run the following command to install the Galaxy Store plugin from RubyGems:
bundle exec fastlane add_plugin galaxystore
This will download and install the plugin and add it to fastlane/Pluginfile. This will also add the plugin to the project’s Gemfile.
To check if the fastlane plugin has been properly installed and if fastlane can reach the API with your credentials, you can try running the following commands in your terminal from the project root:
export GALAXY_STORE_ACCESS_TOKEN="<your-access-token>"
export GALAXY_STORE_SERVICE_ACCOUNT_ID="<your-service-account-id>"
bundle exec fastlane run galaxy_store_app_list
If the plugin was installed correctly and the credentials are correct, the galaxy_store_app_list action will run and display all the applications registered under your account.
Add Galaxy Store Lanes to your Fastfile
Fastfile is the core of automation used in fastlane. It contains various "lanes" or configurations which an automation or CI/CD system can invoke on demand. If you have previously configured a Google Play build and deployment automation system using fastlane, your existing Fastfile should have a structure similar to the following:
default_platform(:android)

platform :android do
  desc "Build a release App Bundle"
  lane :build_aab do
    gradle(task: "clean bundleRelease")
  end

  desc "Build and upload to Google Play"
  lane :deploy do |options|
    build_aab
    upload_to_play_store(
      track: options[:track] || "internal"
    )
  end
end
Next, configure this Fastfile to add the galaxystore actions as lanes. Since we are aiming to have feature parity across Google Play and Galaxy Store deployment, add a Galaxy Store lane for each Google Play lane.
Assuming we have the deploy, upload metadata and update rollout lanes for Google Play, let us define similar lanes for Galaxy Store using the galaxystore fastlane plugin actions. Make sure to define each lane inside the platform :android block.
Importing and Updating Galaxy Store Application Metadata
An important but manual part of the application release process is updating the application metadata. Doing this manually for every app store can become quite tedious.
The Galaxy Store fastlane plugin provides developers with the galaxy_store_import_from_supply action, which developers can use to import the configured metadata for Google Play automatically.
Define the lane for importing and updating the metadata as follows:
  desc "Usage: galaxy_upload_metadata publication_type:<01|03>"
  lane :galaxy_upload_metadata do |options|
    galaxy_store_import_from_supply(default_language_code: "ENG")
    galaxy_store_upload_metadata
    galaxy_store_set_publication_type(publication_type: options[:publication_type])
    galaxy_store_submit_app
  end
Running this lane imports the metadata, updates the listing in the Seller Portal, and submits the changes to Galaxy Store for review without building or uploading a binary.
The galaxy_store_import_from_supply action copies the supply files to fastlane/metadata/galaxystore/, converting language codes such as en-US to the corresponding Galaxy Store codes, such as ENG:
| supply (Google Play) file | Galaxy Store file |
|---|---|
title.txt
|
title.txt
|
short_description.txt
|
short_description.txt
|
full_description.txt
|
long_description.txt
|
changelogs/<versionCode>.txt, or changelogs/default.txt
|
new_feature.txt
|
images/icon.png
|
icon.png
|
images/phoneScreenshots/
|
screenshots/
|
video.txt
|
youtube_url.txt
|
If there is no icon or screenshots provided, the plugin leaves them out of the update. For changelogs, the action uses changelogs/<versionCode>.txt when a version code is specified, otherwise, it uses changelogs/default.txt
After importing the application metadata using galaxy_store_import_from_supply, you need to perform some additional steps so that the updated metadata is visible on Galaxy Store. The galaxy_store_upload_metadata action uploads the imported metadata to Galaxy Store and the galaxy_store_set_publication_type action sets the publication type. Finally, galaxy_store_submit_app submits the application in Galaxy Store for review. The galaxy_store_set_publication_type action requires the publication_type parameter, the value of which can be "01", "02" or "03", depending on whether the publication mode is automatic, scheduled, or manual. For reference, check the fastlane documentation. The lane in this example only takes "01" or "03" as the publication_type value.
Next, let’s see how we can configure a more complete automation process including building and uploading the binary to Galaxy Store.
Automating the Complete Build and Publication Process
For the complete build and deployment process, define the galaxy_deploy lane:
  desc "Usage: galaxy_deploy publication_type:<01|03> [rollout:<1-100>]"
  lane :galaxy_deploy do |options|
    build_aab
    galaxy_store_upload_apk(gms: "N")
    if options[:rollout]
      galaxy_store_update_staged_rollout_binary(function: "ADD")
      galaxy_store_set_staged_rollout(action: "ENABLE", app_status: "REGISTRATION", rollout_rate: options[:rollout])
    end
    galaxy_upload_metadata(publication_type: options[:publication_type])
  end
Running this lane performs the following steps :
- Build the signed application bundle using the existing build_aab lane.
- Upload the binary to Galaxy Store. The galaxy_store_upload_apk action can upload both APK and AAB files to Galaxy Store.
Note: In the galaxy_store_upload_apk(gms: "N") action, the gms: "N" option should only be used if your application does not use the Google Play Services SDK. If the application uses GMS, use gms: "Y" instead. - Add the binary to staged rollout and set the rollout rate (if the optional rollout parameter is used).
- Import the application metadata from supply.
- Upload the imported metadata to Galaxy Store.
- Set the publication type for the application.
- Finally, submit the application for review and publication.
In other words, this will automate the complete process of publishing an application update to Galaxy Store. The previously defined galaxy_upload_metadata lane performs the last four steps.
Defining a lane of any configuration is possible depending on your requirements. Next, define additional lanes for manual publication and changing staged rollout rates:
lane :galaxy_publish do
  galaxy_store_publish_app
end

lane :galaxy_update_rollout do |options|
  galaxy_store_set_staged_rollout(
    action: "ENABLE",
    app_status: options[:app_status],
    rollout_rate: options[:rollout]
  )
end
After defining the lanes, move onto creating the actual GitHub Actions workflow, which will use these lanes to automate the build and release process.
Create the GitHub Actions Workflows
Once creating the lanes are complete, you can now create the GitHub Actions workflows to automate the task of running all the lanes.
Create the workflows in .github/workflows/.
The following workflow, galaxy-deploy.yml, builds the App Bundle and runs galaxy_deploy. It is configured to run manually from the Actions tab.
name: Deploy to Galaxy Store

on:
  workflow_dispatch:
    inputs:
      rollout:
        description: 'Staged rollout percentage, e.g. 10 (empty = 100%)'
        type: string
      publish:
        description: 'Publish after approval: auto, or manual (run Galaxy Store Publish)'
        type: choice
        default: auto
        options: [auto, manual]

concurrency: galaxy-store

jobs:
  deploy:
    runs-on: ubuntu-latest
    steps:
      - uses: actions/checkout@v4
      - name: Set up JDK 17
        uses: actions/setup-java@v4
        with:
          java-version: '17'
          distribution: 'temurin'
          cache: gradle
      - name: Set up Ruby
        uses: ruby/setup-ruby@v1
        with:
          ruby-version: '3.2'
          bundler-cache: true
      - name: Make gradlew executable
        run: chmod +x ./gradlew
      - name: Deploy
        env:
          GALAXY_STORE_ACCESS_TOKEN: ${{ secrets.GALAXY_STORE_ACCESS_TOKEN }}
          GALAXY_STORE_SERVICE_ACCOUNT_ID: ${{ secrets.GALAXY_STORE_SERVICE_ACCOUNT_ID }}
          GALAXY_STORE_CONTENT_ID: ${{ vars.GALAXY_STORE_CONTENT_ID }}
          ROLLOUT: ${{ inputs.rollout }}
          PUBLICATION_TYPE: ${{ inputs.publish == 'manual' && '03' || '01' }}
        run: bundle exec fastlane android galaxy_deploy publication_type:"\$PUBLICATION_TYPE" \${ROLLOUT:+rollout:"$ROLLOUT"}
In this workflow, the env block passes the credentials stored in GitHub repository secrets to fastlane. Thus, the build and publication process uses your credentials such as access token, service account ID and content ID.
This workflow provides two manual inputs: the optional rollout field sets the staged rollout rate, and the publish field selects the publication type. Depending on the publish input choice, the publication_type parameter is set to "01" (auto) or "03" (manual) automatically.
Define other workflows in the same pattern. For example, for manual publication, you only need to call the galaxy_publish lane instead of galaxy_deploy and omit all the inputs. The rest of the workflow remains the same as the above example.
      - name: Publish
        env:
          GALAXY_STORE_ACCESS_TOKEN: ${{ secrets.GALAXY_STORE_ACCESS_TOKEN }}
          GALAXY_STORE_SERVICE_ACCOUNT_ID: ${{ secrets.GALAXY_STORE_SERVICE_ACCOUNT_ID }}
          GALAXY_STORE_CONTENT_ID: ${{ vars.GALAXY_STORE_CONTENT_ID }}
        run: bundle exec fastlane android galaxy_publish
Similarly, define a workflow for updating the staged rollout rate:
      - name: Update rollout
        env:
          GALAXY_STORE_ACCESS_TOKEN: ${{ secrets.GALAXY_STORE_ACCESS_TOKEN }}
          GALAXY_STORE_SERVICE_ACCOUNT_ID: ${{ secrets.GALAXY_STORE_SERVICE_ACCOUNT_ID }}
          GALAXY_STORE_CONTENT_ID: ${{ vars.GALAXY_STORE_CONTENT_ID }}
          ROLLOUT: ${{ inputs.rollout }}
          APP_STATUS: ${{ inputs.app_status }}
        run: bundle exec fastlane android galaxy_update_rollout rollout:"\$ROLLOUT" app_status:"\$APP_STATUS"
Make sure to include concurrency: galaxy-store in all of the Galaxy Store workflows so that two different workflows do not run at the same time or cause any race conditions.
Now save and commit the Fastfile and the workflows and push them to your GitHub repository. After pushing the changes, you should be able to run the workflows from the Actions tab in GitHub.
Test the Workflow by Releasing an Update to Galaxy Store
With everything in place, releasing an update uses the same steps as releasing to Google Play:
- Increase the version code of the application. Each update must have a higher version code than the binary it replaces.
- Write the release notes in
fastlane/metadata/android/en-US/changelogs/default.txt.NoteAvoid using emojis in your changelog or descriptions. Galaxy Store's API rejects emojis with an error, even though Google Play accepts them. - Commit and push the changes.
- In GitHub, go to Actions and select "Deploy to Galaxy Store".
- Click the Run workflow button to bring up the workflow form.
- Set the staged rollout rate and publication type.
- Click Run workflow.
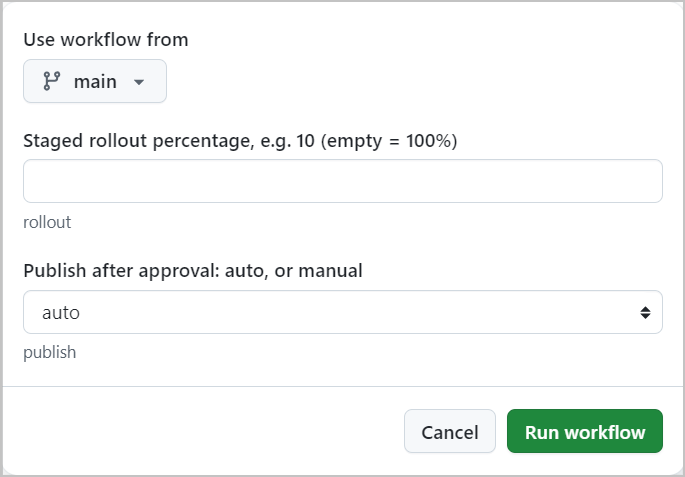
Figure 2: Running workflow from GitHub Actions
Once the workflow is complete, both the application binary and the release notes will be updated in the Seller Portal. Once the Seller Portal review team approves the update, the update will be published automatically or set to wait for manual publication, depending on your selected options. If you selected manual publication, run a publication workflow that calls the galaxy_publish lane after the update passes review and its state changes to READY_FOR_CHANGE.
Conclusion
In this tutorial, you learned how to add the Galaxy Store fastlane plugin to an existing supply setup for Google Play, and how to build, submit, publish, and roll out Galaxy Store updates from GitHub Actions.
Because Galaxy Store lanes reuse the build lane and metadata, you can now reuse your existing Google Play fastlane setup for Galaxy Store releases with the same updates and release notes.
For additional queries and support, feel free to reach out to us through the Samsung Developers Forum, or contact Samsung Developer Support for further inquiries.
Additional References
- Check the Galaxy Store fastlane plugin documentation.
- Learn how to register your application in Seller Portal.
- Learn about the Galaxy Store Developer API.
- Read how to create an access token and use the access token.
- Review GitHub's guide to using secrets in GitHub Actions.