The Samsung Pay Web Checkout service enables you to integrate Samsung Pay into your desktop or mobile website's payment experience. For an overview of the service, see Features and user experience and Service flow.
With the Web Checkout SDK, you can implement a payment checkout in the following ways:
On your website, using a JavaScript-based Web Development Kit
In your Android app, using an Android WebView to display the checkout inside the app as a web page.
The following sections provide all the information you need to integrate the Web Checkout SDK:
Gives step-by-step instructions for adding Web Checkout to your website using JavaScript, and managing the decrypted payment details received from Samsung Pay.
Offers an end-to-end sample code demonstrating a complete implementation from readiness check to payment result notification. For a more detailed step-by-step example, see Samsung Pay Web Checkout code lab.
Supplies the necessary method and object details for your coding.
Features and user experience
Web Checkout allows you to provide Samsung Pay as a checkout option on your website for customers making a purchase. By using Web Checkout, customers can make secure, seamless payments on your website with cards they have previously stored in Samsung Wallet.
Key features of Web Checkout include:
Cross-platform compatibility: Supports web-based payments on both desktop and mobile browsers, allowing customers to complete purchases seamlessly across devices.
Flexible device linking: Customer can link their device to a web session by entering their Samsung Account email or scanning a QR code displayed on the checkout page.
Enhanced transaction security: Payment credentials are securely generated and encrypted on the customer's mobile device before being transmitted to your website.
Desktop experience
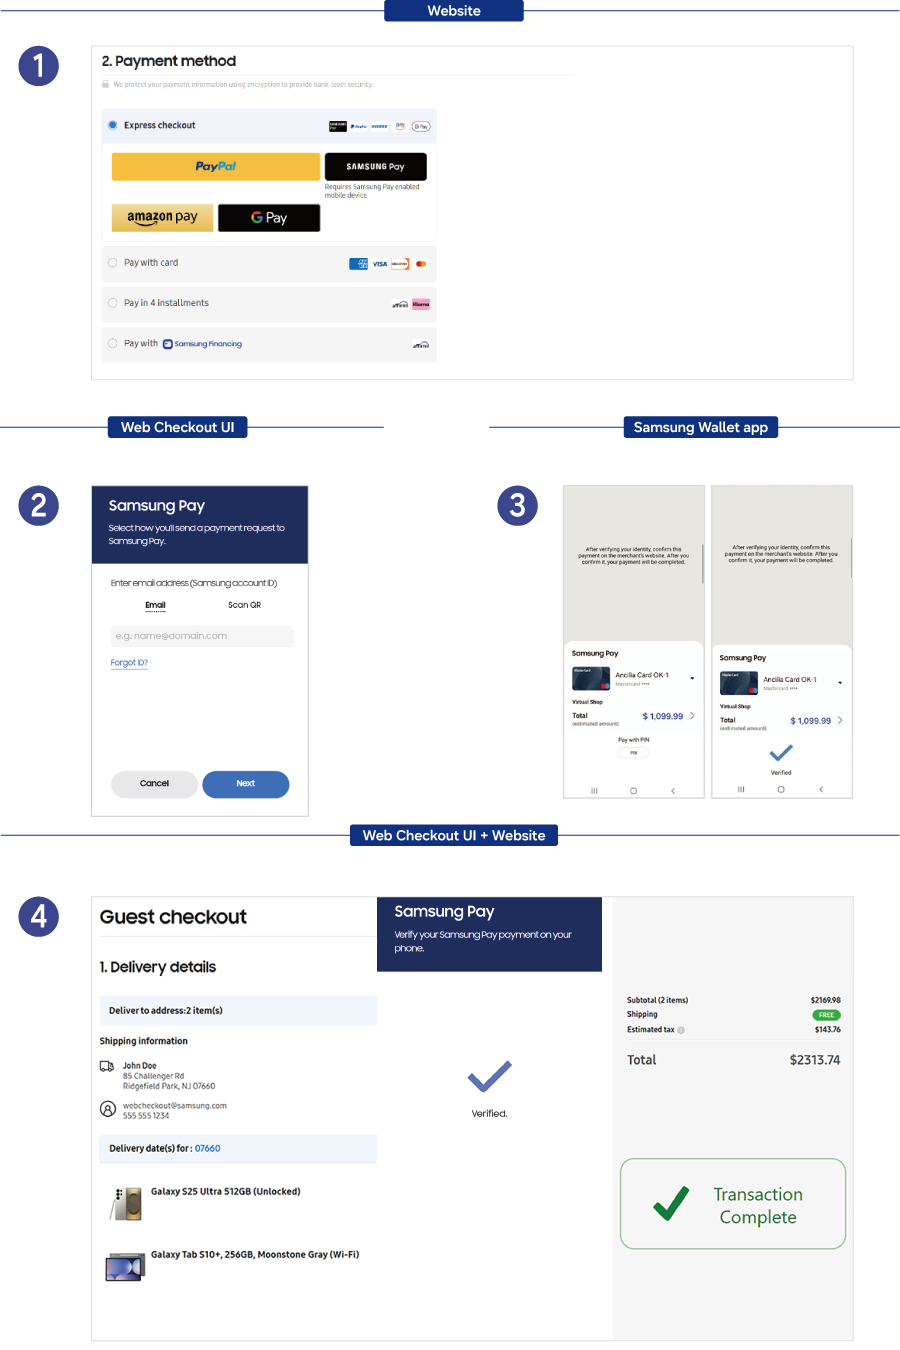
The following figure illustrates the user experience of paying with Samsung Pay on a desktop computer.
When the customer is ready to pay for their purchase, they click Samsung Pay on your website's checkout page in their desktop browser.
The Web Checkout UI opens, prompting the customer to link the transaction to their mobile device. The customer can either enter their Samsung Account email or scan the displayed QR code with their device.
Once linked, the customer receives a push notification on their Samsung Wallet app. When they open the notification, the Samsung Wallet app’s payment sheet displays the order details.
The customer selects a payment card and authorizes the payment via PIN or biometrics.
After authorization, back on the desktop browser, the Web Checkout UI displays the "Verified" screen and your website receives the secure payment credentials from Samsung Pay. You submit the payment to your payment provider and your website displays a "payment successful" screen to the customer.
Mobile experience
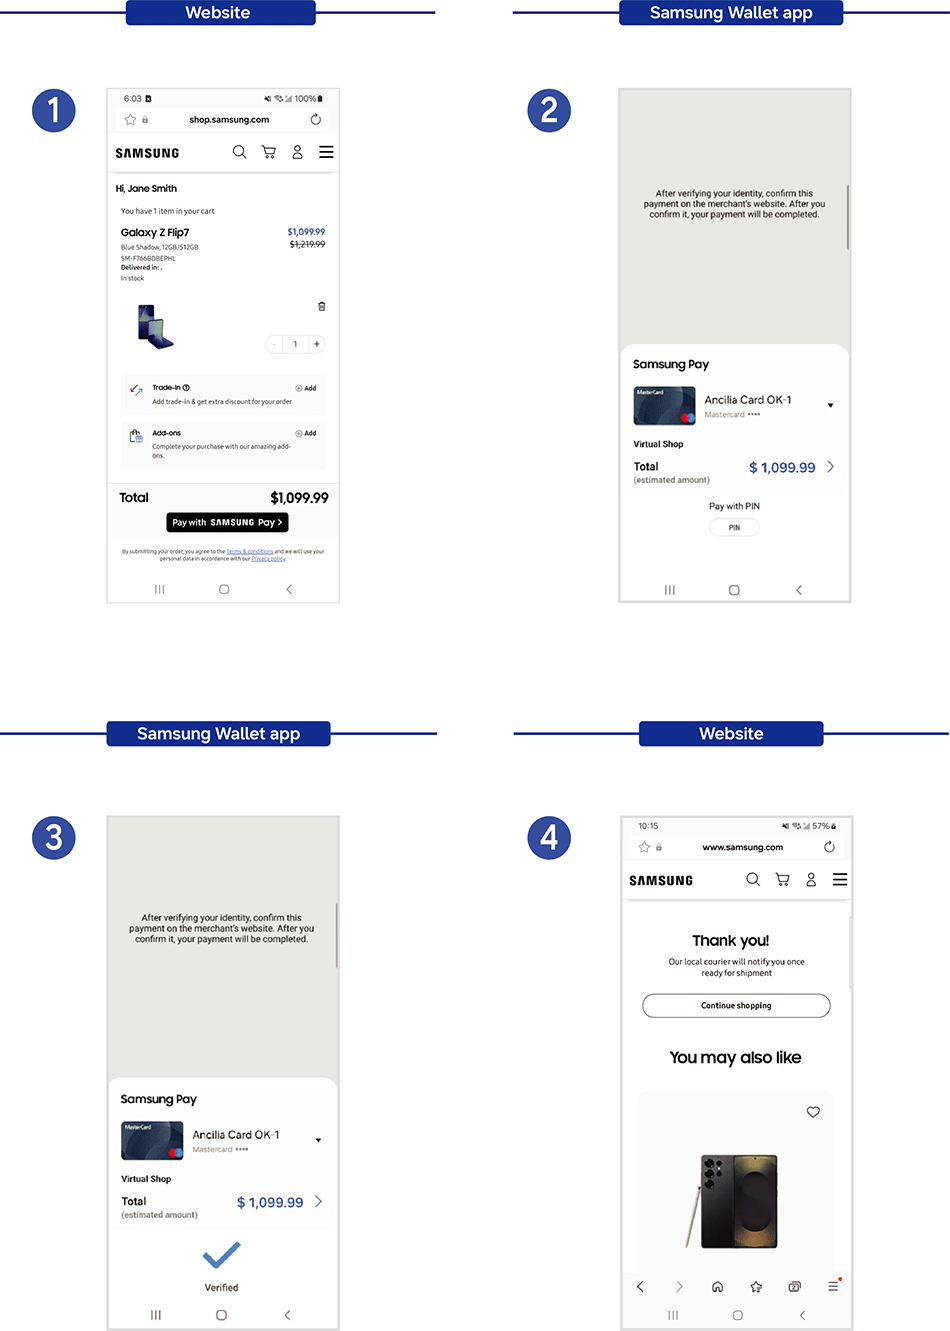
The following figure illustrates the user experience of paying with Samsung Pay on a mobile device.
When the customer is ready to pay for their purchase, they taps Samsung Pay on your website's checkout page on their mobile device.
In a payment request pop-up, the customer taps Pay to open the Samsung Wallet app displaying the order details.
The customer selects a payment card and authorizes the payment via PIN or biometrics.
After authorization, your website receives the secure payment credentials from Samsung Pay. You submit the payment to your payment provider and your website displays a "payment successful" screen to the customer.
Service flow
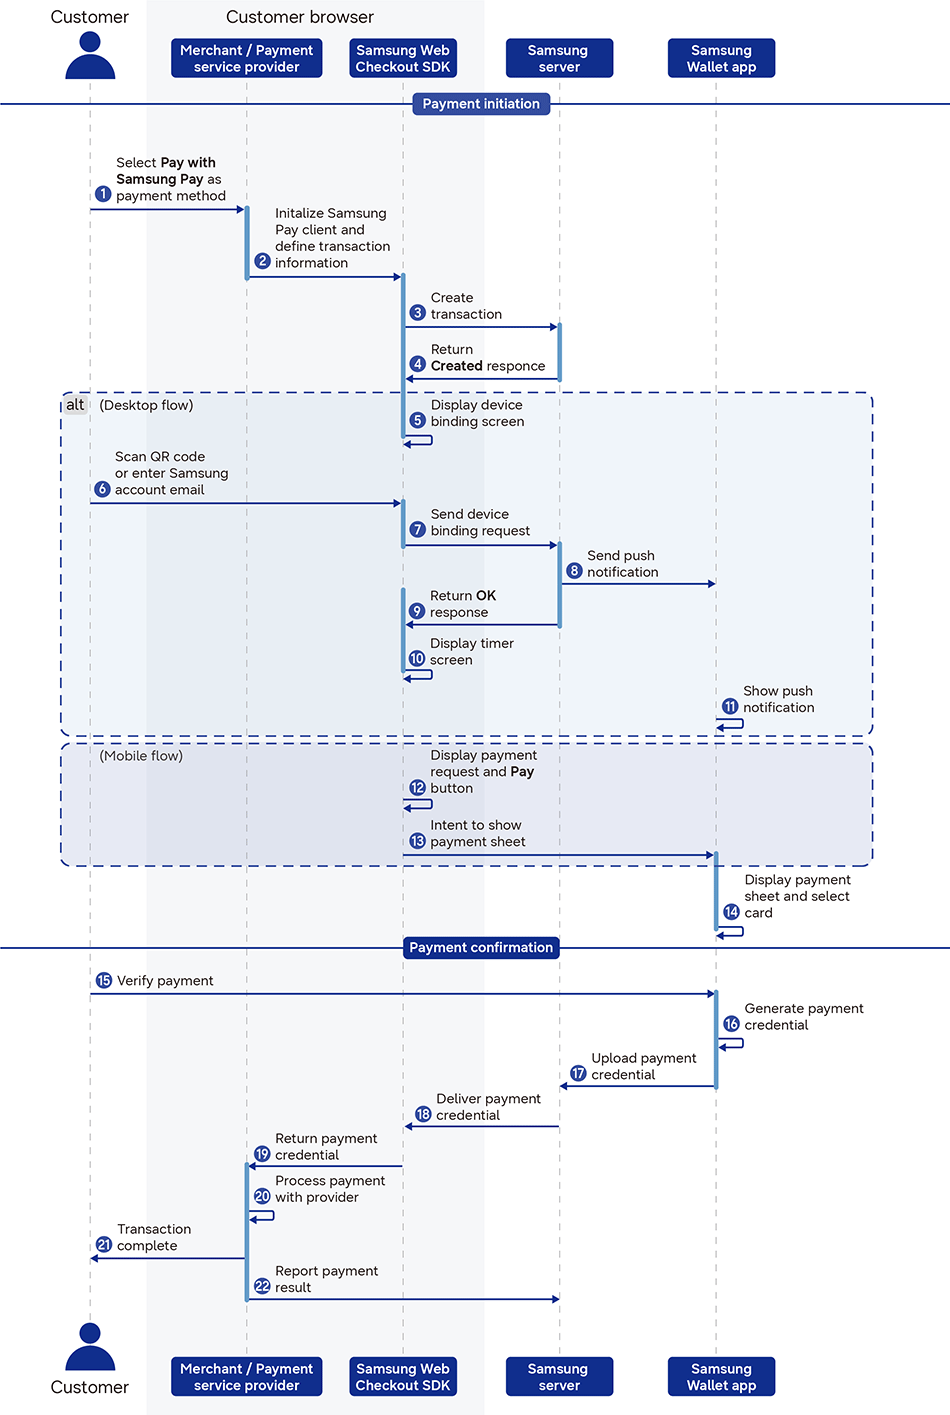
The following diagram illustrates the overall Web Checkout flow from the service point of view.
The customer clicks the Samsung Pay button on your website's checkout page.
The merchant initializes the Samsung Pay client, checks the Samsung Pay availability for the customer, and launches the payment flow by defining the transaction details.
The Web Checkout SDK creates the transaction in the Samsung server.
The Samsung server returns a response after completing the transaction creation.
Desktop flow starts
The Web Checkout SDK displays the device binding screen.
The customer scans the QR code or enters their Samsung Account email.
The Web Checkout SDK sends the device binding request to the Samsung server.
The Samsung server sends a push notification to the Samsung Wallet app.
The Samsung server returns a response to the Web Checkout SDK.
The Web Checkout SDK displays a timer screen.
The Samsung Wallet app shows a push notification.
Desktop flow ends
Mobile flow starts
The Web Checkout SDK displays the payment request and the Samsung Pay button on your checkout page.
The Web Checkout SDK sends the intent to show the payment screen in the Samsung Wallet app.
Mobile flow ends
The Samsung Wallet app displays a payment sheet and lets the customer select their card.
The customer verifies the payment.
Samsung Wallet generates a payment credential.
Samsung Wallet uploads the payment credential to the Samsung server.
The Samsung server delivers the payment credential to the Web Checkout SDK.
The Web Checkout SDK returns the payment credential to the merchant.
The merchant processes the payment credential with their payment provider.
The merchant notifies the customer that the transaction is complete.
The merchant reports the payment result to the Samsung server.
Manage Your Cookies
We use cookies to improve your experience on our website and to show you relevant
advertising. Manage you settings for our cookies below.
Essential Cookies
These cookies are essential as they enable you to move around the website. This
category cannot be disabled.
Company
Domain
Samsung Electronics
developer.samsung.com, .samsung.com
Analytical/Performance Cookies
These cookies collect information about how you use our website. for example which
pages you visit most often. All information these cookies collect is used to improve
how the website works.
Company
Domain
Samsung Electronics
.samsung.com
Functionality Cookies
These cookies allow our website to remember choices you make (such as your user name, language or the region your are in) and
tailor the website to provide enhanced features and content for you.
Company
Domain
Samsung Electronics
developer.samsung.com, google.account.samsung.com
Preferences Submitted
You have successfully updated your cookie preferences.