This guide explains how to register and update information in the TV application.
Registering Application Image
In the "Applications > App Images" menu, you can register and edit application icons and screenshot images to be displayed on the TV.
Input Field
Description
Displayed on TV
Icon Images
Register icon images to be used when your application is displayed on the Smart TV.
WarningWhile the certification and verification are in progress, the application icon cannot be changed. Once the process is finished, this restriction is lifted.
Yes
Screenshot Images
Register screenshot images to be used when your application is introduced on the Smart TV App store.
Yes
Two sizes of application icons must be registered: 1920x1080 and 512x423 pixels.
For the 1920x1080 size icon, if you upload a logo image and a background image separately, 16:9 and 1:1 full-color asset images are automatically created, and the 1:1 size icon can be replaced with another image.
For the logo image, upload a transparent image sized 1920x1080 pixels, in the 32-bit PNG(RGBA) format, and with a file size of 300kb or less. For the background image, upload an image sized 1920x1080 pixels, in the 24-bit PNG(RGB) or JPG format, and with a file size of 300kb or less.
For the 512x423 size icon, upload an image sized 512x423 pixels, in the PNG format, and with a file size of 300kb or less.
You must register 4 screenshots of your application. Upload the screenshot images sized 1920x1080 pixels, in the JPG format, and with a file size of 500kB or less.
Screenshots are displayed on the TV in order of numbers. You can change the order of screenshots by dragging and dropping.
If your application has in-app purchase feature, register a screenshot with price information at number 4. Screenshot number 3 may not be displayed depending on the TV model.
NoteFor detailed specifications of application icons and screenshot images, refer to the App Icons and Screenshots guide.
After entering all the application images, click the "Save" button to complete the registration.
Entering Application Title and Description
In the "Applications > Title/Description on TV" menu, you can register and edit the application title and description that are shown on the TV.
Enter the application title and description for each language so that users can view the application information according to the TV's language selection. And enter the search keyword so that the user can discover your application through the search.
You can add and delete multiple languages by clicking the "Add/Delete Language" button. One of the languages can be designated as the default language, which is then used if there is no application information in the language selected by the user.
Input Field
Description
Displayed on TV
App Title
Enter the application title for the given language. Unlike application names that cannot be changed, you can freely change the application titles displayed on the TV.
ImportantThe application title written in the default language and the application title specified in the configuration file of the application package must be identical. Otherwise, the pre-test will fail during the deployment request process.
WarningWhile certification and verification processes are in progress, the default language and the application title in the default language cannot be changed. Once the processes are finished, this restriction is lifted.
Yes
Description
Feel free to enter a description of the application for the given language, up to 4000 characters.
Yes
Tag
Enter at least 3 search keywords for the given language. Multiple keywords are separated by comma(,).
No
A blue (complete) icon is displayed for languages where all information is entered, including the title and description of the application, and tags for search, and the gray (incomplete) icon is displayed for languages where it has not. The icon can distinguish whether information has been entered.
If there are any languages left with no information entered, you cannot register, so delete unnecessary languages from the list.
After entering the application title and description for each language, click the "Save" button to complete the registration.
Entering Service Information
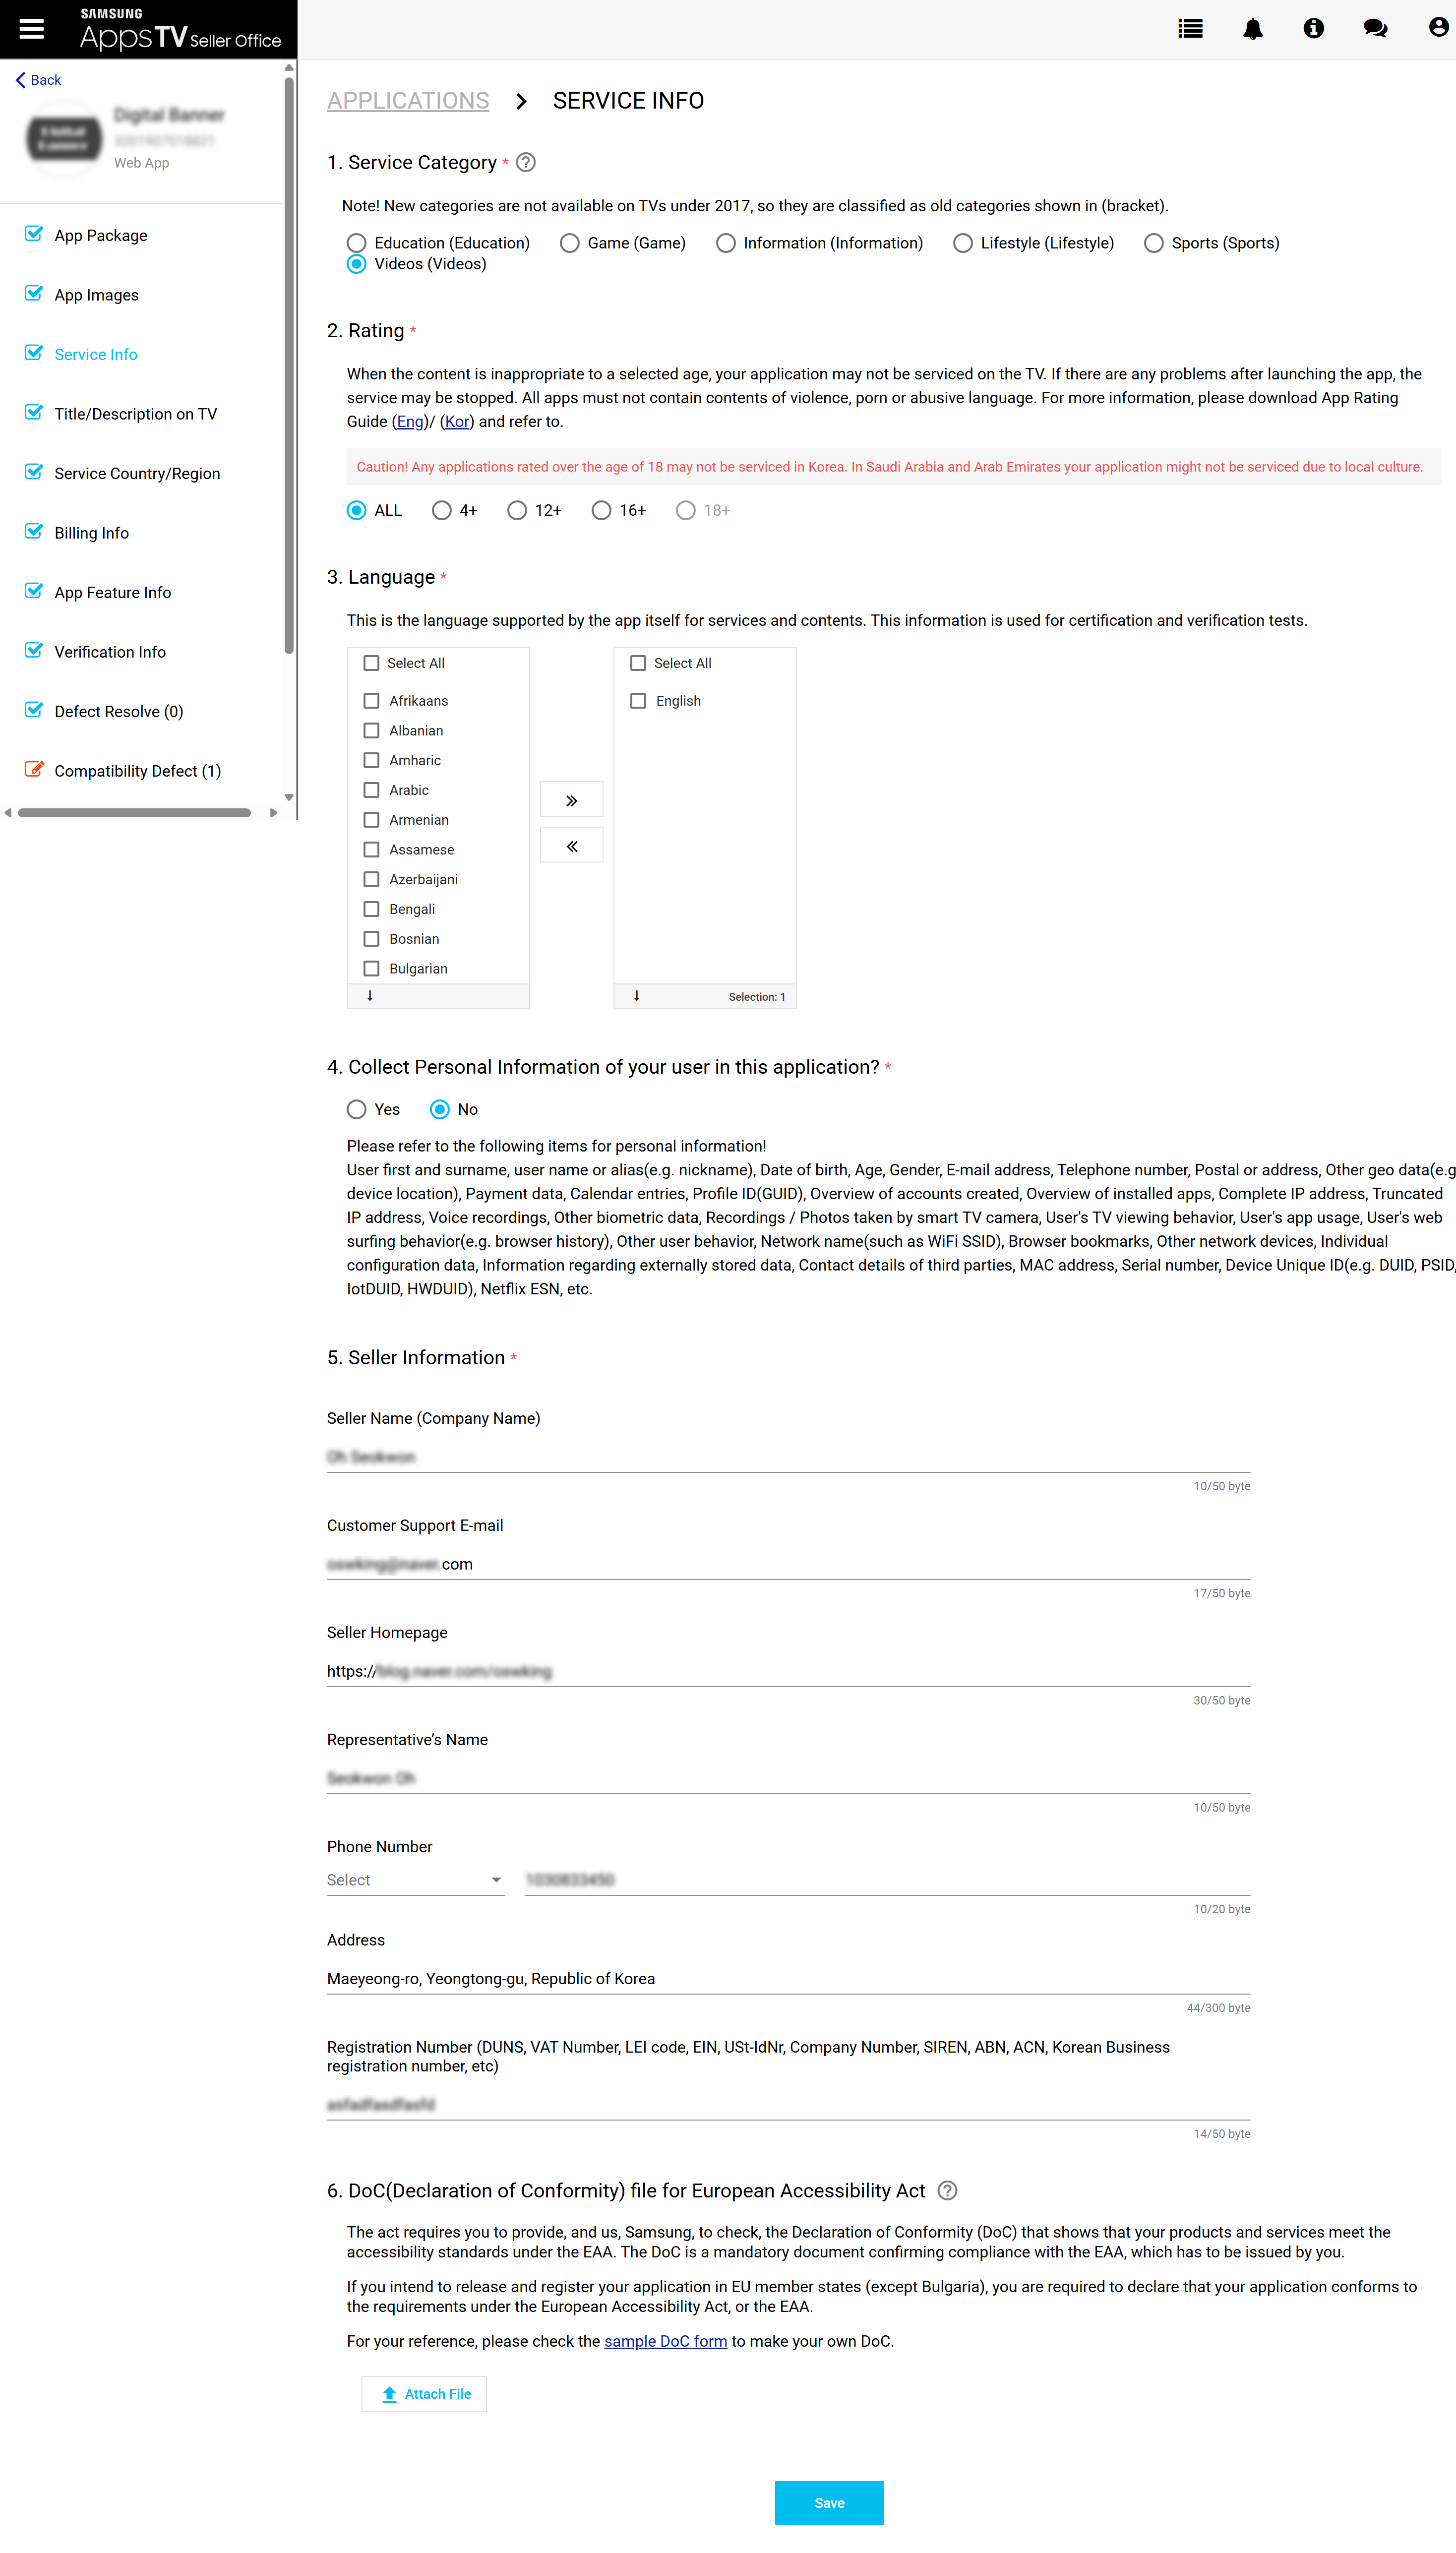
In the "Applications > Service Info" menu, you can register and modify service information provided to the TV.
Input Field
Description
Displayed on TV
Service Category
Choose the Smart TV app category to provide your app from the categories presented: Videos, Game, Sports, Lifestyle, Information, Education, etc.
Warning
Service categories cannot be changed while certification and verification processes are in progress. Once the processes are finished, this restriction is lifted.
For apps serving a global country (if the country of service includes China and other countries), you cannot select a Videos category unless the app is allowed.
Yes
Rating
Choose the age rating of the content. In some countries, an additional rating certificate may be necessary. If the application content is not suitable for the selected age rating, the service may not be released, and if this issue occurs after release, the service may be discontinued. All applications must not contain violence, pornography, or abusive language. Applications with an age rating of 18 years or older cannot be offered in Korea. For more information, please refer to the Age Rating guide.
Yes
Language
Enter the application languages the user can select when using the application.
Yes
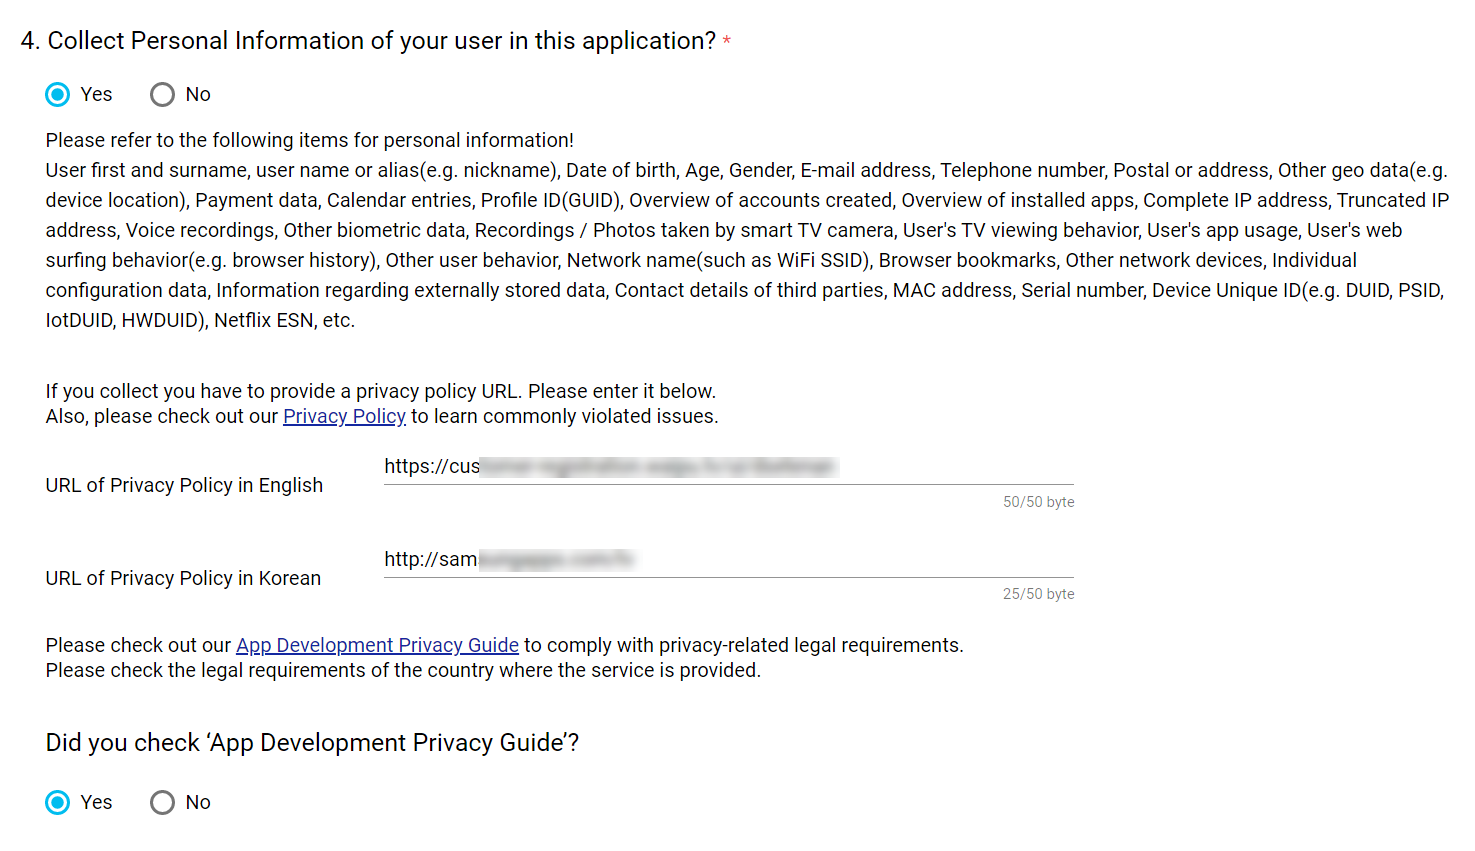
Privacy Policy
If your application collects personal information from users, you need to register the Privacy Policy URL so that it can be explained on the Smart TV.
Yes
Seller Information
According to Korean and European laws, register seller information to service your application. Need to the seller information such as the seller name, customer support email address, home page URL, representative name, phone number, mailing address, and registration number (DUNS, VAT Number, LEI code, EIN, USt-IdNr, Company Number, SIREN, ABN, ACN, Korean Business registration number, etc). If your group's account type is "Individual", no registration number is required.
NoteWhen registering an application, a seller group's information is used for it by default, but you can change the information for each application. Note that the seller group's information changes, the application's seller information does not change accordingly, and vice versa. To change the seller information displayed on the TV, you need to edit the seller information in the application, not the seller group information.
Yes
DoC for EAA
If you intend to release and register your application in EU member states (except Bulgaria), you are required to declare that your application conforms to the requirements under the European Accessibility Act, or the EAA. If applicable, please attach the DoC(Declaration of Conformity) document for the European Accessibility Act.
No
When selecting service categories, please refer to the following description.
Cagegory
Description
Education
Any kind of educational content (includes ALL ages)
Commerce, Weather, Traffic, Financial, Encyclopedias, and Regional Information
Lifestyle
Leisure & Hobby: Music, Social Networking, Gallery, Cooking, Travel, Shopping, Pets, Fashion & Entertainment Magazines etc
“How to” content
Utilities: Diary, Calendars, and Home Improvements
Social Work, Spiritual, and Religious content
Sports
Sports Broad Casting
Sports, Health, & Fitness: Informative, Lessons, Instructional Videos, Workout Routines, Healthcare, Medical Care, Beauty, Meditation
Does not include sports games. These would be included in the (Game) category.
Video
VOD, Movies, Drama, TV Series, Culture, Documentaries, Music Videos, Animations, and User Created Content
WarningFor apps serving a global country (if the country of service includes China and other countries), you cannot select a Videos category unless the app is allowed.
If the applications collect user's personal information, you must enter a URL where the user can view Privacy Policy. To comply with legal requirements related to personal information, review Samsung's Privacy guide, as well as the legal requirements of the countries in which the service is offered.
After entering all service information, click the "Save" button to complete the registration.
Setting Service Country
In the "Applications > Service Country" menu, you can set the country/region where the application will be released.
Partner Sellers can launch TV application services in any country, including the US, whereas Public Sellers can only launch in the US.
Input Field
Description
Displayed on TV
Rating Certification
If you are issued a rating certification, you must register the certificate.
No
Country or Region
Select countries where your application is offered.
No
Some countries require a certificate to launch the application.
In order to release the application for the Brazilian market, you need to select an age limit and upload a certificate issued by MJ/DEJUS. The age limit may be changed according to review by Samsung SIDIA.
Applications with an age rating of 18 years or older cannot be launched in Korea.
For VOD applications (if the service category or mapping category is Videos), you cannot service global countries, including China, unless the applications are specifically allowed. To release the application, you must also either exclude China or set the application to only release in China.
Under the EU's Digital Services Act (DSA), to service an application in a country/region covered by the DSA regulations, you must provide the registration number identifying your company/business. For more information, see the Entering Service Information section.
When you change the service country of an application that has already been released and is being offered on the TV, you must enter a reason for the change, and the change is deployed after Samsung reviews the reason. Therefore, it is recommended to contact the Samsung Content Manager first before making any changes, as changes made without prior agreement may be rejected.
After setting the service country, click the "Save" button to complete the registration.
If the service country of an application being offered on the TV is changed, the change is not implemented immediately, but only after Samsung's review process.
WarningThe service country and certificate cannot be changed while certification and verification processes are in progress or while an beta test or an alpha test is in progress. Once that process is complete, this restriction is lifted. The same restriction also applies if a previously requested service country change has not yet been completed.
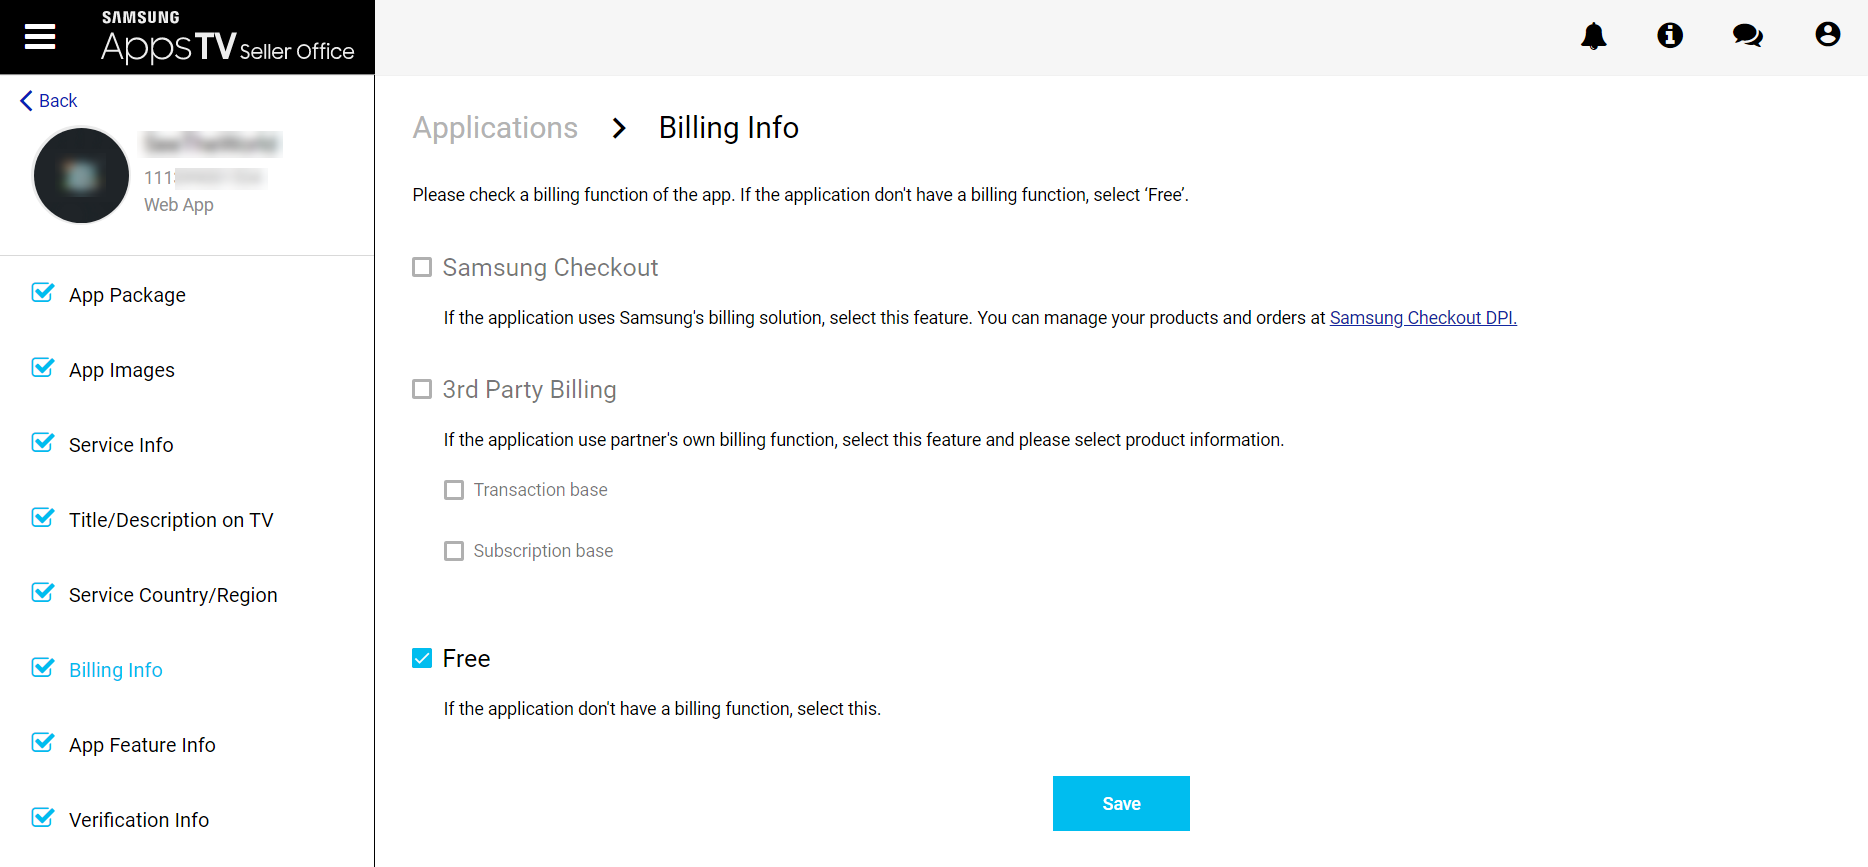
Entering Billing Information
In the "Applications > Billing Info" menu, you need to enter whether the application has a payment function.
If there is no payment function, select 'Free'.
Feature
Description
Samsung Checkout
Select if your application uses the embedded billing function in Samsung Smart TV.
3rd Party Billing
Select if your application uses a partner's own billing function. You need to also select the billing type, either transaction-based or subscription-based.
Free
Select if your application does not have a billing function.
If the Samsung Checkout option is selected, you need to check all items in the integration checklist after reviewing the guidelines presented.
Checklist
Guide
Test in-app purchase in DPI sandbox environment at least once before submitting your app.
Before submitting an app for QA, we require you to complete testing the in-app purchase with actual payment methods for any items. To test your product, you need to create your product at DPI. You can manage your products at Samsung Checkout DPI.
Enter your company's bank information correctly.
For settlement and remittance, we need your company's bank account information. Please enter your bank account information at Samsung Checkout DPI. For more information, see the Managing Bank Account Information guide.
Make sure that your product(SKU) is created at DPI before submitting your app.
To sell your product to Smart TV users, you need to create the product at DPI. Please make sure that you register your product at DPI.
The app must check checkout-available country before calling the billing API.
In addition, to use the Samsung Checkout function, the related privilege API must be defined in the application package configuration file. Applications that do not have the privilege defined cannot be submitted. For more information on the API, refer to the Billing API guide.
After selecting the billing function, click the "Save" button to complete the registration. Any changes made are reflected when you submit a new version of the application.
WarningIf your billing information is checking from Samsung checkout, you cannot change this information.
And you cannot change this information if you are joining or moving a group.
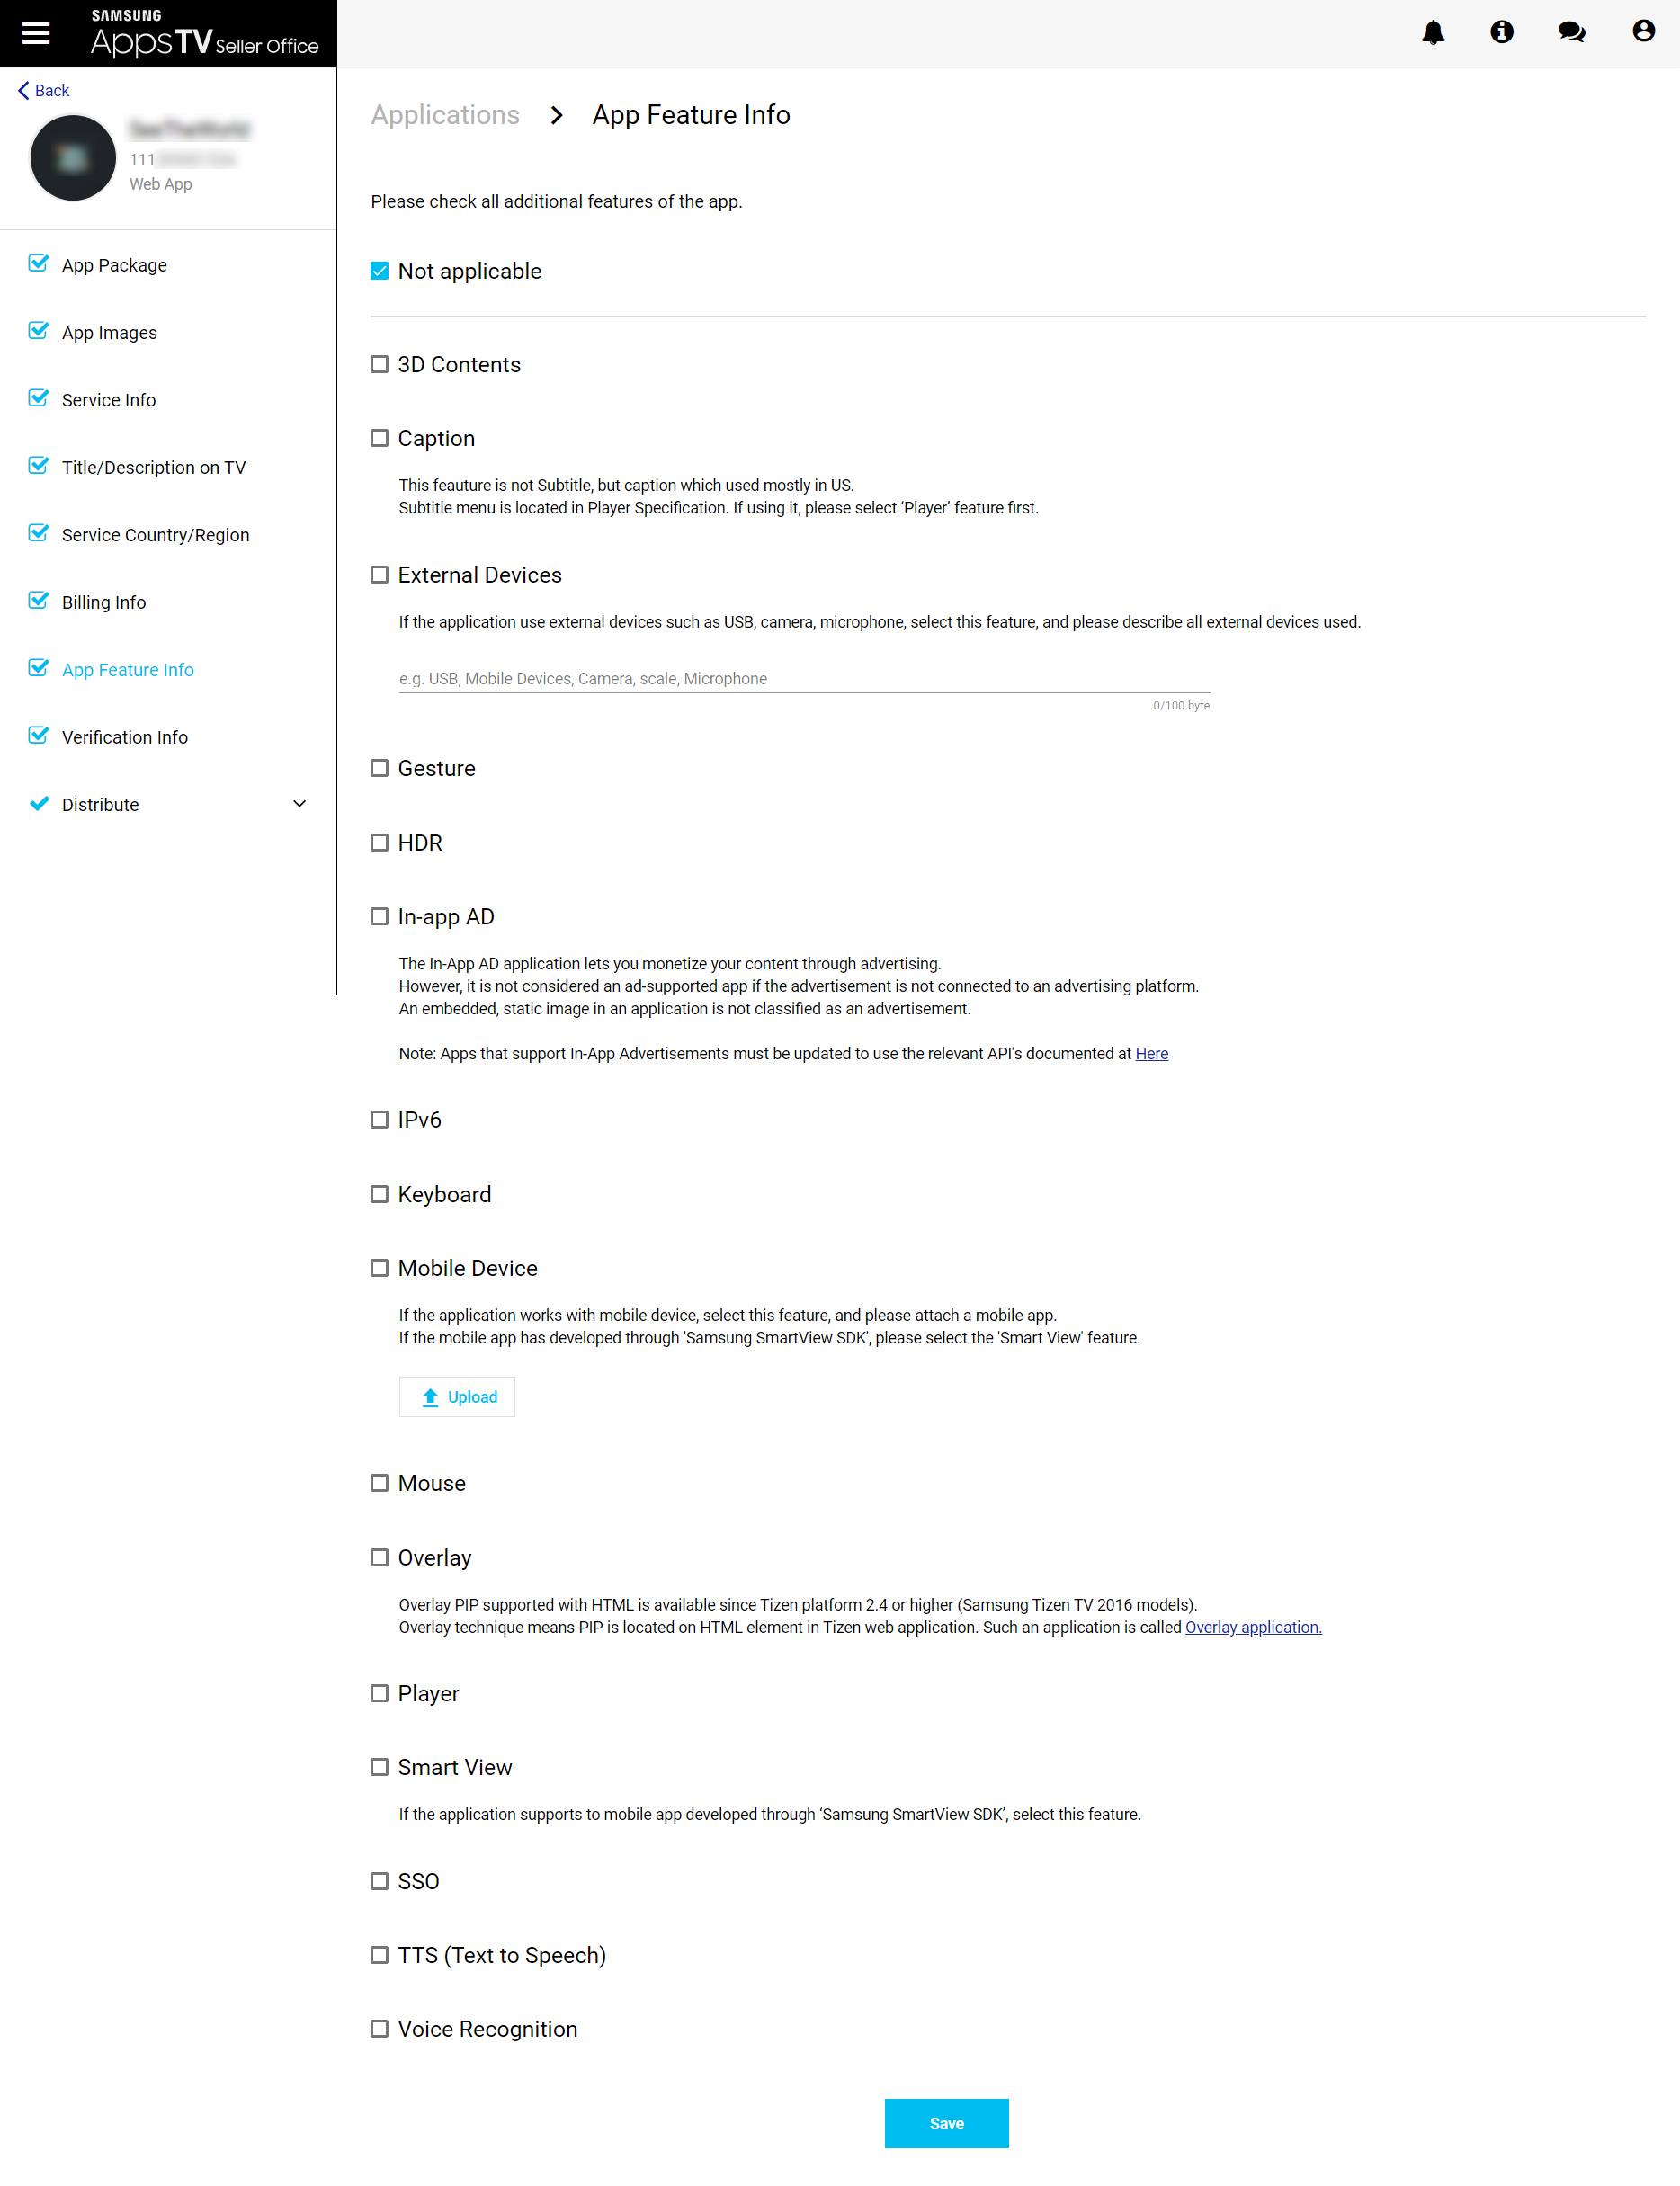
Entering Application Feature Information
If Smart TV features are implemented in the application, you need to check it in the "Applications > App Feature Info" menu.
The feature you checked previously is selected by default as a feature of this application, so the same information will be applied when you submit a new version unless you change it. If you change this information, it will be applied from the new application version you will submit.
If none of the features are applicable, select "Not applicable". But please note that when you select "Not applicable" if you have previously selected features, all of them will be deselected.
Feature
Description
Caption
Select if your application supports Caption. This feature does not refer to subtitles, but IP video closed captioning which is used mainly in the US. Subtitles are located under Player features.
External Devices
Select if your application uses external devices such as USB storage, camera, or microphone, and describe all external devices used.
Game Platform Integration
Select if your app supports game platform integration service on Samsung TV.
HDR
Select if your application supports High Dynamic Range.
In-app AD
Select if your application is connected to an advertising platform for monetization. An application is not considered to be ad-supported if the advertisements are not connected to an advertising platform. An embedded, static image in an application is not classified as an advertisement.
ImportantIf you are using In-App Ads, but do not specify as such, your app may be rejected. Also, apps that support In-App advertisements must be updated to use relevant API’s documented here.
Mobile Device
Select if your application works with mobile devices and attach the corresponding mobile application. However, if the mobile application was developed using the 'Samsung SmartView SDK', select the 'Smart View' feature instead.
Overlay
Select if your application supports Overlay PIP. The Overlay technique means the PIP is located in an HTML element in a Tizen web application.
Player
Select if your app uses a video streaming solution.
Smart View
Select if your application supports a mobile application developed through the ‘Samsung SmartView SDK’.
TTS
Select if your application supports Text to Speech.
UMD Search
Make sure to select this if your content ingested on UMD for Universal Guide/Universal Search. If you unchecked this, all you content catalogue on UMD are not populated on Universal Guide/Universal Search. If you have any question for this feature, Please contact your app SPM/TAM.
After selecting all implemented functions, click the "Save" button to complete the registration. Any changes made are reflected when you submit a new version of the application.
If you select the Caption, In-app AD, Player, or Smart View functions, you need to additionally enter detailed information for each function in the sub-menu.
ImportantCaption and TTS functions must be implemented in order to release an application to a model group subject to FCC regulations. Applications that do not support Caption or TTS functions cannot be submitted to model groups subject to FCC regulations.
Caption Information
If the Caption function is applied, enter the caption application method and details in the "Applications > App Feature Info > Caption" menu.
To comply with the FCC's IP video subtitle rules, content providers must support subtitles for IP video. Applications are considered part of the device and strict rules apply, and CPs must use their own or manufacturer's solutions for captions.
You can download and refer to the 'Video Caption Implementation Guide' and 'User Interface Accessibility Compliance Manual' through the "FCC Guide Document Download" button.
Input Field
Description
Displayed on TV
Solution for Captioning
Select what solution was used for captioning. Select CEA-708/CEA-608 or SMPTE-TT/SAMI if using Samsung's solution, or Application UI if you use your own solution.
No
Content Title and Location
Provide the video title and URL to play with caption.
No
After entering the caption details, click the "Save" button to complete the registration. Any changes made are reflected when you submit a new version of the application.
ImportantCaption and TTS functions must be implemented in order to release an application to a model group subject to FCC regulations. Applications that do not support Caption or TTS functions cannot be submitted to model groups subject to FCC regulations.
In-app AD Information
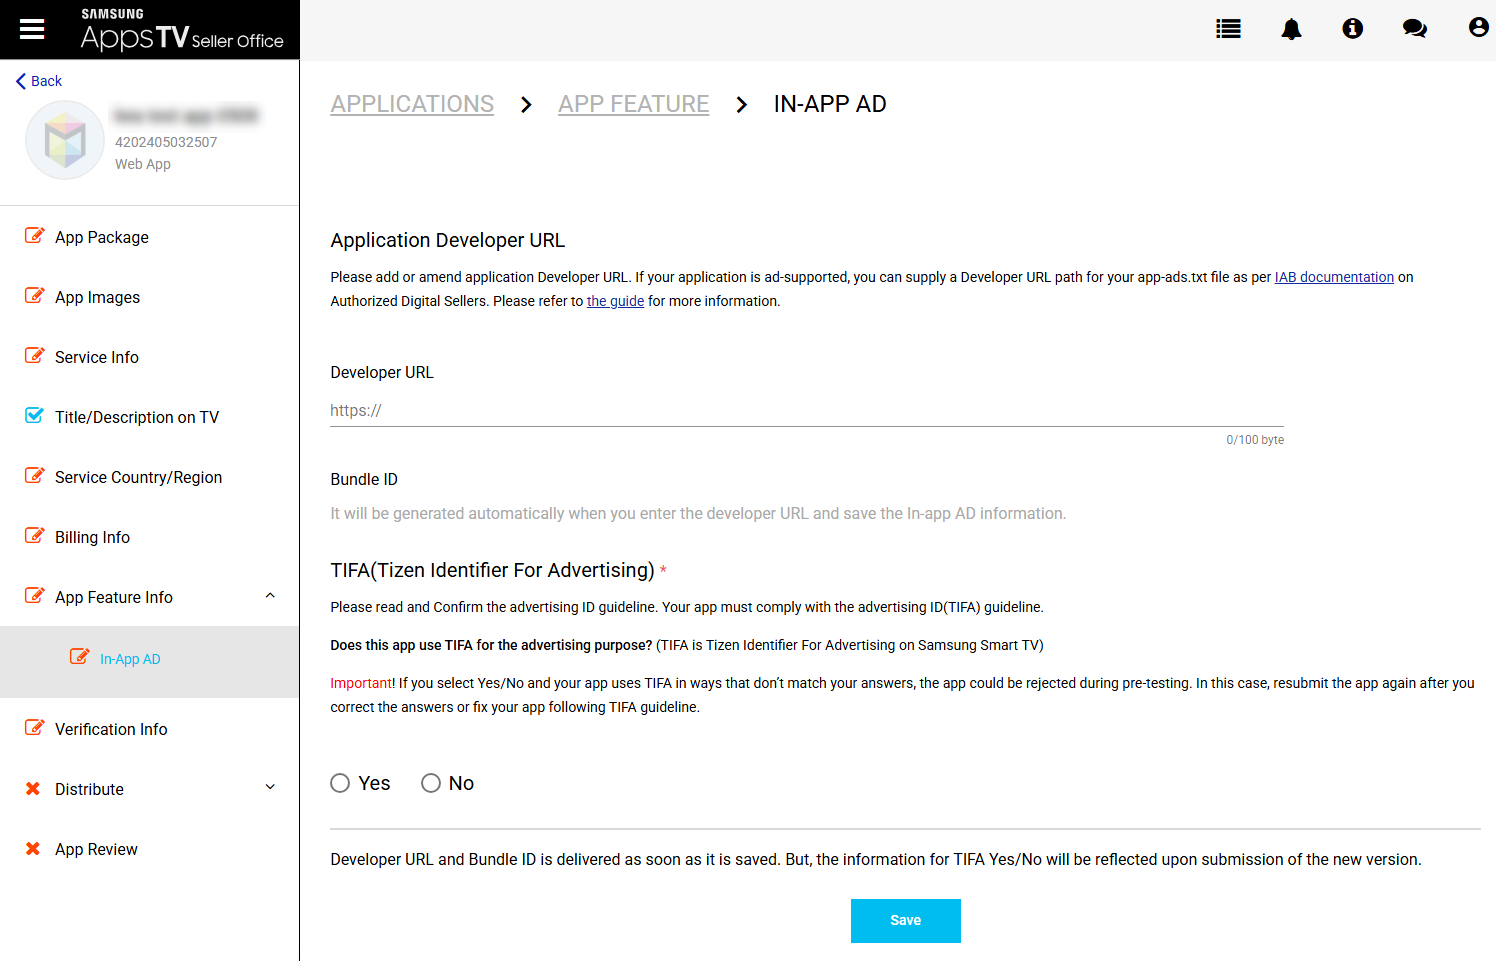
If the In-app AD feature is applied, enter additional items from the "Applications > App Feature Info > In-app AD" menu.
If your application is ad-supported, you can supply a Developer URL path for your app-ads.txt file as per IAB documentation on Authorized Digital Sellers. This will generate a unique App Store URL.
You need to enter whether to use TIFA (Tizen Identifier for Advertising). TIFA is a device identifier that is compliant with the IAB guidelines for targeting and ad tracking. In accordance with Samsung Terms and Conditions, TIFA is a required parameter to be passed from the application through Samsung’s Ads API.
If you select Yes/No and your app uses TIFA in ways that don’t match your answers, the app could be rejected during pre-testing. In this case, resubmit the app again after you correct the answers or fix your app following TIFA guideline.
Input Field
Description
Displayed on TV
Application Developer URL
Enter or update the developer URL path to where your App-ads.txt file is located. For example, you must enter "https://www.samsungtvplus.com/" not "https://www.samsungtvplus.com/app-ads.txt".
ImportantTo verify that this domain is valid, add "/app-ads.txt" to the developer URL to open it. If the URL does not load the app-ads.txt file, a different URL should be supplied.
Once the developer URL is entered, the bundle ID is automatically generated and displayed in the section, which can be used to access the app store URL.
NoteTo access your unique app store web page, add the bundle ID to the URL "https://www.samsung.com/us/appstore/app/". For example, if your bundle ID is "G15147002586", the URL of your page will be "https://www.samsung.com/us/appstore/app/G15147002586/ ". The developer URL, bundle ID, and app store ID are then displayed in the metadata on that page. Use the Bundle ID and App Store URL in your ad tags or bid requests to support App-ads.txt verification.
No
Use TIFA
Select if your application uses TIFA for advertising purposes. Collecting or using TIFA Information for any other purpose is prohibited.
No
Confirm TIFA Guideline
If the application is using TIFA, you need to check the requisite guidelines and Terms and Conditions and select the check box.
No
After entering additional details for the in-app AD feature, click the "Save" button to complete the registration and update. The developer URL and bundle ID information are reflected immediately, and the change for TIFA Yes/No will be reflected from the time you submit a new version of the application.
NoteTo use the In-app AD feature, the related privilege API must be defined in the application package configuration file. Applications that do not have a privilege defined cannot be submitted. For more information on the API, refer to the Adinfo API guide.
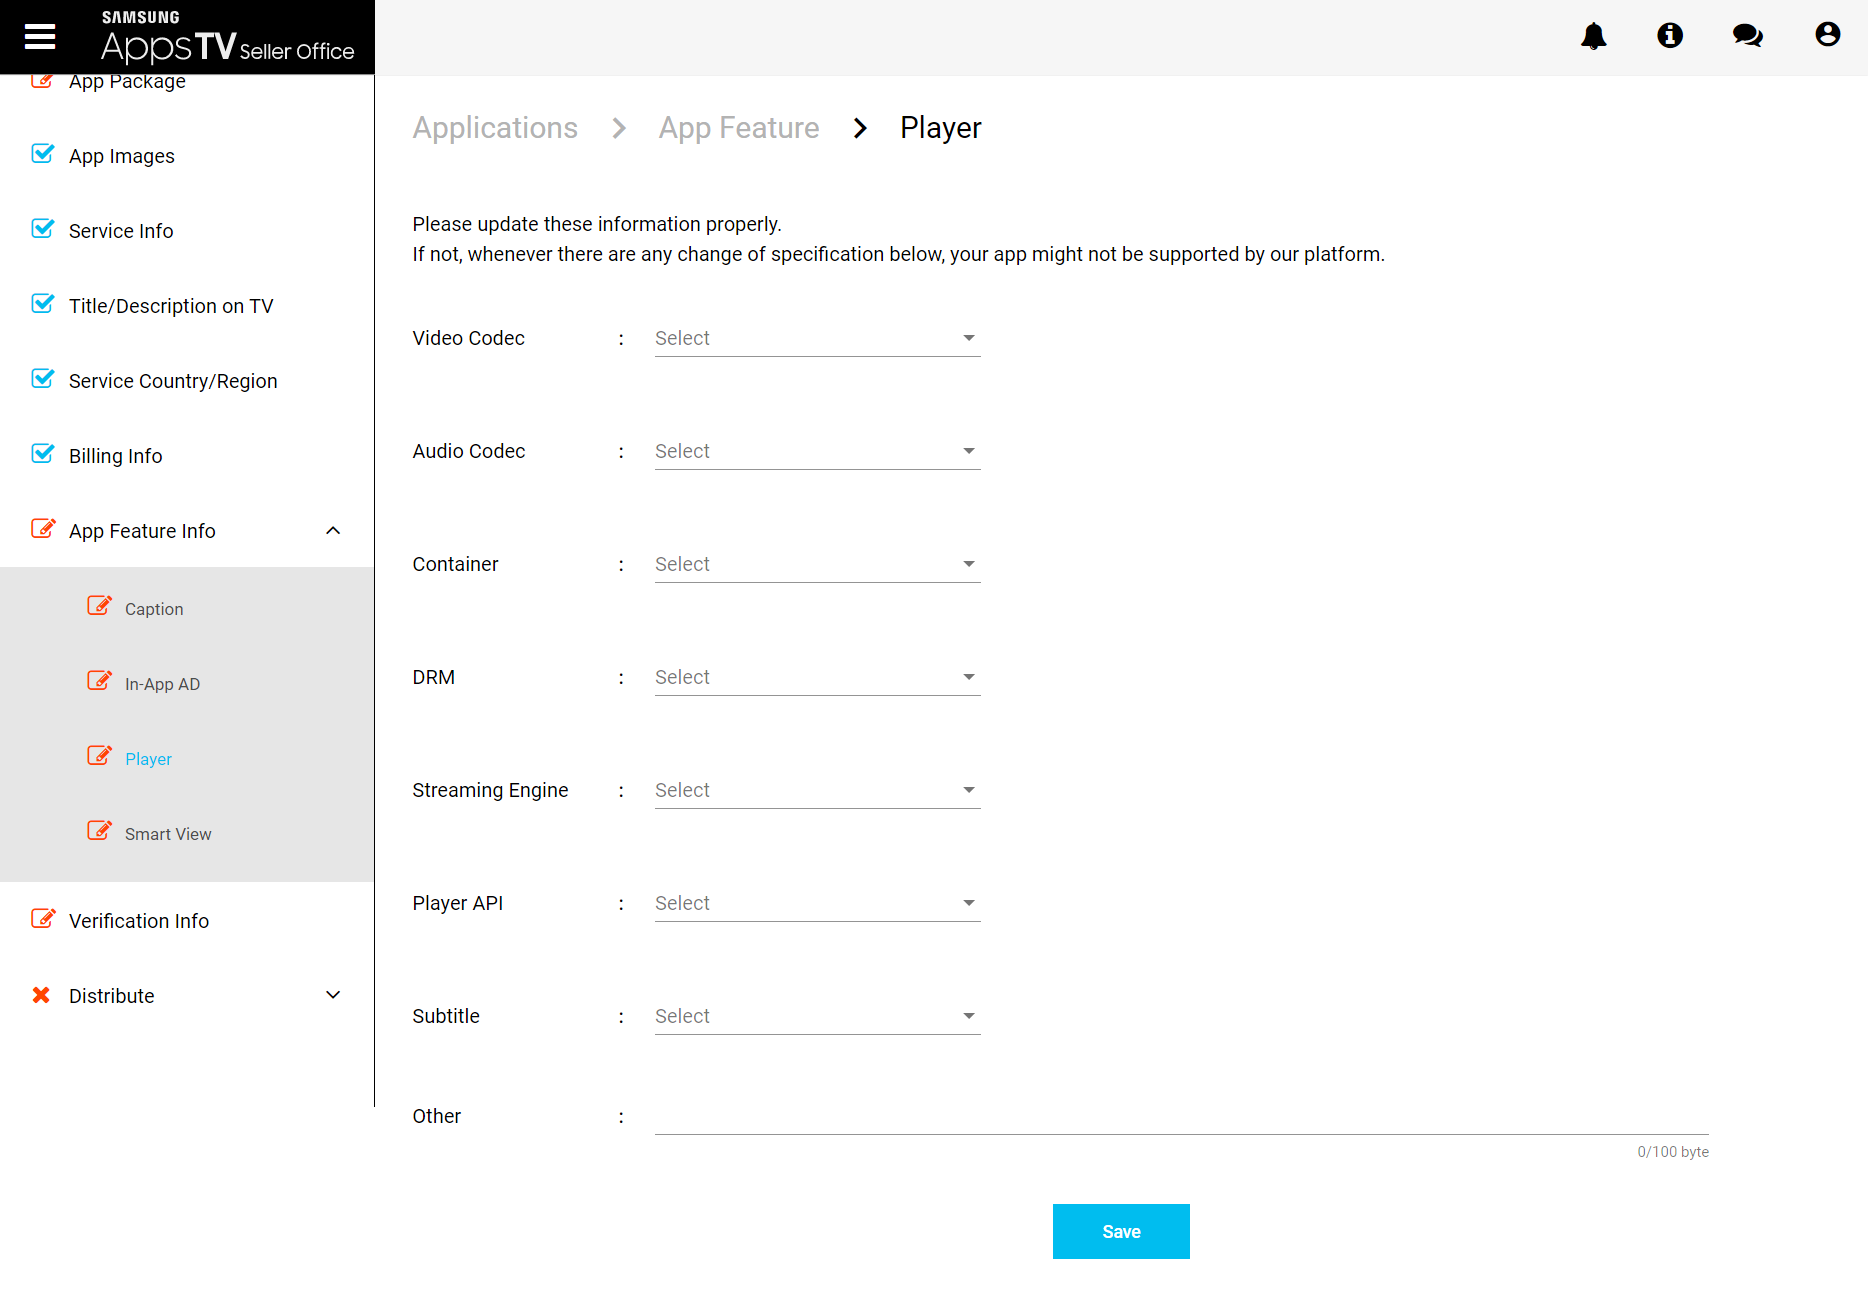
Player Information
If the Player function is supported, enter the details of the video streaming solution in the "Applications > App Feature Info > Player" menu.
Feature
Description
Video Codec
Select the video codec spec between Divx, H.263, H.264, HEVC, Motion JPEG, MPEG1, MPEG2, MPEG4, MVC, RV8/9/10, VC1, VP6, VP8, VP9, WMV7, WMV9, XviD, and Other.
Audio Codec
Select the audio codec spec between AAC, AC3, ADPCM, AIFF, ALAC, APE, DTS, FLAC, HE-AAC, LPCM, MIDI, MP3, Vorbis, WAV, WMA, WMA/DD+, and Other.
Container
Select the container spec between 3GPP, ASF, AVI, MKV, MP4(FMP4), MPEG-TS, Mstroska, PS, VOB, VRO, WebM, and Other.
DRM
Select the DRM spec between AES-128, Playready, Verimatrix, Widevine (Classic), Widevine (Modular), and Other.
Streaming Engine
Select the streaming engine spec between HLS, HTTP (HTTPS), MPEG-DASH, Smooth Streaming, and Other.
Player API
Select the player API spec between AVPlay, C#, MSE, and Other.
Subtitle
Select the subtitle spec between Close Caption, SMPTE-TT, WebVTT, and Other.
Other
Describe if there are other player specifications not listed above.
After entering the player details, click the "Save" button to complete the registration. Any changes made are reflected when you submit a new version of the application.
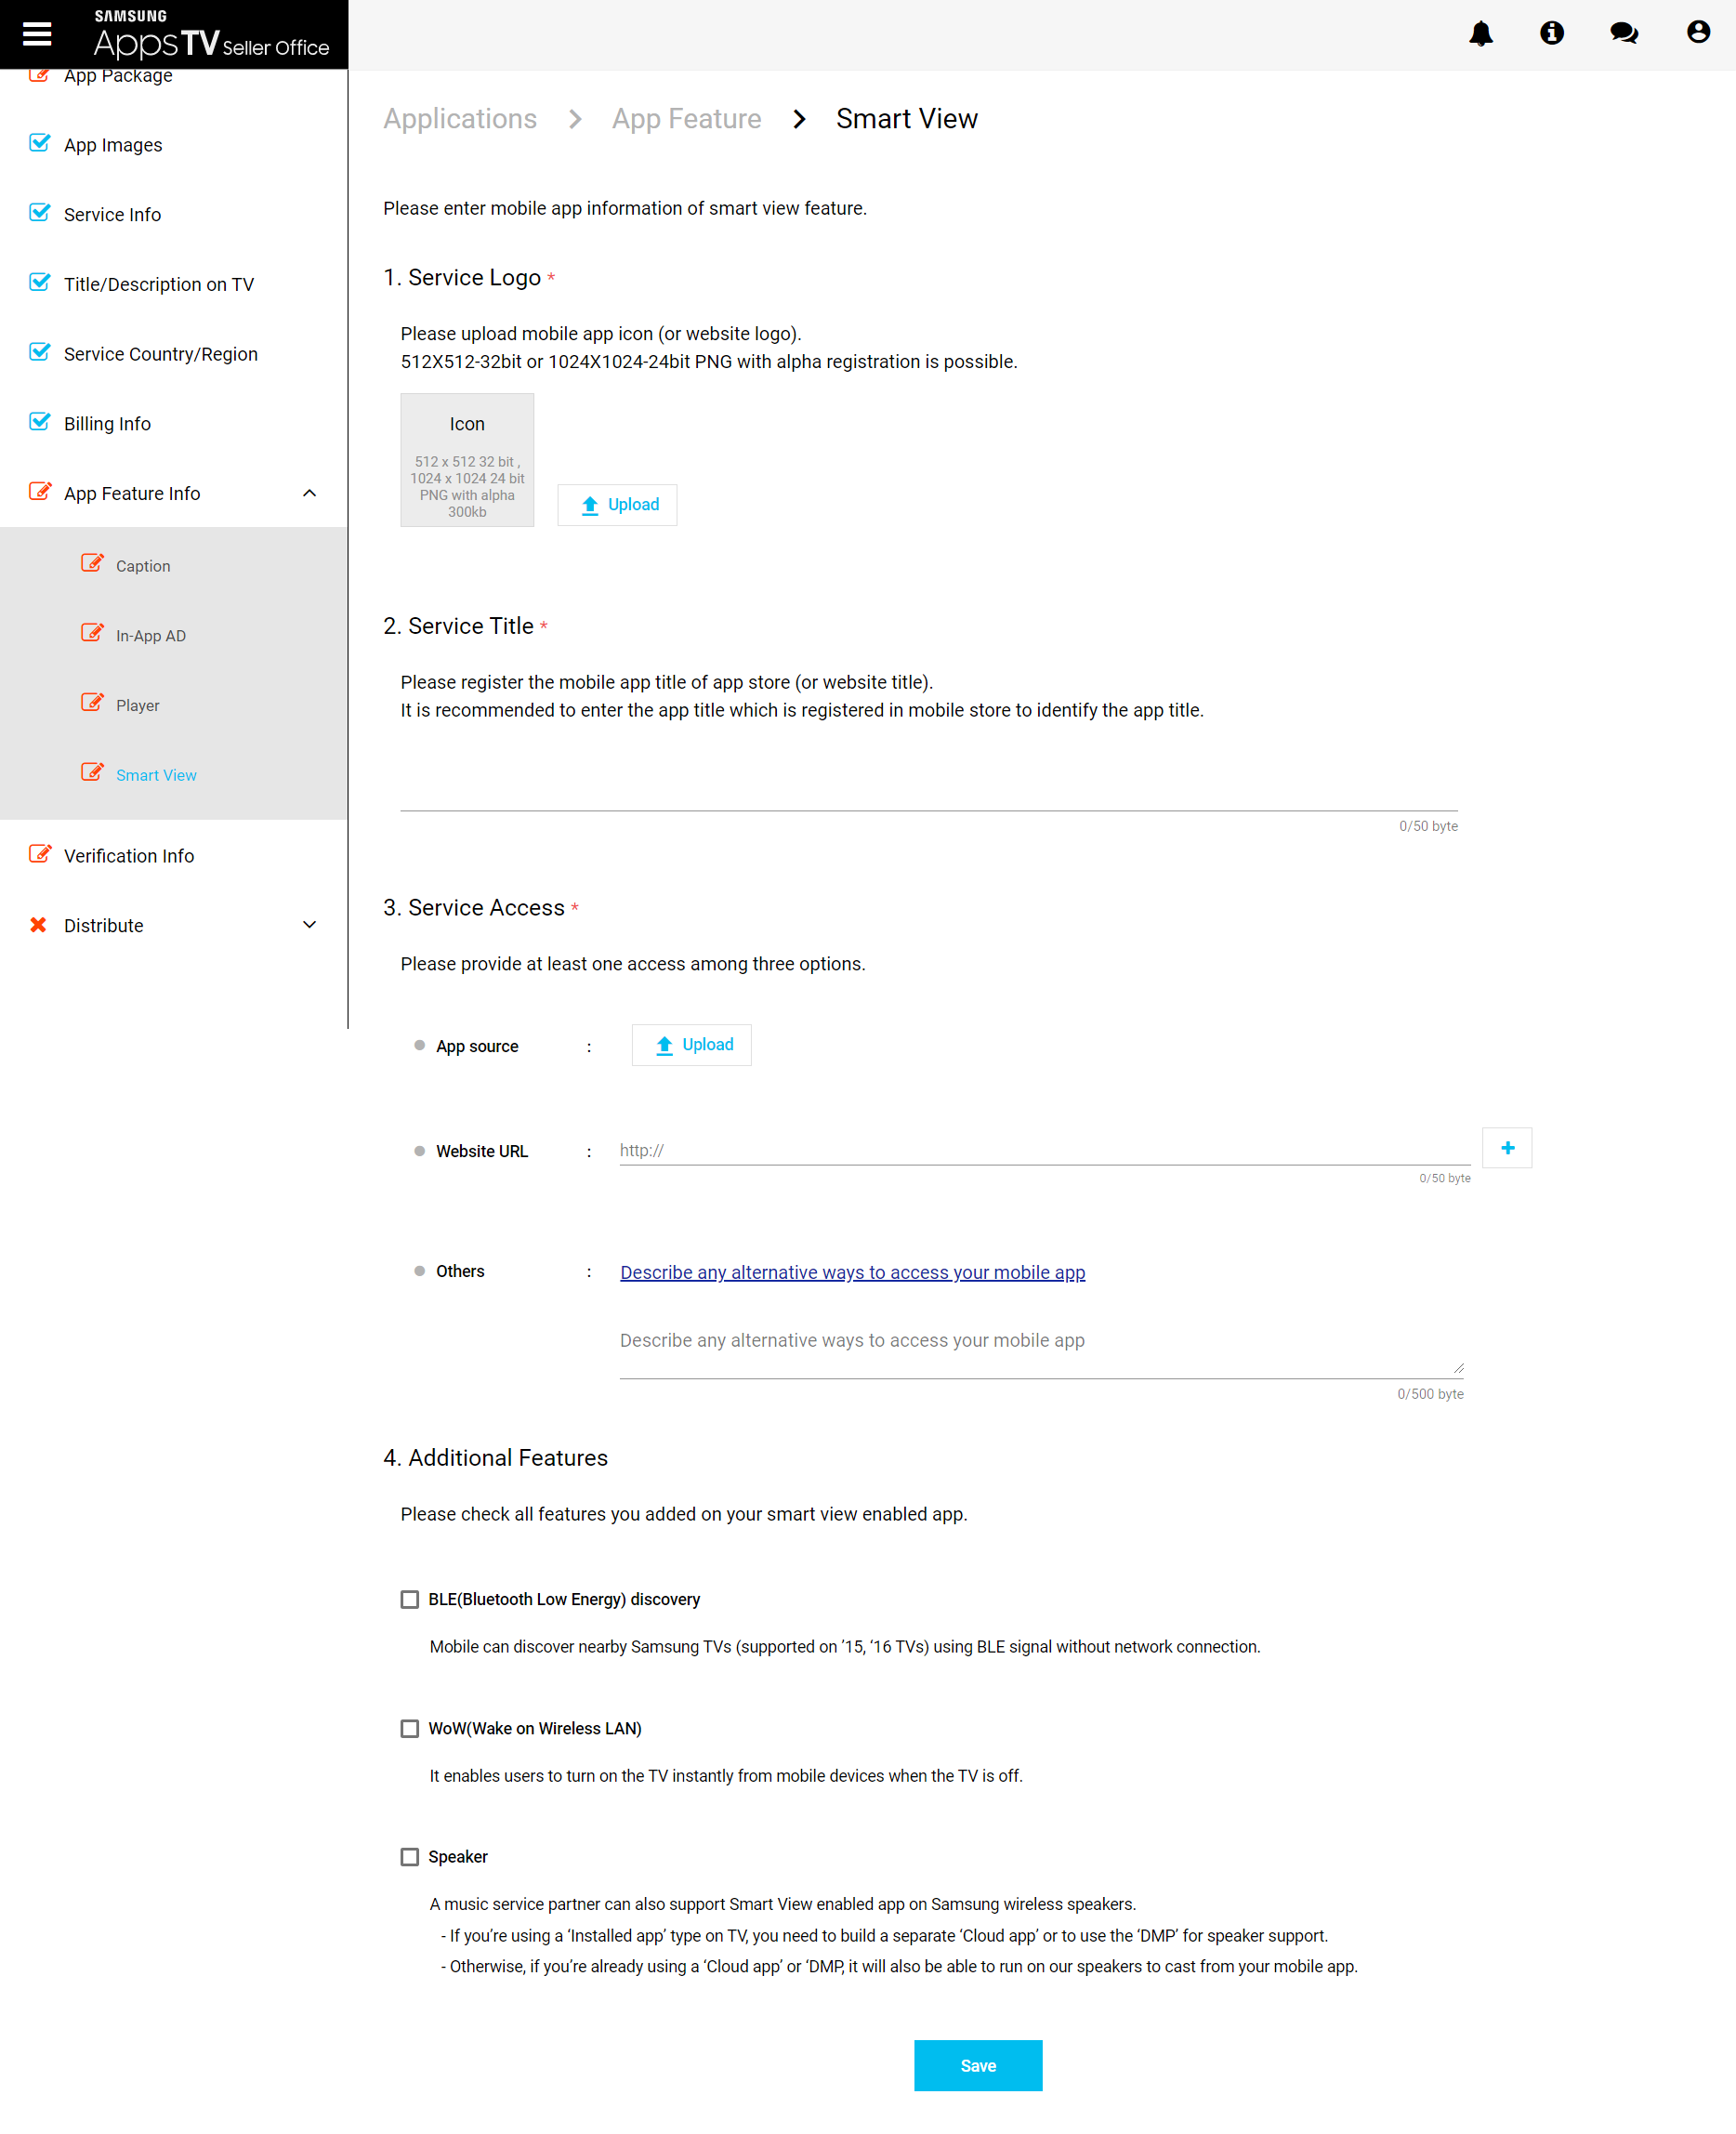
Smart View Information
If the Smart View function is selected, enter detailed information about the Smart View function and mobile application in the "Applications > App Feature Info > Smart View" menu.
Input Field
Description
Displayed on TV
Service Logo
Upload the mobile application icon or website logo.
No
Service Title
Register the mobile application title on the App store or website.
No
Service Access
Provide at least one of the following: Application source, Website URL, Other.
No
Additional Features
Select features you added on your Smart View enabled application, between BLE (Bluetooth Low Energy) discovery, WoW (Wake on Wireless LAN), and Speaker.
No
For the logo image, upload an image sized 512x512 or 1020x1024 pixels, in the 24-bit PNG format, and with a file size of 300kB or less. Images with transparency are also permitted.
Depending on the service access method selected, upload the application source directly or enter the URL information to access it. If there are other ways to access the mobile application, explain them.
After entering the Smart View details, click the "Save" button to complete the registration. Any changes made are reflected when you submit a new version of the application.
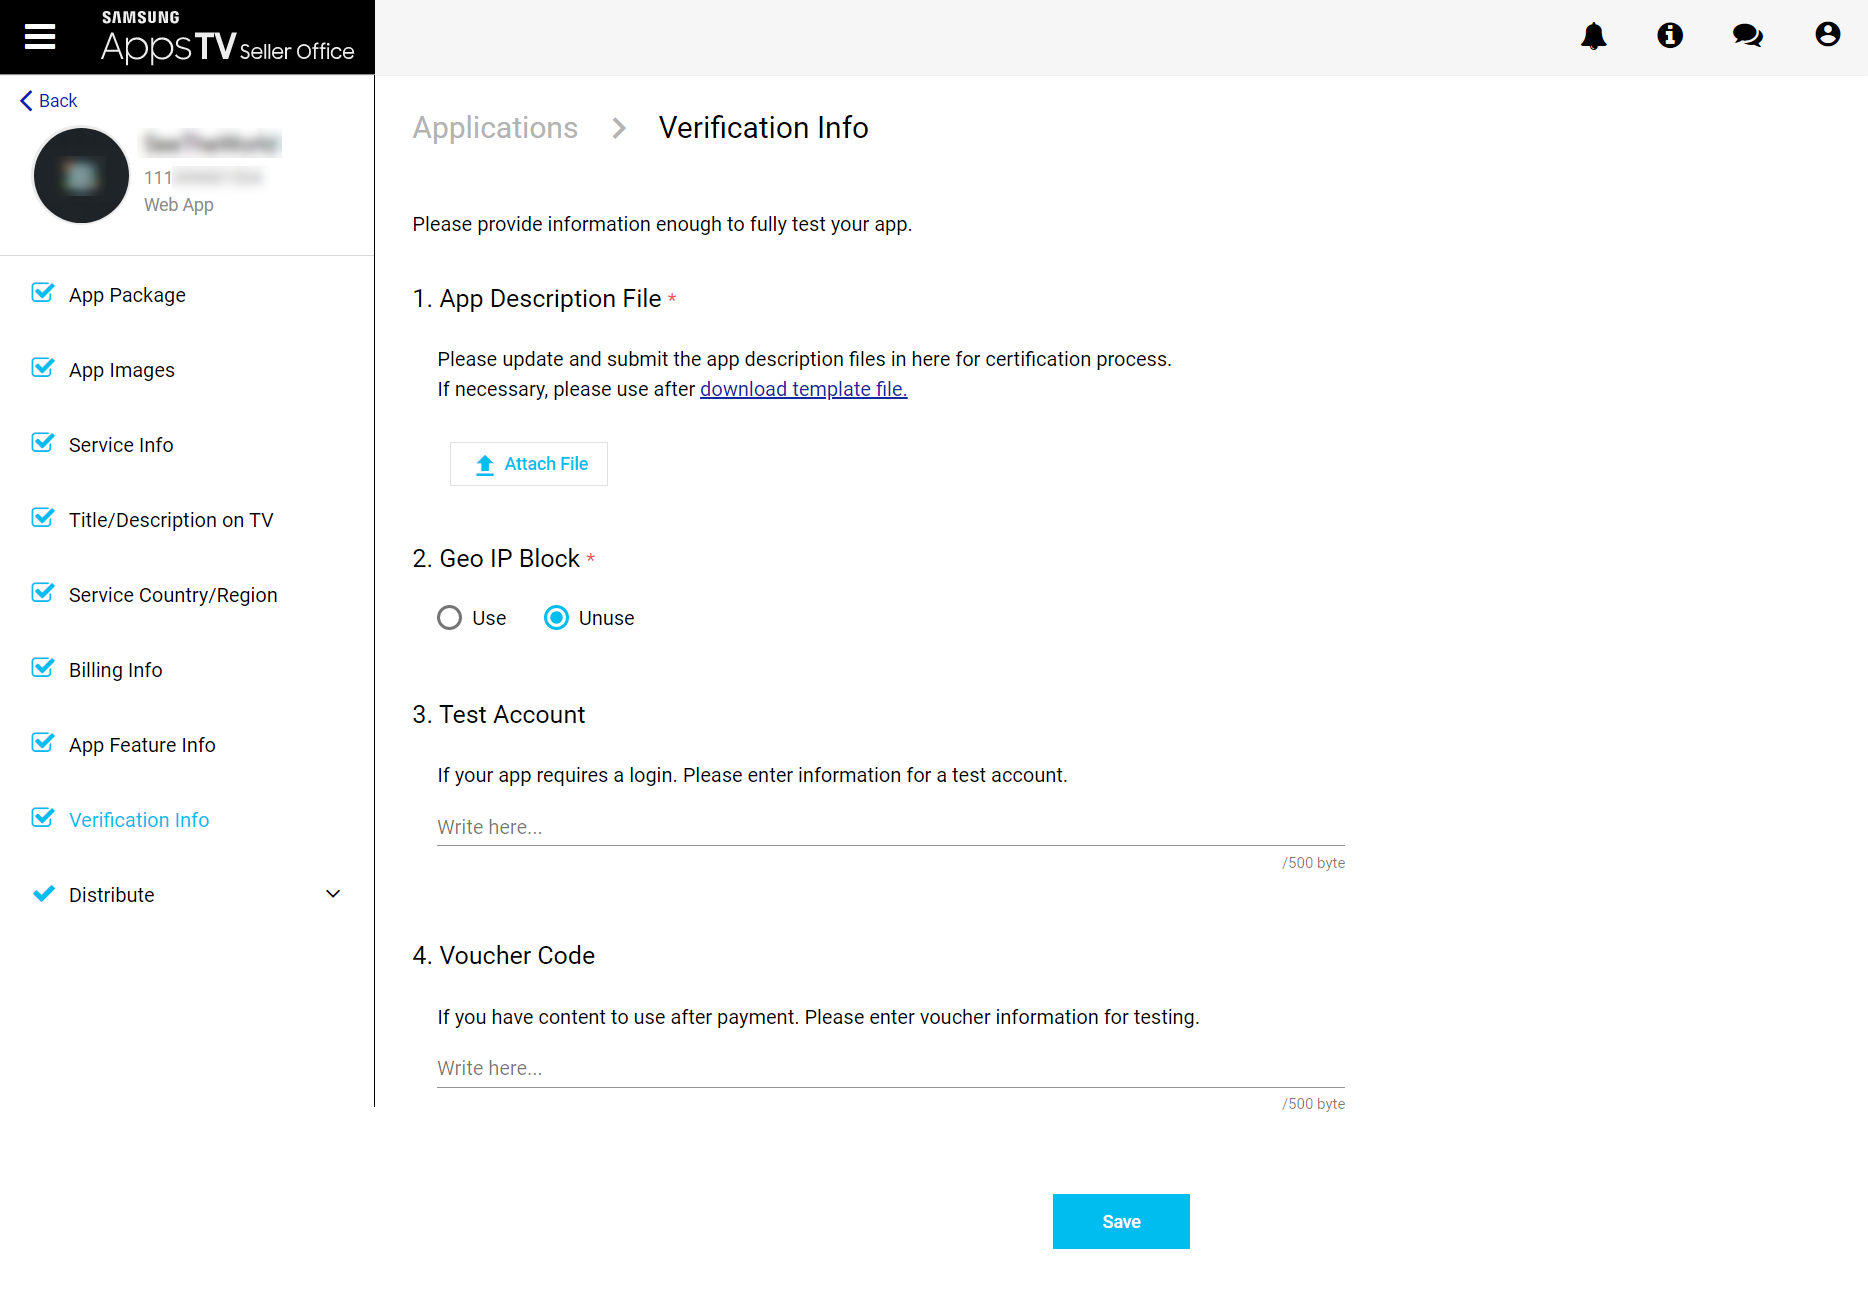
Entering Verification Information
This information will be used by the Samsung Smart TV certification and verification team, and the process may be rejected if it is missing.
Please check if you can fully test your application with the information you provide and update it if there is any invalid information.
Input Field
Description
Displayed on TV
App Description File
Provide application documentation to help Samsung testers understand the application's workflow and user scenarios. For detailed specifications of the application description document file, refer to the Application UI Description guide.
No
Geo IP Block
Select if geo-filtering is used for application content. Make sure that all IP addresses used by Samsung testers are allowed on your servers.
No
Test Accounts
If your application requires a login to use, provide the credentials for test accounts. You must provide at least 1 test account for each model group that your application supports. Each test account must have enough credit to comprehensively test all the application features on a specific platform.
ImportantThe application is tested simultaneously across all requested model groups. Consequently, you must provide a number of test accounts equal to or greater than the number of requested model groups. Insufficient test accounts can cause your application to fail verification at the testing phase.
Additionally, if the content and user experience vary depending on the account, provide accounts that can test each specific scenario. Example: If the presence of ads, Live TV, or Premium VOD differs by account ID: Samsungtest1@samsung.com (Ads provided) ID: Samsungtest2@samsung.com (4K Content provided) ID: Samsungtest3@samsung.com (Live TV provided)
No
Voucher Code
If you have content to use after payment, enter voucher information for testing.
No
After entering the test information, click the "Save" button to complete the registration and update. Any changes for Geo IP Block, Test Account, and Voucher Code information are reflected immediately, and the change for App Description File will be delivered with the app package when you submit a new version of the application.
Manage Your Cookies
We use cookies to improve your experience on our website and to show you relevant
advertising. Manage you settings for our cookies below.
Essential Cookies
These cookies are essential as they enable you to move around the website. This
category cannot be disabled.
Company
Domain
Samsung Electronics
developer.samsung.com, .samsung.com
Analytical/Performance Cookies
These cookies collect information about how you use our website. for example which
pages you visit most often. All information these cookies collect is used to improve
how the website works.
Company
Domain
Samsung Electronics
.samsung.com
Functionality Cookies
These cookies allow our website to remember choices you make (such as your user name, language or the region your are in) and
tailor the website to provide enhanced features and content for you.
Company
Domain
Samsung Electronics
developer.samsung.com, google.account.samsung.com
Preferences Submitted
You have successfully updated your cookie preferences.