DISTRIBUTION OF TIZEN-BASED WATCH APPS HAS BEEN DISCONTINUED
Create Your First Watch Face
Creating a watch face is simple using Galaxy Watch Studio. In this tutorial, you’ll learn how to start a project and then design a basic analog watch face and a digital watch face.
Once you understand the basics of creating a watch face, you can try out more features to create unique and interactive designs.
Start a Project
A project is a collection of files that make up your watch face (such as image, font, and XML files). You can start a new project, open an existing project, or open one of the sample projects provided with Galaxy Watch Studio.
For this example, you will start a new project.
Launch Galaxy Watch Studio.
If the New Project window is not displayed, from the main menu bar, click File > New to start a new project.
Click New.
Enter a Project Name. The name cannot contain special characters such as: < > * : ” / \ | @
Do not include spaces in the project name. The Project Name is used to name the .TPK or binary file. You cannot upload a binary file to Seller Portal if it has a special character or space in its name.
Tip :
If you want the New Project window to display every time you launch Galaxy Watch Studio, select the Show on application start checkbox.
Click OK.
You now have a blank canvas on which to design your watch face!
See Development for an overview of each area of the Galaxy Watch Studio interface.
Note :
You must explicitly save your new project (File > Save) before you exit GWS if you want to save your work. By default, project files are saved to /Users/<user.name>/GearWatchDesigner/workspace/<project.name>.gwd.
Use **File > Save As** to save the file in another directory or to rename the project.
Design an analog watch
Create an analog watch in three easy steps.
Step 1. Select a background image
Step 2. Add an index
Step 3. Add watch hands
Select a background image
On the left side of the window, from the Component menu, click Background, and select a background image from the files provided by Galaxy Watch Studio (or, you can import a custom image).
Note :
If you import a custom image, it will be saved as a PNG file as part of the project. If you update the image in your design, it will not affect the original image (stored on your system). Likewise, if you update the original image, it will not affect the image in your design. If you update the original image and want to use it in your design, you will need to re-import or swap the new image into your project.
The size of the background is 360 x 360 px. However, you may import images that are larger or smaller.

<div class="alert alert-success" role="alert"><strong>Tip</strong> : <p>If you are using multiple backgrounds, consider importing a small image, expanding it, and adjusting the color and opacity. This will help minimize the size of your project.</p>
<div class="alert alert-success" role="alert"><strong>Tip</strong> : <p>After you add a component, it is added to and selected in the layer table (located in the lower left corner) and automatically selected in the Preview window (by default, a selected item is outlined by a red dotted line). When a component is selected, you can modify its properties (such as its name, Dimensions, Placement, Appearance, and other settings) from the Properties window.</p>
An index is one or more markers that circle the outermost part of a watch face. For example, an index can be used to indicate the hour or minute on an analog watch.
From the Component menu, click Index. You can select a full set of markers, a single marker, or import a custom image.
Add watch hands
a. From the Component menu, click Watch Hand, and select one from the files provided or import a custom image.
b. Configure what the watch hand measures (for example, hours, minutes, or seconds). Select the watch hand. In the Rotation Properties section of the Properties window, set the Sync with option to the appropriate measurement. For example, selecting Hour in Day configures the watch hand to point at the hour of the current time. So, if it’s 2 o’clock, the watch hand would point at the number 2.
Tip :
A watch hand can be used to measure more than time. You could also configure the hand to measure conditions such as step counts or temperature.
c. Repeat steps **a** and **b** to add and configure additional watch hands (that measure minutes and/or seconds).

<div class="alert alert-info" role="alert"><strong>Note</strong> : <p>By default, all provided watch hands are set to measure <strong>Hour in Day</strong>. So, if you add the classic_min hand, you must configure the <strong>Sync with</strong> property to <strong>Minute in Hours</strong> in order for the watch hand to measure minutes.</p>
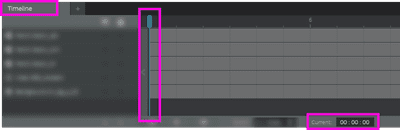
<div class="alert alert-success" role="alert"><strong>Tip</strong> : <p>Before you swap a watch hand image (right-click on the selected watch hand and select <strong>swap image</strong>), set the timeline to midnight (the Current time displays 00:00:00) to ensure exact hand alignment when the design is run on a watch.</p>
d. From the main menu bar, click **File > Save** to save your project. You have created an analog watch face!
Design a digital watch
Create a digital watch in three easy steps.
Step 1. Select a background image
Step 2. Add a digital clock
Step 3. Customize the clock
Select a background image
On the left side of the window, from the Component menu, click Background, and select a background image from the files provided by Galaxy Watch Studio (or, you can import a custom image).
Note :
If you import a custom image, it will be saved as a PNG file as part of the project. If you update the image in your design, it will not affect the original image (stored on your system). Likewise, if you update the original image, it will not affect the image in your design. If you update the original image and want to use it in your design, you will need to re-import or swap the new image into your project.
The size of the background is 360 x 360 px. However, you may import images that are larger or smaller.

<div class="alert alert-success" role="alert"><strong>Tip</strong> : <p>If you are using multiple backgrounds, consider importing a small image, expanding it, and adjusting the color and opacity. This will help minimize the size of your project.</p>
Add a digital clock
From the Component menu, click Digital Clock. A digital clock that shows hour, minutes, and seconds is placed in the center of the watch face.
Tip :
The Digital Clock can be repositioned by dragging and dropping it in the Preview window.
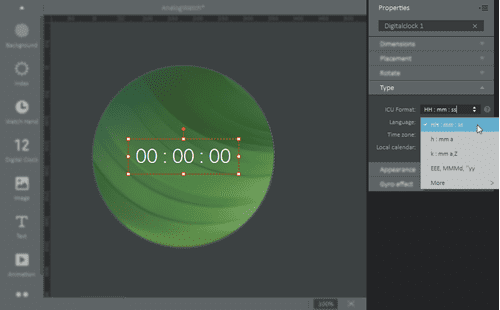
Customize the clock by setting one or more of its properties. Select the clock in order to view its properties in the Properties window.
Configure the ICU Format to customize what the watch displays. You can select a predefined format or you can create your own. By default, the watch is set to a 24-hour format (HH:mm:ss). To set the watch to a 12-hour format, you can edit the ICU format by replacing “HH” with “hh”; or you can select the predefined ICU format h:mm a. Click on the icon for more information about ICU formats.
Tip :
If the icon appears next to a property or field, additional information is available about the item and can be displayed by clicking the icon.
<div class="alert alert-success" role="alert"><strong>Tip</strong> : <p>The Digital Clock component can also be used to display dates (see <a href="http://userguide.icu-project.org/formatparse/datetime">Formatting Dates and Times</a> for more information about all the formats that can be displayed by the Digital Clock component). Simply set the ICU Format to display an option that includes the day or month (for example: EEE, MMMd, “yy). Note that you may need to increase the size of the component or change the font size in order for all the data to be displayed. Also, if you are planning to display the digital watch in different languages, you will need to take into consideration that words in different languages will be different lengths. Adjust the properties accordingly to accommodate all languages to fit in the area designated for the component.</p>
The selected digital clock’s ICU Format has been changed to display the day of week, date, and year. It uses the default Appearance settings. Note that the size of the component is too small and all the data does not fit in the designated area (the plus sign denotes that not all data is displayed).
The selected digital clock is the same size and shows the same data as the clock above. However, its font size was decreased so that all the data is displayed.
From the main menu bar, click File > Save to save your project. You have created a digital watch face!
We use cookies to improve your experience on our website and to show you relevant
advertising. Manage you settings for our cookies below.
Essential Cookies
These cookies are essential as they enable you to move around the website. This
category cannot be disabled.
Company
Domain
Samsung Electronics
developer.samsung.com, .samsung.com
Analytical/Performance Cookies
These cookies collect information about how you use our website. for example which
pages you visit most often. All information these cookies collect is used to improve
how the website works.
Company
Domain
Samsung Electronics
.samsung.com
Functionality Cookies
These cookies allow our website to remember choices you make (such as your user name, language or the region your are in) and
tailor the website to provide enhanced features and content for you.
Company
Domain
Samsung Electronics
developer.samsung.com, google.account.samsung.com
Preferences Submitted
You have successfully updated your cookie preferences.


 icon for more information about ICU formats.


