DISTRIBUTION OF TIZEN-BASED WATCH APPS HAS BEEN DISCONTINUED
Build a simple UI
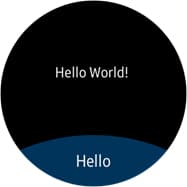
The following instructions help you to create the UI illustrated in the following figure.
1. Build the layout using the EFL box UI component.
The UI consists of 2 box items, the first one is the layout object of the label and second one is the button object to call a function for sending a message.
static void
_create_base_gui(appdata_s *ad)
{
	// Window
	ad->win = elm_win_util_standard_add(_PACKAGE, _PACKAGE);
	elm_win_autodel_set(ad->win, EINA_TRUE);


	evas_object_smart_callback_add(ad->win, "delete,request",
	_win_delete_request_cb, NULL);
	eext_object_event_callback_add(ad->win, EEXT_CALLBACK_BACK, _win_back_cb, ad);


	// Conformant
	ad->conform = elm_conformant_add(ad->win);
	elm_win_indicator_mode_set(ad->win, ELM_WIN_INDICATOR_SHOW);
	elm_win_indicator_opacity_set(ad->win, ELM_WIN_INDICATOR_OPAQUE);
	evas_object_size_hint_weight_set(ad->conform, EVAS_HINT_EXPAND, EVAS_HINT_EXPAND);
	elm_win_resize_object_add(ad->win, ad->conform);
	evas_object_show(ad->conform);


	Evas_Object* box = _create_box(ad->conform);


	Evas_Object* layout = _create_label_layout(box);
	elm_box_pack_end(box, layout);
	ad->label = _create_label(layout);
	elm_object_part_content_set(layout, "label_swallow", ad->label);


	Evas_Object* button = _create_button(box);
	evas_object_smart_callback_add(button, "clicked", _send_button_clicked_cb, ad);
	elm_box_pack_end(box, button);


	elm_object_content_set(ad->conform, box);


	// Show the window after the base GUI is set up
	evas_object_show(ad->win);
}
2. Set up the label layout with EDJ.
Create an EDJ file path by using the _app_get_resource() function. Pass the group name that is declared in the myapplication.edc file to the elm_layout_file_set() function.
Make a res/edje directory and create a myapplication.edc file in it using the IDE Project Explorer view (right-click and select New).
The EDC file is converted to the *.edj file after the project is built with the edje_cc EDC compiler. The edje_cc is a built-in tool in the SDK, so the conversion process works automatically. During the project build, the EDJ file is generated in the Debug/res/edje folder.
Look at the following EDC code. It contains a group named “label_layout” with 3 parts in it:
The first and second parts are of the SPACER type, which is invisible. They define the padding, which has a fixed size of 45x120 and 45x30, with the first part located in the top left corner and the other in the bottom right corner.
The third part is of the SWALLOW type, which can contain any UI components, even other containers, such as box, grid, layout, or scroller. The third part has a relative relationship with the other parts.
You can create the “bottom” style button using the elm_object_style_set() function using the “bottom” style as the second parameter.
static Evas_Object*
_create_button(Evas_Object* parent)
{
	Evas_Object* button = elm_button_add(parent);
	elm_object_style_set(button, "bottom");
	// The box expands when its contents need more space
	evas_object_size_hint_weight_set(button, EVAS_HINT_EXPAND, 0);

	// The button fills the available space on the horizontal axis and is
	// placed at the bottom of the vertical axis (1 is the end of the axis,
	// the coordinates start at (0, 0) on the top-left corner
	evas_object_size_hint_align_set(button, EVAS_HINT_FILL, 1);

	// Set the text for the button
	elm_object_text_set(button, "Hello");
	evas_object_show(button);

	return button;
}
We use cookies to improve your experience on our website and to show you relevant
advertising. Manage you settings for our cookies below.
Essential Cookies
These cookies are essential as they enable you to move around the website. This
category cannot be disabled.
Company
Domain
Samsung Electronics
developer.samsung.com, .samsung.com
Analytical/Performance Cookies
These cookies collect information about how you use our website. for example which
pages you visit most often. All information these cookies collect is used to improve
how the website works.
Company
Domain
Samsung Electronics
.samsung.com
Functionality Cookies
These cookies allow our website to remember choices you make (such as your user name, language or the region your are in) and
tailor the website to provide enhanced features and content for you.
Company
Domain
Samsung Electronics
developer.samsung.com, google.account.samsung.com
Preferences Submitted
You have successfully updated your cookie preferences.