DISTRIBUTION OF TIZEN-BASED WATCH APPS HAS BEEN DISCONTINUED
Gyro
Add movement to your watch face that’ll make your design stand out from the rest.
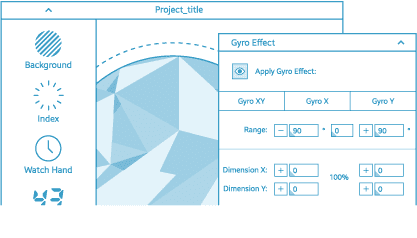
Gyro Effect
Add gyro effects to your watch face and see how it moves and changes appearance as you tilt your watch.
The aspects of watch face components that you can change include size, Inner Pivot position, rotation and opacity. You can use the Gyro Effect tab to tweak the X and Y rotation dimensions of objects independently to create 3D effects for your watch face.
The watch gyroscope
Gyro effects are applied as the watch moves within the -90º to 90º range along the X and Y axes. 0º indicates that the watch is level.
Watch faces can also change appearance when the watch moves clockwise or counter-clockwise.
-90º on the X axis indicates that the watch has rotated 90º upwards along the X axis (counter-clockwise).
Conversely, 90º indicates that the watch has rotated 90º downwards along the X axis (clockwise).
-90º on the Y axis indicates that the watch has rotated 90º to the left (counter-clockwise).
Conversely, 90º on the Y axis indicates that the watch has rotated 90º to the right (clockwise).
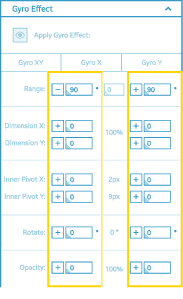
Gyro effects let you adjust the dimensions, inner pivot positions, rotation, and opacity of objects in your watch face.
Tip :
You can only enter values for each property for the -90º to 90º range.
Gyro effects won’t work unless the absolute values of each property’s reference points are equal. For example, Inner pivot X can’t use -90 and 45 as its reference points, but it can use -45 and 45.
The values you enter will determine how much the actual value of the property will change with respect to the base value. The actual value will be calculated through linear interpolation using the values at -90º and 90º.
For example, if you enter values of -90 and +90 for Inner pivot X to allow a range of -90º to 90º, then Inner pivot X will be +80 px of the base value when the watch is rotated 80º.
There are three different tabs (Gyro XY, Gyro X, Gyro Y) for applying gyro effects. Gyro XY properties are always applied, regardless of the axis of rotation.
Tip :
You can only change each property in one tab. For example, if a Rotation value is entered in the Gyro X tab, then the Rotation value cannot be entered in the Gyro Y or Gyro XY tabs.
The Gyro X and Gyro Y tabs allow you to control the properties when the watch rotates along the X and Y axes respectively, so you can use these Gyro properties independently to create a variety of cool effects.
Let’s take a look at how the Dimension property can be used to create watch faces. When the watch is laid flat with no tilt in any direction (0º along both the X and Y axes), the dimension values of the watch face are at 100% (Case 1 below). Any movement downwards or to the right will incrementally increase this percentage up to a maximum of 200%. Any movement upwards or to the left will decrease this percentage down to a minimum of 0%.
In the example above:
2 If the watch rotates -90º along the X axis or -90º along the Y axis, the object will shrink and disappear from the screen (0%).
3 If the watch rotates 90º along the X axis or 90º along the Y axis, the object will double in size in that direction (200%).
4 If the watch rotates along both the X and Y axes, the properties entered for both axes will be applied simultaneously. If the watch rotates in opposite directions along the X and Y axes, then the object will stretch vertically or horizontally.
5 If the watch rotates in the same direction along the X and Y axes, then the object will increase or decrease in size.
Resize
Enlarge and shrink an object in relation to a point at its center. The point will remain in the same position as the object gets bigger or smaller.
Move
Change the position of an object using a point at its center. The value of the Position input field is based on the center of the object.
Rotation
Rotate an object based on a point at its center. Rotations will not change the position of the object.
Tip :
Tip! When entering an exact value in the Gyro input field, it’s important to anticipate an object’s position and dimension changes. Place the object to see how it looks and where it is located at -90 or +90. Then enter the difference value into the Gyro input field so that the object reaches the desired end position.
Adding depth to watch faces
Create dynamic watch faces with a sense of depth.
Step 1. Create a shadow
Use a tool like Photoshop or Sketch to make shadows for your objects.
Step 2. Place the shadow
Place the shadows above the background images, and below the watch components.
Step 3. Apply Gyro effects
Apply the following Gyro effects to the shadows.
In the Gyro X tab – Inner pivot X: +5px to -5px.
In the Gyro Y tab – Inner pivot Y: +5px to -5px.
Adding a level to watch faces
Use Gyro effects to create a watch face with integrated level functions.
Step 1. Create step-wise images
Use a tool like Photoshop or Sketch to create a series of images that gradually decrease in size.
Step 2. Place the step-wise images
Place the images in order based on size, with the largest image at the bottom.
Step 3. Apply Gyro effects
Apply Gyro effects to the images. The bottom-most image should have the smallest value, and the top-most image the largest. The images in-between should have gradually decreasing values. For example, you can apply the following values: 14 px, 20 px, 30 px, 40 px.
The bottom-most image:
In the Gyro X tab – Inner pivot Y: +14 px to -14 px.
In the Gyro Y tab – Inner pivot X: +14 px to -14 px.
The top-most image:
In the Gyro X tab – Inner pivot Y: +40 px to -40 px.
In the Gyro Y tab – Inner pivot X: +40 px to -40 px.
Adding parallax effects to watch faces
Use Gyro effects to create a watch face with parallax effects.
Step 1. Create the images
Use a design tool like Photoshop or Sketch to create images for the effect: a background image and a number of PNG images to be placed on top. For this example, we will create a watch face showing someone floating in a tube.
Step 2. Place the images
Place the background image at the bottom, then overlay the images for the tube shadow, waves, and person/tube in that order.
Step 3. Apply Gyro effects
Apply the following Gyro effects to the images for the tube shadow, waves, and person/tube.
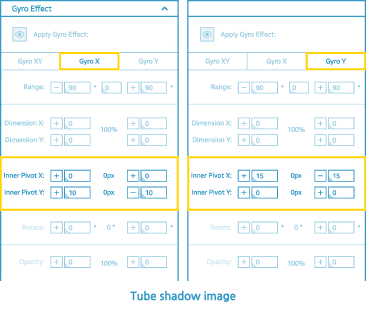
Tube shadow:
In the Gyro X tab – Inner pivot Y: +10 px to -10 px.
In the Gyro Y tab – Inner pivot X: +15 px to -15 px.
Waves:
In the Gyro X tab – Inner pivot Y: +10 px to -10 px.
In the Gyro Y tab – Inner pivot X: +10 px to -10 px.
Person/tube :
In the Gyro X tab – Inner pivot Y: -35 px to +35 px.
In the Gyro Y tab – Inner pivot X: -40 px to +40 px.
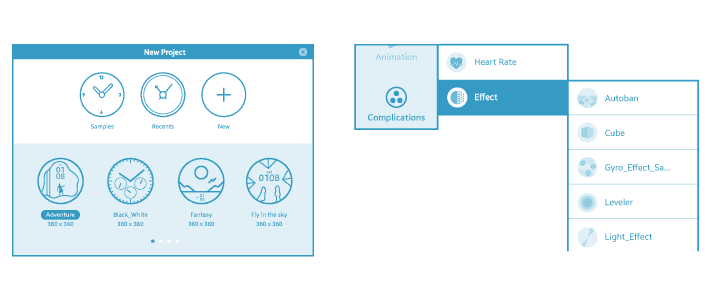
For more details on producing dynamic Gyro effects, take a look at the sample watch faces included with GWS or check out the Gyro presets in Complications > Effects.
Manage Your Cookies
We use cookies to improve your experience on our website and to show you relevant
advertising. Manage you settings for our cookies below.
Essential Cookies
These cookies are essential as they enable you to move around the website. This
category cannot be disabled.
Company
Domain
Samsung Electronics
developer.samsung.com, .samsung.com
Analytical/Performance Cookies
These cookies collect information about how you use our website. for example which
pages you visit most often. All information these cookies collect is used to improve
how the website works.
Company
Domain
Samsung Electronics
.samsung.com
Functionality Cookies
These cookies allow our website to remember choices you make (such as your user name, language or the region your are in) and
tailor the website to provide enhanced features and content for you.
Company
Domain
Samsung Electronics
developer.samsung.com, google.account.samsung.com
Preferences Submitted
You have successfully updated your cookie preferences.