DISTRIBUTION OF TIZEN-BASED WATCH APPS HAS BEEN DISCONTINUED
Bitmap Fonts
Bitmap fonts aren’t really fonts. Bitmap fonts are bitmap images used to replace predefined dynamic content like dates, time, and weather in Text and Digital Clock components. You can replace numbers, punctuation, clock and calendar abbreviations, or characters/words in different languages. Bitmap fonts can also be combined with other features of Galaxy Watch Studio (GWS) to add custom functionality.
When you import images as bitmap fonts into GWS, they are saved as PNG files as part of the watch face project. If you update the original image (on your system), it will not affect the image in your project. If you update the original image and want to use it in your watch face, you will need to re-import the new image into your project.
Bitmap font images cannot be resized in GWS.
Create a digital watch that uses pictographs
This example is a simple replacement of numbers and predefined date values with images within a Digital Clock component.
This watch face shows two Digital Clock components whose ICU Format is set to “MMM d EEE” (where “MMM” is the abbreviated month, “d” is the numerical day of the month, and “EEE” is the abbreviated day of the week). The upper digital clock uses the default Truetype fonts. The lower digital clock uses bitmap fonts for months of the year, numbers, and days of the week.
To create the lower digital clock, do the following:
In your favorite drawing program, create images for months of the year, numbers (for the days of the month), and days of the week. Because you cannot resize these images in GWS, images should be the same or similar height. You may want to test images of different heights before creating all of your images. In this example, the numbers have a height of 30px and the pictographs have a height of 50px.
Tip :
If you want some space between the images that make up the digital clock, add some blank space on the right of the month images and on the left of the days of the week images.
Start a new GWS project and add a Digital Clock component.
In the Type section of the Properties window, set ICU Format to “MMM d EEE”.
In the Appearance section of the Properties window:
a. Select Bitmap Font then click Bitmap Font Setting.
b. In the Digit tab, set the numbers. Click to import an image for each digit.
c. Click the Other tab and set the predefined clock and calendar abbreviations. Click to import an image for each item.
d. Click OK
Note :
If you do not enter an image for a value and that value is used by the component, nothing is displayed for that value in the watch face. For example, if you do not assign an image to the number 1 and the time is 12:15, then the digital clock will display 2:5.
Add a background that will make your images stand out on the watch face.
Information :
A Background component is always added as the bottom or lowest layer in your design.
Use custom images for weather, health, or moon phase
Weather, health, and moon phase components display dynamic predefined content. You can replace this content using bitmap fonts.
The Weather type text component has five different display types: Main, Icon, Description, Number, and ID. The Icon display type cannot be customized using bitmap fonts. However, the Main, Description, Number, and ID display types can be customized using bitmap fonts. You can configure one of these display types to display customized weather icons.
This example shows all five display types and their values when the weather is clear. The image on the bottom is the ID display type configured to display a custom icon.
For a list of the predefined values provided by OpenWeather and an example of how to display custom weather icons, see Weather.
This watch face shows the moon phase type, step count, and heart rate (bpm) text components. On the left, the components use the default configuration. On the right, the step count and heart rate components have been customized to show an icon rather than the units of measurement (steps and bpm). The moon phase type component is used as the background of the watch face.
To create the customized moon phase type, step count, and heart rate components, do the following:
In your favorite drawing program, create the following (you cannot resize these images in GWS):
Images for numbers for the step counts and heart rate components. The numbers should be the same height. You can use the same images for both components or create different ones for each component. In this example, the numbers all have a height of 30px.
Images for the units of measurement for the step counts and heart rate components. In this example, the height of these images are the same height as the numbers (30px).
Tip :
If you want some space between the numbers and the icon in the watch face, add some empty space on the left side of these images.
* Images of the moon phase types. There are a total of eight moon phase types. See FAQ [Q.14 How do I use the Moon phase and position?][9] for more information. Because these images are being used as a background for the watch face, they are 360 x 360 px (the size of the watch face).
Start a new GWS project and add a Moon Phase Type text component.
Position the moon phase component in the center of the watch face.
In the Appearance section of the Properties window:
a. Select Bitmap Font then click Bitmap Font Setting.
b. In the Digit tab, set the numbers. Click to import an image for numbers 0 - 7.
Click OK.
Add an image component that is the background for the step count and heart rate to make the content stand out.
Position the image in the watch face by dragging and dropping it to the desired location.
Add a Step Counts component.
Position the step counts component in the watch face by dragging and dropping it to the desired location.
In the Appearance section of the Properties window:
a. Select Bitmap Font then click Bitmap Font Setting.
b. In the Digit tab, set the numbers. Click to import an image for each digit.
c. In the Custom tab, select Add Text String and enter the image for the “steps” unit of measurement. The text string is case-sensitive.
Click OK.
Add a Heart rate (bpm) text component.
Position the heart rate component in the watch face by dragging and dropping it to the desired location.
In the Appearance section of the Properties window:
a. Select Bitmap Font then click Bitmap Font Setting.
b. In the Digit tab, set the numbers. Click to import an image for each digit.
c. In the Custom tab, select Add Text String and enter the image for the “bpm” unit of measurement. The text string is case-sensitive.
Click OK.
Add a language not supported by a watch feature or a phone
Many GWS components display dynamic or static content that are only available in English. Or, some components offer other languages, but they may not provide the language you want. Using bitmap fonts, you can translate these items to a language that is not supported.
For example, the Weather Type text component displays a single-word description of the weather, in English only (the Main display type). Using bitmap fonts, you can display this information in any language.
This watch face shows three Weather Type text components. The leftmost component is the Icon display type, which cannot be customized. The upper component is the Main display type and uses Truetype fonts (and it can only be displayed in English). The lower component is the Main display type and uses bitmap fonts to show the weather in Greek.
To create the Greek Weather Type component, do the following:
In your favorite drawing program, create images for each of the Greek translations for the English Main display type. For a list of the English Main display types, see Weather. The images should be the same height. You cannot resize these images in GWS. In the examples, the Greek word images have a height of 50px.
Start a new GWS project and add a Weather Type text component.
If a Warning window displays, read and acknowledge that the listed features and components cannot be used when this Weather Type component is used. Click OK.
Position the weather component in the watch face by dragging and dropping it to the desired location.
In the Appearance section of the Properties window:
a. Select Bitmap Font then click Bitmap Font Setting.
b. In the Custom tab, select Add Text String and enter a Main display type (in English). Repeat this step for every Main display type.
Note :
Values entered are case-sensitive. That is, if you enter “snow” (instead of “Snow”), nothing is displayed in the watch face when the weather type is Snow.
c. Click  to import an image for each text string.
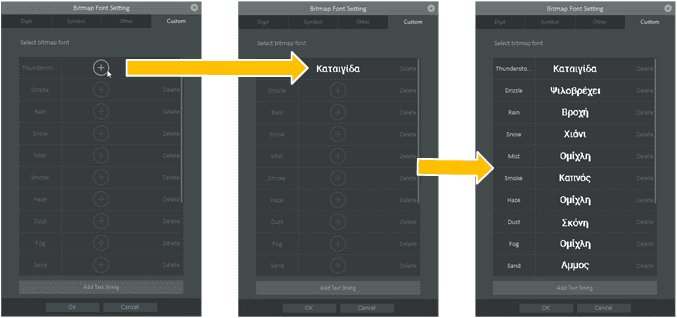
d. Click **OK**.
<div class="alert alert-info" role="alert"><strong>Note</strong> : <p>If you do not enter a value or an image for a value and that value is used by the component, nothing is displayed for that value in the watch face. For example, if you do not add the value Fog, if the weather type is Fog, nothing is displayed in the watch face.</p>
Add a background that will make your images stand out on the watch face.
Note :
A Background component is always added as the bottom or lowest layer in your design.
Replace a word for more than one language (Digital Clock component)
In a Digital Clock component, you can select one or more languages in which the information will display on the watch face (the language displayed is determined by the language setting of the paired phone). If you have selected more than one language, you can replace the same word or words, language by language, using bitmap fonts.
This watch face displays the day of the week. The languages set for the Digital Clock component are Korean, Russian, and Vietnamese. The language displayed depends on the language setting of the phone.
In your favorite drawing program, create images for the days of the week. Make sure the images fit in the watch face. You cannot resize these images in GWS.
Start a new GWS project and add a Digital Clock component.
In the Type section of the Properties window, set ICU Format to “EEEE” (where “EEEE” is the full name of the day of the week):
In the Appearance section of the Properties window:
a. Select Bitmap Font then click Bitmap Font Setting.
b. In the Custom tab, select Add Text String and enter the day of the week in one of the languages. Repeat this step for every day of the week for each language.
Note :
Values entered are case-sensitive. That is, if you enter “Thứ năm” (instead of “Thứ Năm”) and the day of the week is Thursday (Thứ Năm), nothing is displayed in the watch face paired with a phone whose language setting is Vietnamese.
c. Click  to import an image for each text string.
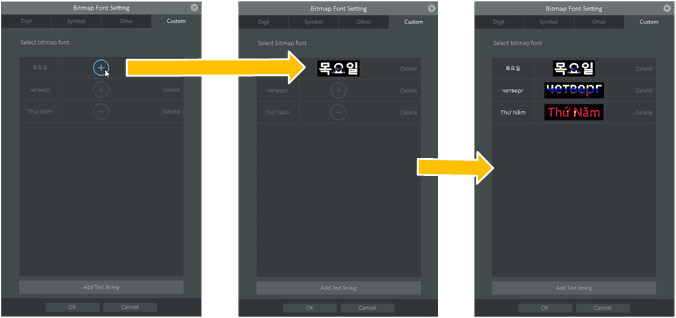
d. Click **OK**.
<div class="alert alert-info" role="alert"><strong>Note</strong> : <p>If you do not enter a value or an image for a value and that value is used by the component, nothing is displayed in the watch face. For example, if you do not add a value for 금요일 (Friday in Korean), if the day of the week is Friday, nothing is displayed in the watch face that is paired with a phone whose language setting is Korean.</p>
Change font color by tap
Have you ever wanted to design a watch face that dynamically changes the color of a word or number by tapping it? Unfortunately, GWS does not directly provide this feature. However, you can use bitmap fonts along with a tappable image to create this action.
This watch face is a digital clock whose numbers have been replaced by bitmap fonts. The bitmap font numbers are transparent. The Digital Clock component is layered above an image of a single color. The image has been set as a button and changes images when tapped.
In your favorite drawing program, create the following:
Images for numbers and a colon. These should be transparent on a background that matches the background you will use for your watch face (the images will look like stencils). The numbers should be the same height and width. The colon should be the same height. You cannot resize these images in GWS. In this example, the numbers are 38px x 50px and the colon is 15px x 50px.
Images of the colors you want to use for the numbers in your watch.
Tip :
If you are using solid colors, make the images 2px x 2px. After you import them, you can resize them. Using smaller images will minimize the size of your project.
Start a new GWS project and add a Digital Clock component.
In the Appearance section of the Properties window:
a. Select Bitmap Font then click Bitmap Font Setting.
b. In the Digit tab, set the numbers. Click to import an image for each digit.
c. Click the Symbol tab, and set the image for the colon. Click to import the image.
d. Click OK.
Add the image of one of the colors. Move and resize it to exactly cover the digital clock. You can enlarge the image in the Preview window to precisely resize the image.
Move the color image to the layer below the Digital Clock component: in GWS’s Layer area, select the image, then drag and drop it on the Digital Clock component.
In the Properties window of the image (the image must be selected), select Set as Button from the dropdown menu.
In the Action tab of the Properties window, click on the Action and select Change Image.
Click to add more images of different colors.
Add a background to the watch face that matches the background of the numbers.
In the Run window, click on the digital clock to change the colors.
If your digital watch has stripes on either side of the time, it may be because the width of your bitmap images are not the same (in the picture below, the width for the image of the number 1 is 22px while the other numbers are 38px) or the color image is longer than the Digital Clock component.
Note :
You should always test your design on an actual watch to make sure all components are positioned correctly.
About custom bitmap font text strings
When entering custom bitmap font text strings, consider the following:
Text is case-sensitive within GWS. GWS saves the image and names the file based on the text string. Therefore, if you enter text strings that are the same but with different capitalization, only one image is saved. That is, if you enter both “cloud” and “Cloud,” you will only be able to use one image for both strings. This is because file naming on your PC (Windows or macOS) is not case-sensitive.
Text is character-based and supports multiple languages.
Text will replace full words or substrings returned by the component.
Only the text entered is replaced; all other content returned by the component that does not match the configured text strings will not be replaced and is not displayed.
After you have saved and exited your project, when you re-open the project and the Bitmap Font Settings window, in the Custom tab, the text strings will be re-ordered in the precedence that they will be replaced.
If you have entered the same text strings with different capitalization, in order to change the image used by all instances of these text strings, you must re-import the image for the last instance. It is the image set for the last instance that is used by all other instances. In order for the re-imported image to appear in GWS, you must save your project, exit GWS, then re-launch GWS. For example, if you enter “cloud,” “Cloud,” and “CLOUD” (in this order), “CLOUD” is the last instance and the image imported for it will be used by “cloud” and “Cloud” (after you re-open the project). If you want to change the image used by these strings, you must re-import the image for “CLOUD.” If you want to see this change in GWS, you must save your project, exit GWS, and then re-launch GWS. If you don’t exit GWS and simply re-open the project, the image reverts back to the previous image. However, when you exit and re-launch GWS, the image will change to the re-imported image.
For example, if you configured a normal text component with the following bitmap fonts for “Cloud,” “loud,” “y,” and “구름,”
Here is what displays when “Cloud,” “cloud,” “Cloudy,” “Clouds,” “aloud,” and “구름” are entered into that text component:
Here is how the text strings are re-ordered in the Custom tab area after a project has been saved and re-opened:
How to re-import a bitmap font image
If you have updated an image and want to replace an existing bitmap font image in your watch face design, open the Bitmap Font Setting window, select the tab where the image is set, and click on the image that needs to be updated.
Manage Your Cookies
We use cookies to improve your experience on our website and to show you relevant
advertising. Manage you settings for our cookies below.
Essential Cookies
These cookies are essential as they enable you to move around the website. This
category cannot be disabled.
Company
Domain
Samsung Electronics
developer.samsung.com, .samsung.com
Analytical/Performance Cookies
These cookies collect information about how you use our website. for example which
pages you visit most often. All information these cookies collect is used to improve
how the website works.
Company
Domain
Samsung Electronics
.samsung.com
Functionality Cookies
These cookies allow our website to remember choices you make (such as your user name, language or the region your are in) and
tailor the website to provide enhanced features and content for you.
Company
Domain
Samsung Electronics
developer.samsung.com, google.account.samsung.com
Preferences Submitted
You have successfully updated your cookie preferences.


