ImportantDue to NaCl deprecation by the Chromium project, Tizen TV will continue its support for NaCl only until 2021-year products. Meanwhile, Tizen TV will start focusing on high-performance, cross-browser WebAssembly from 2020-year products.
This topic describes the "2D Graphics in C++" sample application implementation.
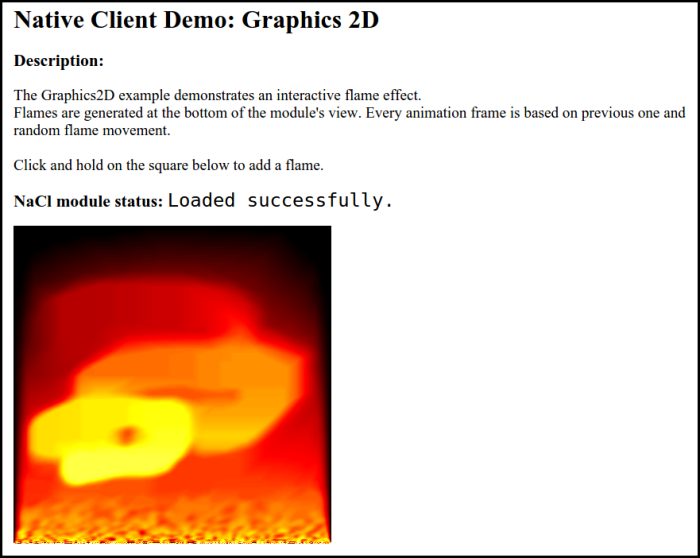
This tutorial describes how to implement an interactive 2D animation in C++ as a Native Client (NaCl) embed object. The sample application draws a flame animation, which can be controlled with the mouse.
For information on how to access the sample application cheat sheet and run the application, see Sample-based Tutorials.
In the sample application source code, pay attention to the following member variables in the Graphics2DFlameInstance class:
callback_factory_ simplifies the creation of completion callbacks used to implement the main drawing loop.
context_ and flush_context_ are used to double-buffer the graphics rendering.
device_scale_ and size_ define the scale and size of the viewport.
mouse_ stores the current mouse position.
mouse_down_ indicates whether the mouse button is pressed.
palette_ is the color palette for the drawing, stored as 32-bit values in RGBA or BGRA format, depending on the host system.
buffer_ contains palette entries in the same size as the graphics context.
Initializing the Instance and Context
To implement 2D graphics, you must initialize the instance and the graphics context:
In the class constructor, enable mouse input events, and initialize the required members, random number generator, and the Logger class. Call the CreatePalette() function to prepare the color palette for the animation.
Initialize the color palette.
To create smooth transitions between flame colors, the CreatePalette() function populates the palette with RGB colors from black to red to yellow to white:
void Graphics2DFlameInstance::CreatePalette() {
  for (int i = 0; i < 64; ++i) {
    // Black to red
    palette_[i] = MakeColor(i * 2, 0, 0);
    palette_[i + 64] = MakeColor(128 + i * 2, 0, 0);
    // Red to yellow
    palette_[i + 128] = MakeColor(255, i * 4, 0);
    // Yellow to white
    palette_[i + 192] = MakeColor(255, 255, i * 4);
  }
}
To convert each RGB color to a 4-byte pixel color value, the MakeColor() function checks whether the host system uses the RGBA or BGRA data format, and converts the RGB color to the appropriate format:
uint32_t MakeColor(uint8_t r, uint8_t g, uint8_t b) {
  uint8_t a = 255;
  PP_ImageDataFormat format = pp::ImageData::GetNativeImageDataFormat();
  if (format == PP_IMAGEDATAFORMAT_BGRA_PREMUL) {
    return (a << 24) | (r << 16) | (g << 8) | b;
  } else {
    return (a << 24) | (b << 16) | (g << 8) | r;
  }
}
Define the context creation function.
The CreateContext() function creates an instance of the pp::Graphics2D interface and binds the graphics context to it. When context creation succeeds, it creates a buffer of palette entries, updates the size field of the instance class, and returns true.
bool Graphics2DFlameInstance::CreateContext(const pp::Size& new_size) {
  const bool kIsAlwaysOpaque = true;
  context_ = pp::Graphics2D(this, new_size, kIsAlwaysOpaque);
  // To ensure the image is scaled correctly on HiDPI displays, call SetScale before BindGraphics
  context_.SetScale(1.0f / device_scale_);
  if (!BindGraphics(context_)) {
    Logger::Error("Unable to bind 2D context!");
    context_ = pp::Graphics2D();
    return false;
  }

  // Allocate a new buffer of palette entries of the same size as the new context
  if (buffer_ != NULL)
    delete[] buffer_;
  buffer_ = new uint8_t[new_size.width() * new_size.height()];
  size_ = new_size;

  return true;
}
The DidChangeView() function is called whenever a viewport is created or changed, and it provides information about the viewport, such as its size and location.
Retrieve the device scale and size, and create the graphics context in that size. Start the main drawing loop, if necessary.
void Graphics2DFlameInstance::DidChangeView(const pp::View& view) {
  device_scale_ = view.GetDeviceScale();
  pp::Size new_size = pp::Size(view.GetRect().width() * device_scale_,
                               view.GetRect().height() * device_scale_);

  if (!CreateContext(new_size))
    return;

  Logger::Log("Successfully initialized module's view with resolution %dx%d",
              new_size.width(), new_size.height());

  // When flush_context_ is null, it means there is no Flush callback in
  // flight. This may have happened if the context was not created
  // successfully, or if this is the first call to DidChangeView (when the
  // module first starts). In either case, start the main loop.
  if (flush_context_.is_null())
    MainLoopIteration(0);
}
Implementing the Drawing Loop
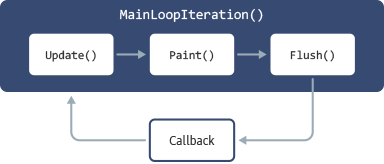
The MainLoopIteration() function represents a single iteration of the drawing loop. Since the application runs in a single processing thread, to prevent the application from freezing, an infinite loop cannot be invoked in the main thread. Instead, non-recursive looping behavior is implemented using completion callbacks. At the end of the MainLoopIteration() function, the Flush() function is called. It triggers a completion callback, which calls the MainLoopIteration() function again.
void Graphics2DFlameInstance::MainLoopIteration(int32_t) {
  if (context_.is_null()) {
    // If the current context is null, updating and rendering is unnecessary
    // Set flush_context_ to null also, so if DidChangeView is called again,
    // the main loop is restarted
    flush_context_ = context_;
    return;
  }

  Update();
  Paint();
  // Store a reference to the context being flushed; this ensures the
  // callback is called, even if context_ changes before the flush completes
  flush_context_ = context_;
  // When Flush() finishes, call MainLoopIteration() again to keep the animation running
  context_.Flush(callback_factory_.NewCallback(
    &Graphics2DFlameInstance::MainLoopIteration));
}
To draw and update the flame image:
In the Update() function, interpret the mouse input and update the buffer field representing the flame image. The buffer field is an array containing palette entries for each pixel of the viewport. Update the buffer field with the new drawing information. For more information on the Update() function, see the source code.
In the Paint() function, take data from the buffer, convert it with the defined color palette, and copy it to the context framebuffer:
Create a pp::ImageData object and populate it with the colors from the buffer field.
Copy the image data object to the context object, using the ReplaceContents() function.
void Graphics2DFlameInstance::Paint() {
  PP_ImageDataFormat format = pp::ImageData::GetNativeImageDataFormat();
  const bool kDontInitToZero = false;
  pp::ImageData image_data(this, format, size_, kDontInitToZero);

  uint32_t* data = static_cast<uint32_t*>(image_data.data());
  if (!data)
    return;

  uint32_t num_pixels = size_.width() * size_.height();

  for (uint32_t offset = 0; offset < num_pixels; ++offset) {
    data[offset] = palette_[buffer_[offset]];
  }

  context_.ReplaceContents(&image_data);
}
To draw the pixels on the screen, call the Flush() function on the context object.
Manage Your Cookies
We use cookies to improve your experience on our website and to show you relevant
advertising. Manage you settings for our cookies below.
Essential Cookies
These cookies are essential as they enable you to move around the website. This
category cannot be disabled.
Company
Domain
Samsung Electronics
developer.samsung.com, .samsung.com
Analytical/Performance Cookies
These cookies collect information about how you use our website. for example which
pages you visit most often. All information these cookies collect is used to improve
how the website works.
Company
Domain
Samsung Electronics
.samsung.com
Functionality Cookies
These cookies allow our website to remember choices you make (such as your user name, language or the region your are in) and
tailor the website to provide enhanced features and content for you.
Company
Domain
Samsung Electronics
developer.samsung.com, google.account.samsung.com
Preferences Submitted
You have successfully updated your cookie preferences.